Purpose
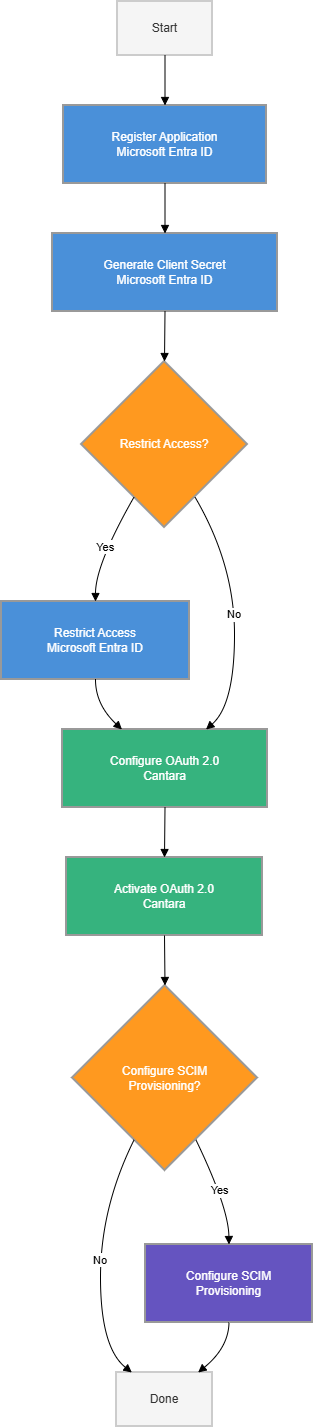
Guide administrators through configuring Microsoft Entra ID as an OAuth 2.0 Identity Provider (IdP) to enable Single Sign-On (SSO) for Cantara, and optionally configuring SCIM provisioning for automatic user and group synchronisation. This guide covers the following three steps:
-
Step 1: Register an Application in Microsoft Entra ID — Register an application that allows Cantara to authenticate users via OAuth 2.0.
-
Step 2: Configure OAuth 2.0 in Cantara — Enter your Entra ID credentials into Cantara and activate the identity provider.
-
Step 3 (Optional): Configure SCIM User Provisioning — Register an enterprise application in Microsoft Entra ID and configure automatic user and group provisioning into Cantara.
Note: Both Step 1 and Step 3 require registering an application in Microsoft Entra ID, but they serve different purposes and use different registration types.
Before you begin
-
You have admin access to Microsoft Entra ID.
-
You have admin access to the Cantara Administration Console.
Step 1: Application Registration in Microsoft Entra ID
Purpose
To register the Cantara application in Microsoft Entra ID, which allows Cantara to connect with Entra ID for user authentication. This process will generate necessary credentials, such as the Client ID and Client Secret, which are essential for configuring OAuth 2.0 in Cantara.
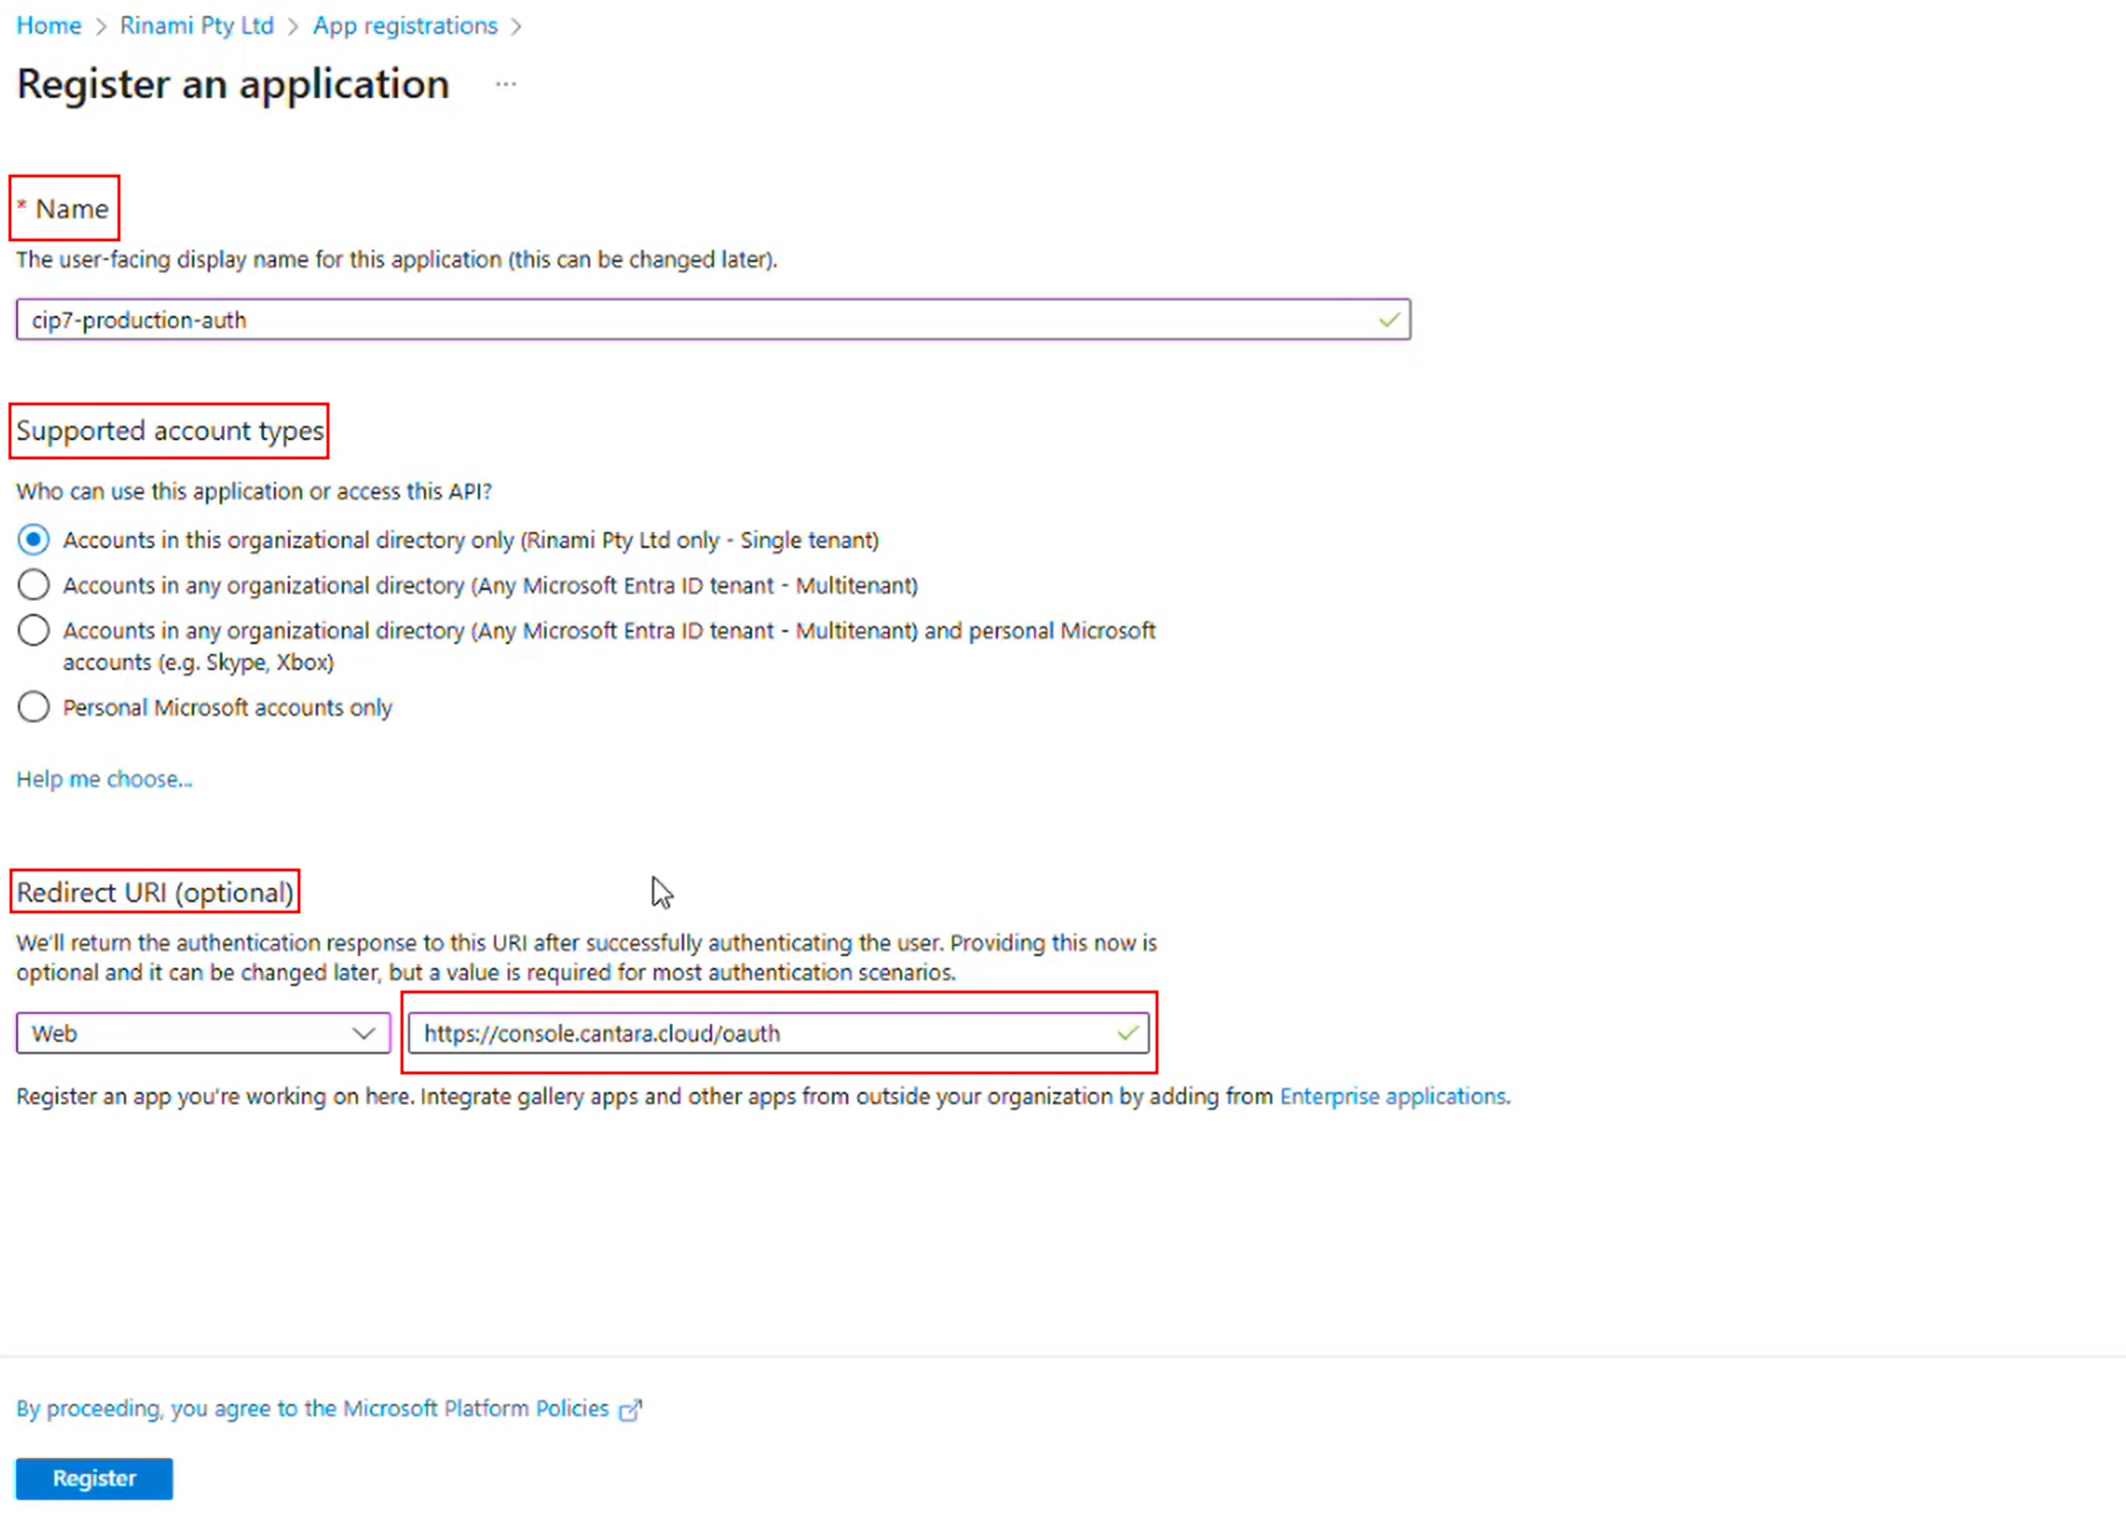
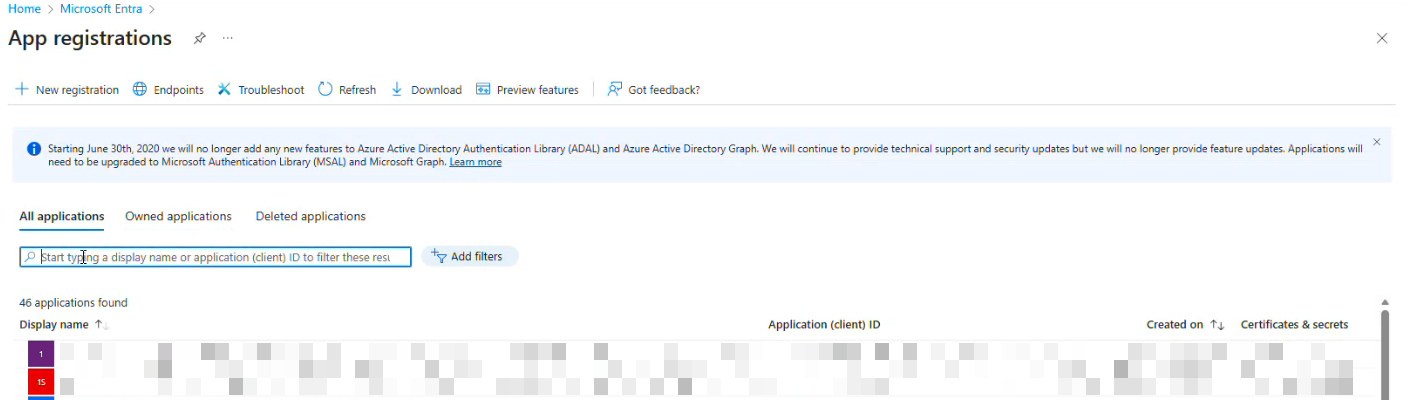
Register a New Application
-
In the Microsoft Entra admin center, navigate to App registrations.
-
Click + New registration.
-
On the Register an application page, enter the following details:
|
Field |
What to Enter |
|---|---|
|
Name |
User-facing display name for this application (this can be changed later). |
|
Supported account types |
Choose according to your environment. |
|
Redirect URI |
Copy and paste the following URI provided by Cantara:
|
-
Click Register to create the application.
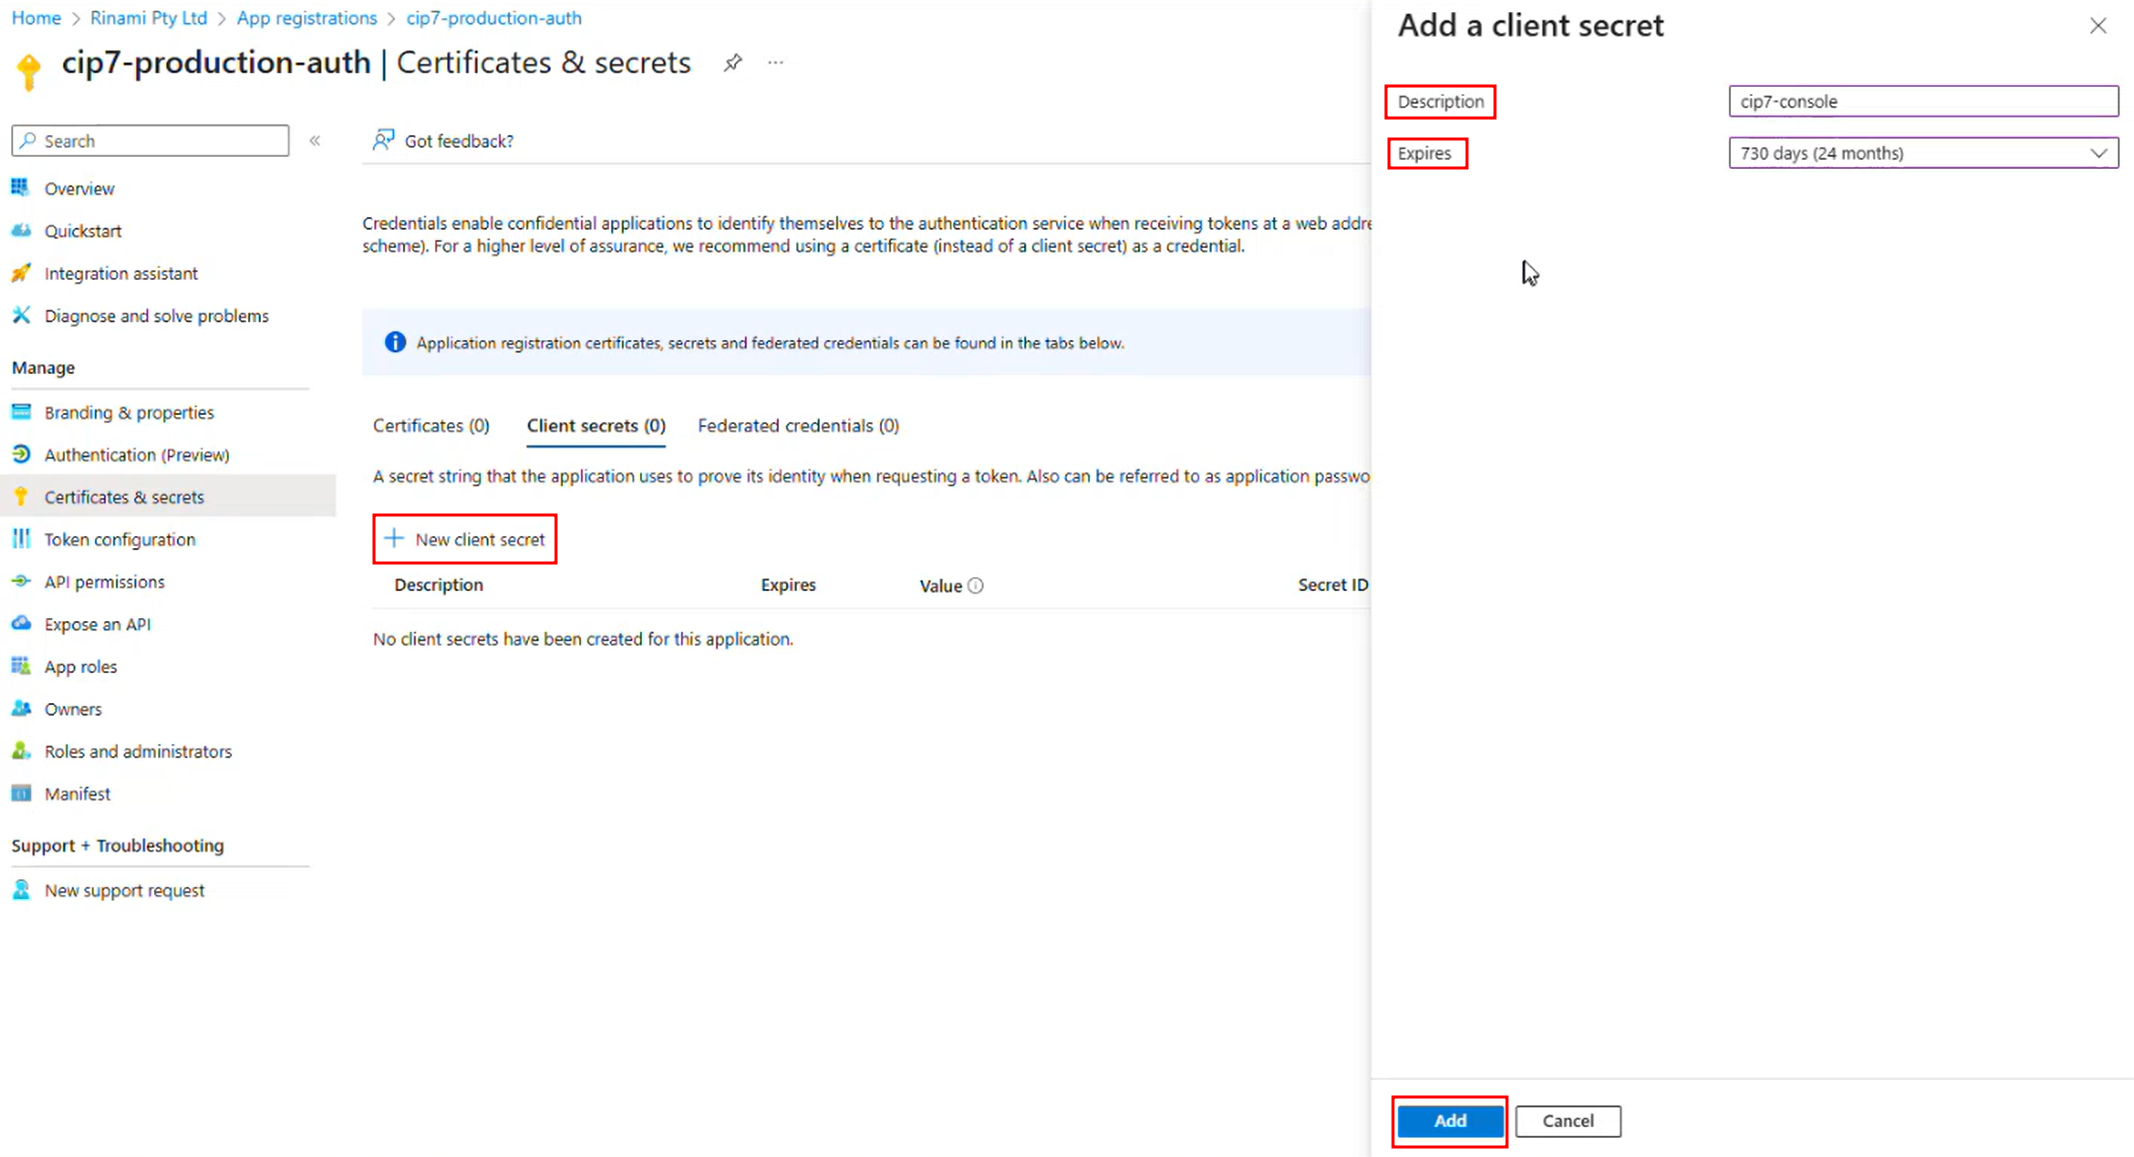
Generate the Client Secret
-
Navigate to Certificates & secrets.
-
Click + New client secret.
-
Enter the following details:
|
Field |
What to Enter |
|---|---|
|
Description |
Any descriptive label |
|
Expires |
Select appropriate expiration |
-
Click Add
IMPORTANT: The client secret is displayed only once upon creation. Copy and store it securely. If it is lost, a new client secret must be generated.
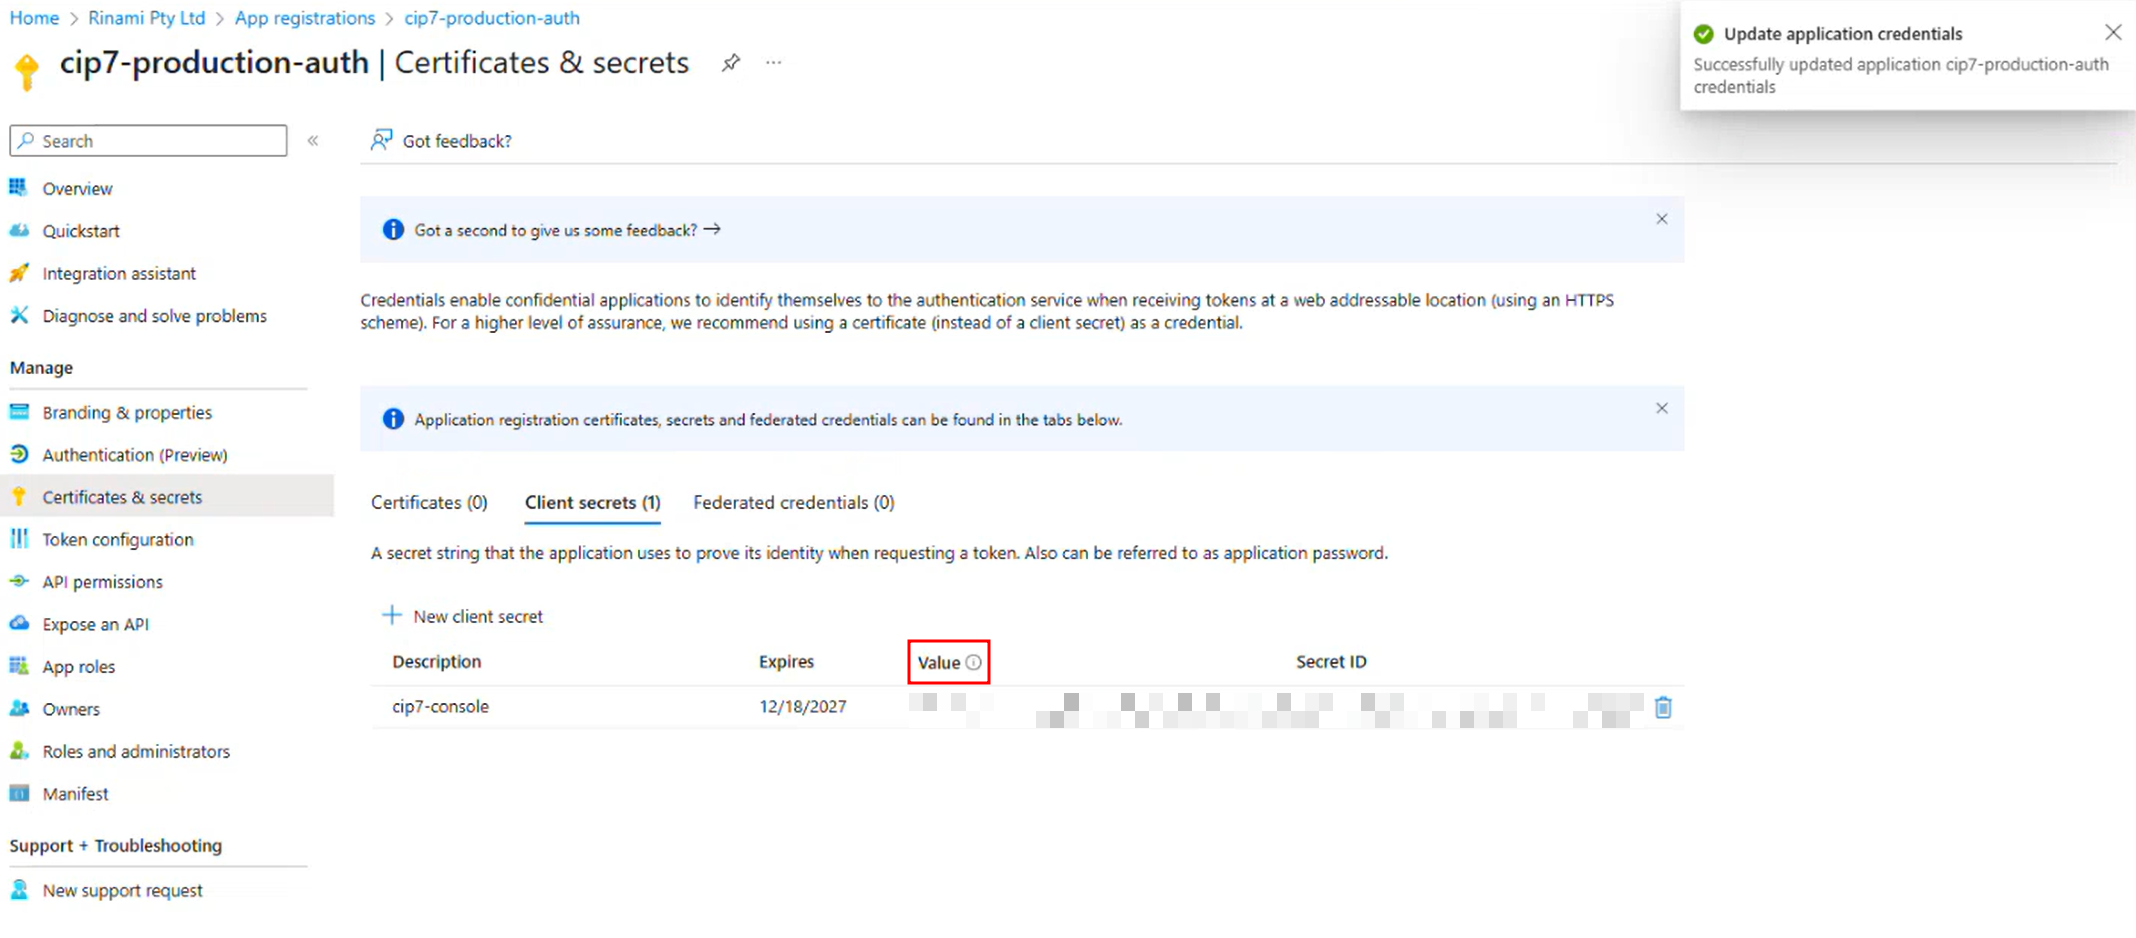
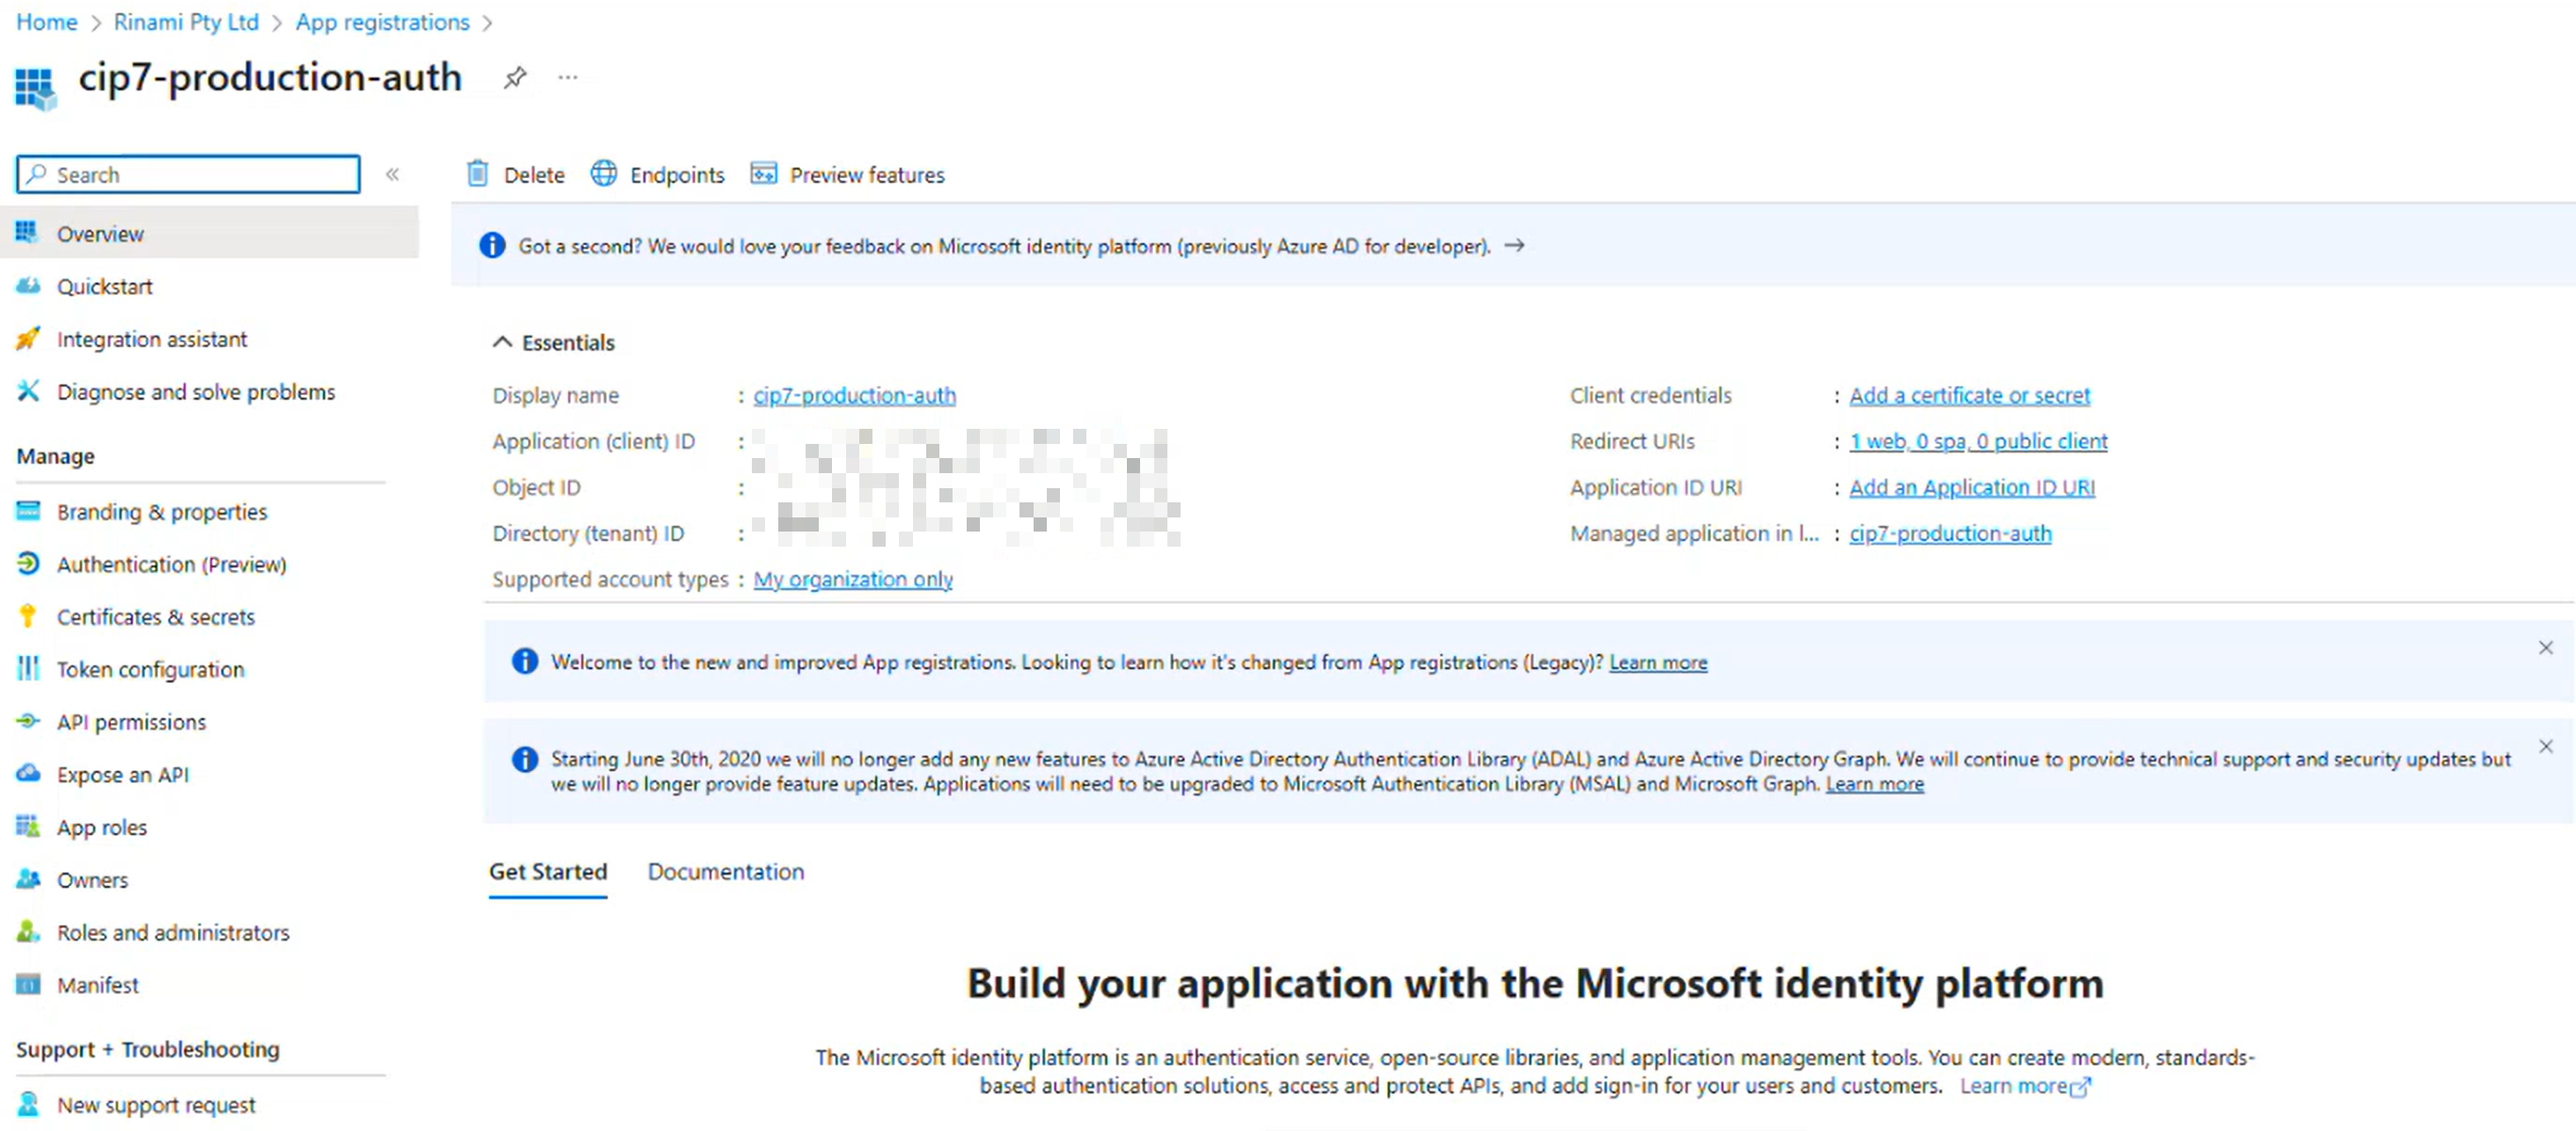
Outcome
The application is registered in Microsoft Entra ID, and the required OAuth 2.0 credentials (Client ID and Client Secret) are generated for use in Cantara.
Optional: Restrict Access to Assigned Users and Groups
By default, users in your Microsoft Entra ID can authenticate once the application is configured. To restrict access, you can assign specific users or groups.
To assign users or groups:
-
In Microsoft Entra admin center, navigate to App registrations.
-
Select your registered application.
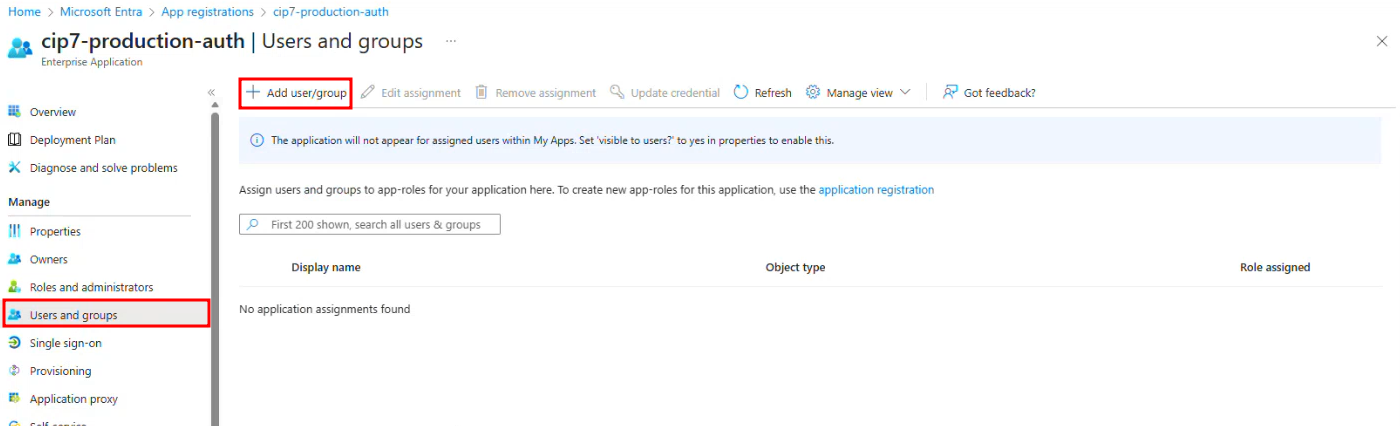
-
Navigate to Users and groups.
-
Click + Add user/group.
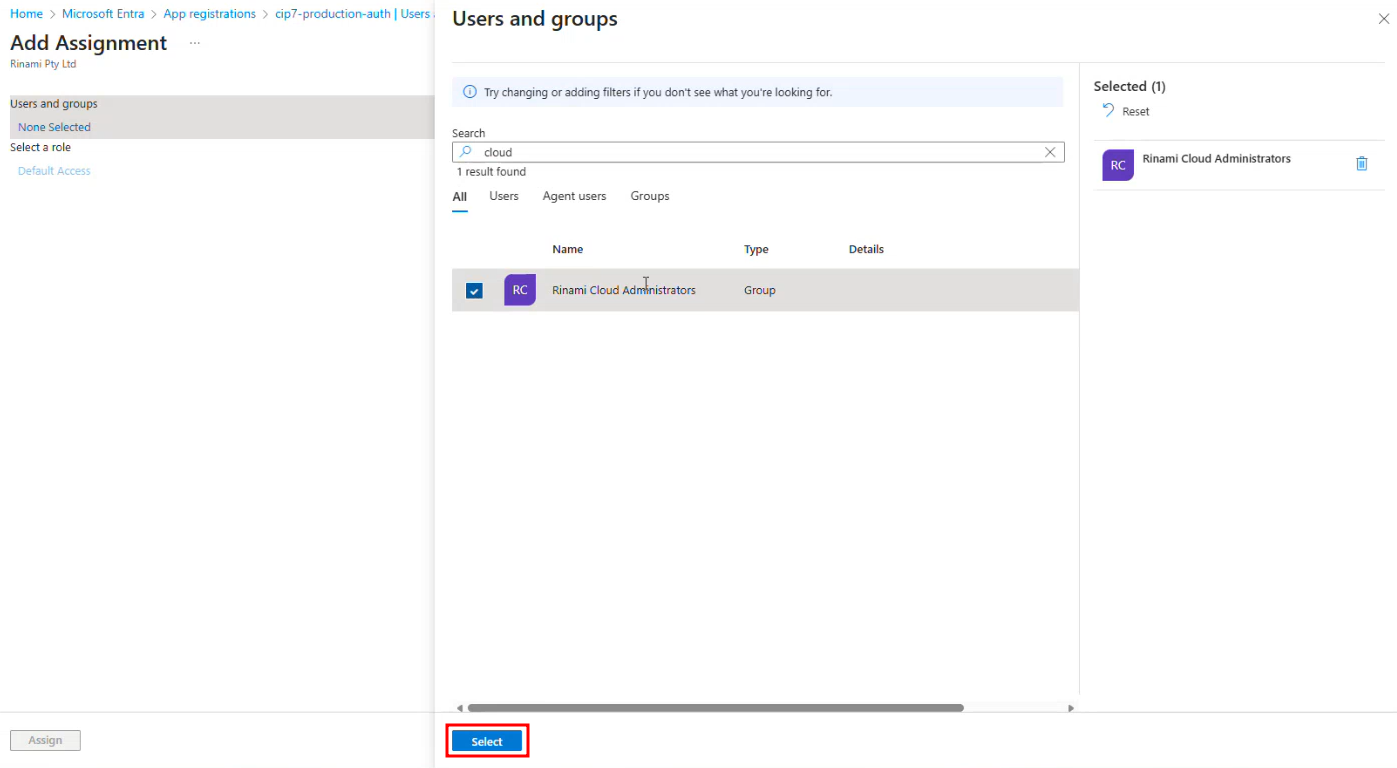
-
Select the users or group and click Select.
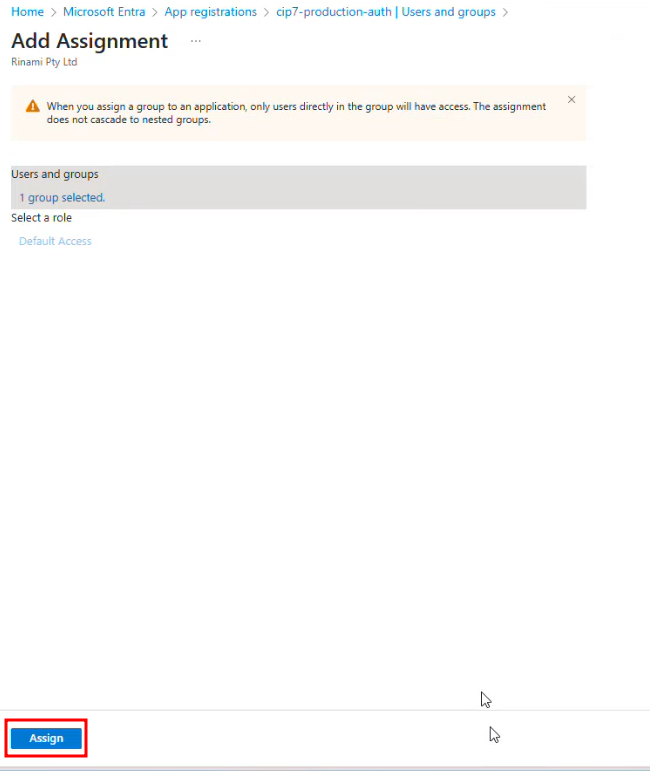
-
Click Assign.
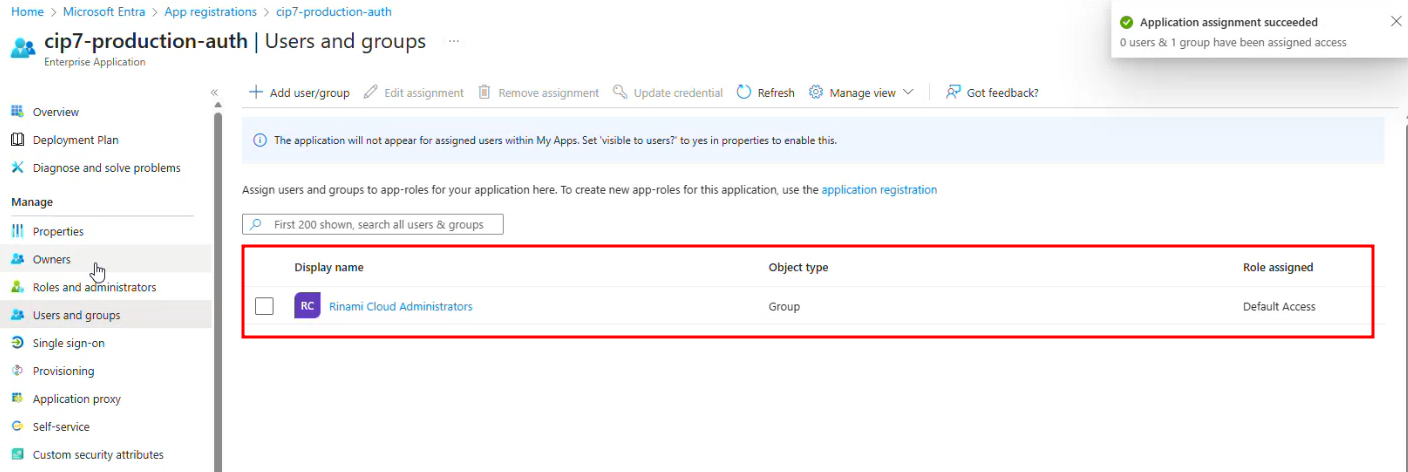
Outcome
Only assigned users and group members will be able to log in to Cantara.
Step 2: Configure OAuth 2.0 in Cantara
Purpose
To configure OAuth 2.0 in Cantara, enabling authentication via Microsoft Entra ID.
Procedure
-
In Cantara, navigate to Identity Providers. Click + Add Identity Provider.
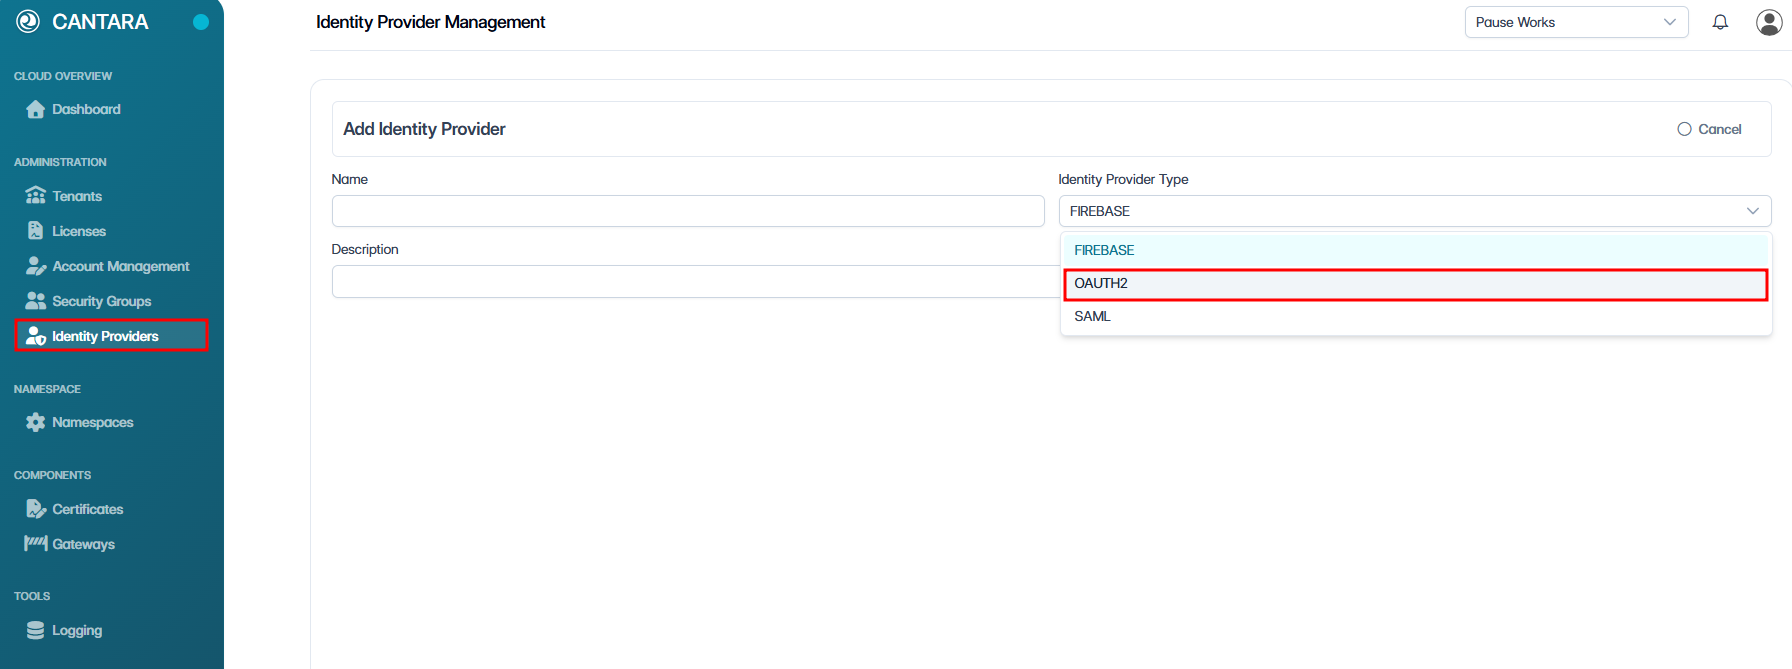
-
Select OAuth2 as the Identity Provider Type.

-
Enter a name and description for your identity provider.
-
Enter the OAuth 2.0 configuration details.
Note: Some fields in this table are optional and dependent on your Identity Provider (IdP) configuration.
Required OAuth 2.0 fields
Use this table to cross-check the fields that are typically required for the Microsoft Entra ID OAuth 2.0 configuration.
|
Field |
Value / Setting |
|---|---|
|
Authentication Method |
Select the method that matches your IdP configuration. Defaults to |
|
Client ID |
Copy the Application (client) ID from Microsoft Entra. |
|
Client Secret |
Copy the client secret created previously. |
|
Authentication URL |
Copy from Entra ID Application → Overview → Endpoints. |
|
Access Token URL |
Copy from Entra ID Application → Overview → Endpoints. |
|
Redirect URL |
|
|
JSON Web Key Set URL |
Obtain the JWKS endpoint from Microsoft Entra ID. |
|
Username Attribute |
|
Additional OAuth 2.0 fields
The following fields are supported by Cantara and may be required depending on your Identity Provider (IdP) configuration. Refer to your IdP settings to determine which fields apply to your setup.
|
Field |
Value / Setting |
|---|---|
|
Issuer URI |
The issuer URI for the OAuth 2.0 provider. |
|
User Info URL |
The URL used to retrieve user information from the provider. |
|
Secure JWKS URL |
Enables the secure URL for the provider's JSON Web Key Set. |
|
Logout URL |
The URL used to log users out of the provider. |
|
Resource |
The resource identifier requested from the provider. |
|
Audience |
The intended audience for issued tokens. |
|
Display Name Attribute |
The attribute used to populate the user's display name in Cantara. |
|
Authorisation Grant Type |
The OAuth 2.0 authorisation grant type used by the provider. |
|
Scopes (spaces or comma separated) |
The scopes requested from the provider, separated by spaces or commas. |
|
Provider Display Name |
The display name shown for this identity provider. |
|
PKCE Enabled |
Enables Proof Key for Code Exchange (PKCE) for additional security. |
Enable Refresh Tokens
If refresh tokens are required for your authentication flow, enable the Refresh Token setting in your IdP application configuration.
-
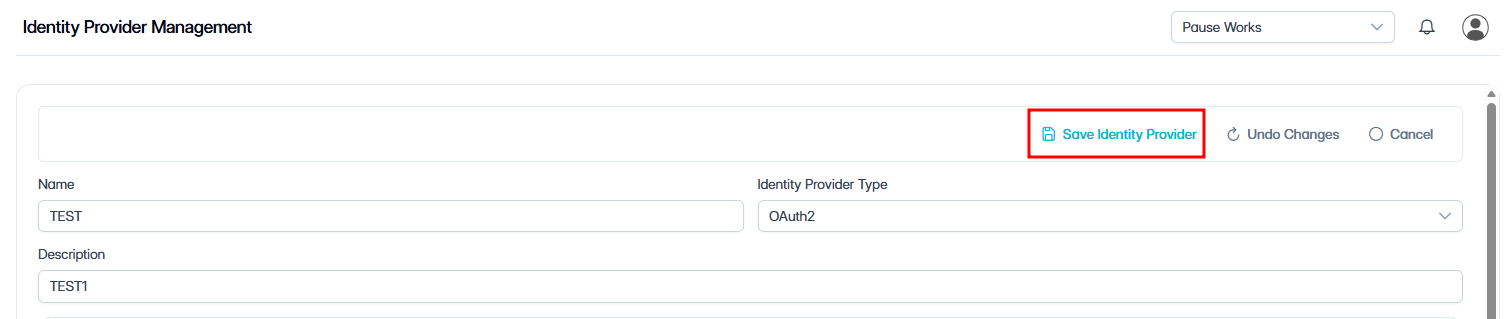
Click Save Identity Provider.

A confirmation dialog appears: “Identity Provider saved”.
-
Click Activate.
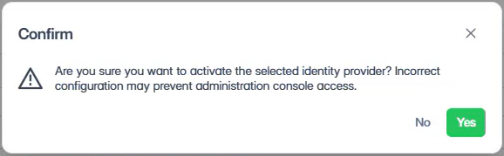
A confirmation dialog appears:
“Are you sure you want to activate the selected identity provider? Incorrect configuration may prevent administration console access.”
-
Click Yes to confirm the activation.
Once active, users can log in authenticated by Microsoft Entra ID.
First-Time User Prompt
Users may be prompted to consent to sharing basic profile information during their first login.
In some Identity Providers, administrators can grant consent on behalf of users. This behaviour varies depending on configuration.
Outcome
Once configured and activated, users can log in to the Cantara Administration Console using Single Sign-On (SSO). Cantara authenticates users via Microsoft Entra ID using OAuth 2.0.
(Optional) Step 3: Configure SCIM User Provisioning
Purpose
To configure SCIM provisioning using Microsoft Entra ID, enabling automatic synchronisation of user accounts and group memberships into Cantara.
Register an Enterprise Application in Microsoft Entra ID
-
Log in to the Microsoft Entra Admin Center.
-
Navigate to Enterprise applications.
-
Click + New Application.
-
In the pane that opens, enter a suitable name for your provisioning.
-
Select the option "Integrate any other application you don't find in the gallery (Non-gallery)".
-
Click Create.
Configure Application
-
In the application’s overview, click Provisioning in the left menu.
-
Click + New configuration.
Enter the following details:
|
Field |
Action/Value |
Notes |
|---|---|---|
|
Authentication Method |
Select Bearer Authentication |
Required for SCIM provisioning |
|
Tenant URL |
|
The last part of the URL is your Tenant ID. |
|
Token/Secret |
Enter the SCIM provisioning token. |
To generate the token, in Cantara go to your tenant, and generate a new token. For detailed instructions, see Generate a Provisioning Token. |
-
Click Test Connection to verify the URL and token.
If successful, a dialog box will appear indicating that the Provisioning test connection was successful.
-
Click Create to finalise the configuration.
Provisioning is now successfully configured, but users have not been provisioned yet. You must decide which users will be pushed into Cantara.
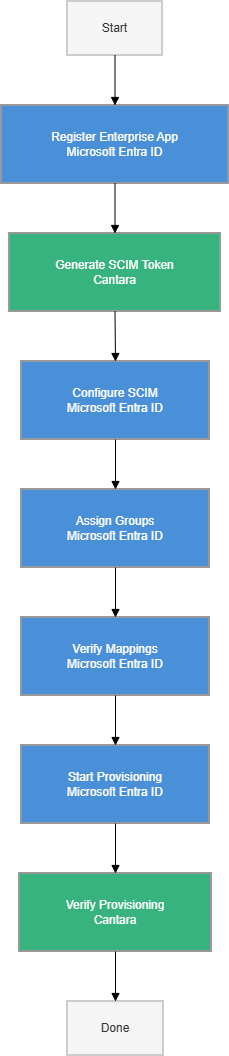
Assign a Group
-
Navigate to Users and groups.
-
Click + Add user/group.
-
Find and select the users or groups that you want to assign. Click Select.
-
Click Assign to assign the group for provisioning.
Verify Group and User Attribute Mappings
-
Navigate to Provisioning.
-
Select Attribute Mappings.
-
Ensure that Provision Microsoft Entra ID Groups is enabled.
By default, security groups will be automatically moved over, so no changes are needed to the default group mapping.
-
Click Provision Microsoft Entra ID Users to open the Attribute Mapping page.
-
Remove any fields that are not required for user authentication.
Only the following core attributes are required:
|
Attribute |
Required |
|---|---|
|
|
Yes |
|
|
Yes |
|
|
Yes |
|
|
Yes |
|
|
Yes |
|
|
Yes |
|
|
Yes |
|
|
Yes |
|
|
Optional |
Note: Remove any unnecessary fields this reduces latency when provisioning.
-
Once you have finished reviewing and editing the mapping, click Save.
Configure Settings and Email Notifications
-
On the Provisioning screen, under Settings, check the ‘Send an email notification when a failure occurs’ checkbox.
-
Enter a notification email address.
-
Under Scope, select ‘Sync only assigned users and groups’.
-
Set Provisioning Status toggle to On.
-
Click Save.
This will enable the provisioning process and allow Cantara to begin syncing users and groups based on your settings.
Start SCIM Provisioning
On the Overview (Preview) page, click Start Provisioning to initiate the process.
The system will begin syncing users and groups from Microsoft Entra ID to Cantara based on the configurations you have set.
Verify Group in Cantara
After provisioning starts, in Cantara navigate to Security Groups.
-
The added security group will be listed with the members of that group successfully provisioned.
-
If any errors occur or if the group does not appear as expected, double-check the mappings and group assignments.
What to Expect
Once SCIM provisioning is enabled, accounts provisioned from Microsoft Entra ID will appear in Cantara with the following behaviour:
-
Account Source — displays as SCIM (rather than Local).
-
Account fields — Read-only in Cantara. Changes must be made in the Identity Provider.
-
User updates — Changes made in Microsoft Entra ID (e.g., name, email, phone) are automatically synced to Cantara.
-
Deactivation — When a user is deactivated or removed in Microsoft Entra ID, the account is automatically deactivated in Cantara.
-
Groups — Group memberships configured in Microsoft Entra ID are synced and reflected in Cantara Security Groups.
What’s next?
-
With user access and provisioning set up, the next step is to understand how to assign Security Topics, see User Permissions.