Overview
In CIP7, a tenant is your organisation’s dedicated boundary within the Cantara Platform. It defines the scope in which all configuration, access control, licences, user accounts, and Identity Provider (IdP) integrations are managed.
Each tenant is:
-
Region-specific – Created in a cloud region that determines the physical data centre where your tenant's data and configuration are hosted. Selecting the right region is important for:
-
Data Sovereignty – Hosting your data in a specific region helps meet local regulatory and compliance requirements (e.g., keeping Australian customer data within an Australian data centre).
-
Performance – A region geographically close to your users ensures lower latency and a better overall experience.
-
-
Secure and isolated – Your data and configurations are kept separate from other tenants.
Tenant Registration
Before you begin
Before you begin, have the following ready:
-
Organisation details — Legal name, registration numbers, and contact information.
-
Data region preference — The cloud region where your tenant data will be hosted.
-
Business address — Primary address and billing address, if different.
-
Support Service Domain — Email domain used to authenticate support requests.
Procedure
The registration process involves creating a user account and then completing the tenant registration.
Step 1: Register New User
To get started, complete the Register New User form.
The form includes the following fields:
|
Field |
Description |
|---|---|
|
|
Your primary contact email address. This is used to create your user account and will be associated with the new tenant. |
|
Full Name |
Your full name as it should appear in the system. |
|
Mobile Phone |
Your mobile phone number. |
Once submitted, a Registration Successful message is displayed. You will then receive an email with a link to set your password.
To continue registration:
-
Open the email and click the link.
-
Set your password.
-
Log in to the Cantara Administration Console.
After logging in the first time, the Terms and Conditions are displayed. Review them and click Accept to continue. The Register New Tenant form is displayed.
Step 2: Register New Tenant
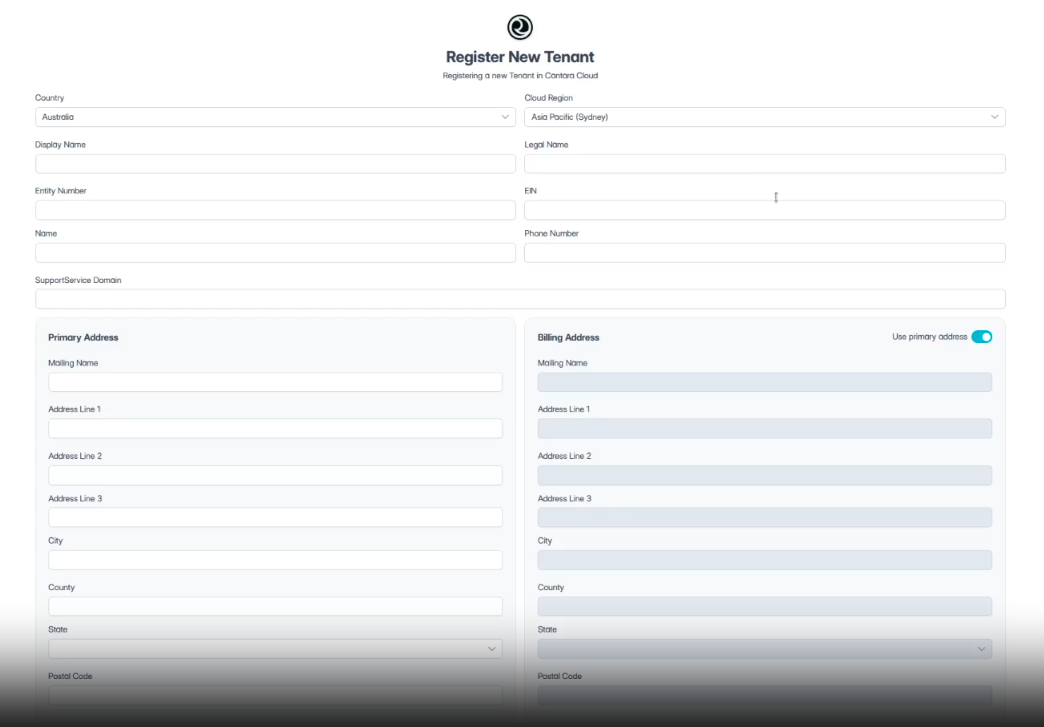
Complete the Register New Tenant form with your organisation, tenant, and address details.
The form includes the following fields:
|
Field |
Description |
|---|---|
|
Country |
The country in which the tenant is registered. |
|
Cloud Region |
The region where your tenant data will be hosted. |
|
Display Name |
The organisation name displayed in the platform interface. Unlike the tenant Name, this is a user-facing label rather than a system identifier. |
|
Legal Name |
The registered legal name of your organisation. |
|
Entity Number |
Your organisation's entity registration number (e.g., ACN in Australia). The field label may vary based on your browser's locale settings. |
|
EIN |
Your organisation's business identifier (e.g., ABN in Australia). The field label may vary based on your browser's locale settings. |
|
Name |
A permanent system identifier. Cannot contain spaces or be modified after creation. |
|
Phone Number |
Contact phone number for the tenant. |
|
Support Service Domain |
Email domain used to authenticate support requests. |
|
Primary Address |
The primary business address for the tenant. This is mandatory. |
|
Billing Address |
If your billing address differs from the primary address, select the billing address tick box to enter a separate address. Otherwise, the primary address will be used for billing. |
Click Register to complete the tenant registration. You are then taken directly to the Cantara Administration Console Dashboard.
What happens when your tenant is created
-
A unique Tenant ID is generated for your tenant.
-
The tenant status is set to Active.
-
An Owner Group is automatically created with administrative access to the Cantara Administration Console.
-
The person associated with the email address provided during registration is added to the Owner Group.
-
The tenant is visible in the Tenant Management screen.
What’s next?
You can now begin configuring your new registered Tenant. For details, see Navigate Cantara Administration Console.