
Purpose
This guide provides step-by-step instructions for configuring a Gateway in Cantara. A Gateway establishes a secure connection between Cantara and your JD Edwards (JDE) environment, allowing authenticated requests to be routed safely and reliably.
Optional SCIM provisioning can also be configured to automate user and group synchronisation between the identity provider (IdP) and Cantara.
Before you begin
Before starting Gateway configuration, ensure the following conditions are met:
-
Cantara access: Administrative permissions to manage Gateways.
-
JD Edwards access: Administrative access to the JDE environment to configure nodes and services.
-
Identity provider (IdP) access: Administrative access to the IdP for configuring single sign-on (SSO) authentication.
-
Namespace: At least one namespace must already exist in Cantara, as the Gateway is created within a namespace.
-
License: An active license must be assigned to the namespace in Cantara before the gateway can be configured.
-
SSL Certificate: Required for JWT token signing. Certificate creation is covered in Part One: JD Edwards Configuration.
-
SCIM (Optional): If you plan to configure automated user and group synchronisation, ensure SCIM provisioning is enabled and working.
Procedure
The configuration process is divided into the following three parts, grouped by where the work is completed: JD Edwards, your IdP, and Cantara. Complete the parts in order to ensure the gateway is configured correctly and securely.
Part One: JD Edwards Configuration
Purpose
This section covers the JD Edwards configuration required for SSO, including node configuration, token lifetimes, trust relationships, and SSL certificate configuration for JWT token signing.
Procedure
Step 1: Access the SSO Configuration Tools in JD Edwards
-
Log in to JD Edwards as an administrator.
-
Access the SSO Configuration Tools using one of the following paths:
Both paths open the same screens, so use whichever option you prefer.
Path A - Via menu navigation:
-
Navigate to Single Sign-On → SSO Environment Configuration Tools.
-
The SSO Environment Configuration Tools screen opens displaying three options relevant to this setup: Single Signon Node Configuration, Single Signon Token Lifetime Configuration, and Single Signon Trusted Node Configuration.
Path B - Via application P986115:
-
Launch application P986115 directly.
-
On the Machine Search & Select screen, click Form in the toolbar.
-
Three options are available: Node Configuration, Token Lifetime Cfg, and Trusted Node Config.
Note: It is recommended to enable long user IDs before starting the gateway configuration. For information, see Setting Up Long User IDs.
Step 2: Configure Nodes in JD Edwards
-
Select Single Signon Node Configuration (Path A) or Node Configuration from the Form menu (Path B).
-
On the Single Sign-On - Work With Node Configuration form, click Add.
-
Create nodes for each JD Edwards component:
-
Gateway - Required for token generation.
-
Web Server - Recommended per server; covers AIS and JAS. You may create separate nodes for AIS and JAS, or share nodes if desired.
-
Enterprise Server - Each JD Edwards component is represented as a node. Trust must be established between nodes for token handoff.
-
-
On the SSO Node Configuration Revisions form, complete the following fields:
|
Field |
Description |
|---|---|
|
Node Name |
Enter a name for the node (max 15 characters).
|
|
Node Description |
Enter a description of the node. |
|
Machine Name |
|
|
Node Status |
Set to Active |
|
Node Password |
Enter a password for the node. This password helps ensure that tokens generated by the node cannot be tampered with. |
|
Verify Node Password |
Re-enter the password. |
-
Click Save.
The new nodes now appear in the list of nodes.
Step 3: Set Token Lifetime
-
Navigate to the token lifetime configuration: via menu select Single Signon Token Lifetime Configuration; via P986115 select Token Lifetime Cfg from the Form menu. On the Single Sign-On - Work With Token Lifetime Configuration form, click Add.
-
In the Node Name field, enter or search for the required node.
-
Select the appropriate node.
-
On the Single Sign-On - Token Lifetime Configuration Revision form, complete these fields:
-
Regular Token Lifetime
Specify the expiration time for a regular token. The default value for a node is 720 minutes (12 hours).
-
Extended Token Lifetime
Specify the expiration time for an extended token. The default value is 4320 minutes (three days).
-
-
Click Save.
Step 4: Add Enterprise Server Trusted Node Configuration
Trusted node configuration establishes which nodes are permitted to validate tokens generated by other nodes. This is required so that authenticated tokens can be passed securely between the gateway, web server (JAS/AIS), and enterprise server without each connection requiring a separate login. Configure trust so that each enterprise server trusts its web server, and each web server trusts the gateway node. Enterprise servers do not need to trust the gateway directly.
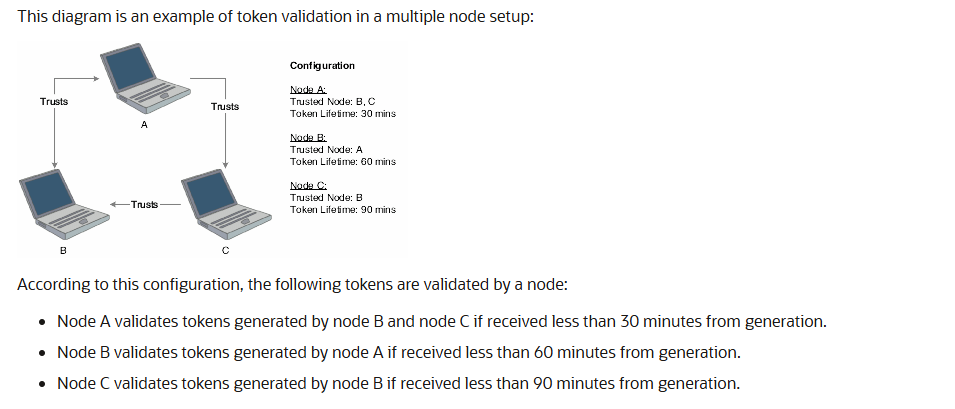
For more information, see How a Node Validates an Authenticate Token.
-
Navigate to the trusted node configuration: via menu select Single Signon Trusted Node Configuration; via P986115 select Trusted Node Config from the Form menu. On the Single Sign-On - Work With Trusted Node Configuration form, click Add.
-
In the Node Name field, enter or search for the node that will trust another node (for example the web server node).
-
In the Trusted Node Name field, enter or search for the node being trusted (for example the gateway node).
-
Repeat for all required trust relationships.
-
Click Save.
Note: The nodes that you add to a new trusted node configuration must already be defined and have token lifetime configuration records.
Step 5: SSL Certificate Creation and Configuration
Create an SSL certificate to be used for JWT token signing.
-
The certificate can be self-signed, internally signed, or publicly signed
-
The certificate must include a private key
-
Load the certificate into a Java keystore format
-
Ensure the keystore file is local to the JD Edwards web server where it will be used
-
Securely store the keystore location and keystore password
Step 6: Apply SSL Certificate to JD Edwards Services
After setting up the SSL certificate, the next step is to apply it to the JD Edwards services (JAS and AIS) and ensure the proper configuration for token signing.
-
Apply the certificate to the JAS and AIS servers.
-
If multiple servers are used, repeat this configuration on each server
-
Ensure that Allow JWT Token Login is enabled.
-
If PS token login is in use, Allow PS Token Login should be enabled as well.
-
After configuring, synchronise the settings and restart the affected services to apply the changes.
Note: In some environments, the gateway prefix may need to be added to the Allowed JAS Server Overrides (list) (e.g., <prefix>.GW.cantara.cloud) to avoid redirect errors or access issues. This configuration may vary by environment.
Currently, the system uses prefix-based names (e.g., <prefix>.GW.cantara.cloud). A future update will allow the use of custom domain names for the gateway (e.g., jde.rinami.com), replacing the current prefix-based system.
Outcome
The JD Edwards nodes are configured, token lifetimes are set, trust relationships between enterprise servers, web servers, and the gateway have been established, and SSL certificates are configured and applied for secure JWT token signing.
Part Three: Cantara Configuration for the Gateway
Purpose
This section covers the Cantara configuration required to upload the SSL certificate, create the gateway, configure authentication and identity mapping, connect the AIS or JAS service, and confirm network requirements.
Step 1: Load SSL Certificate
-
In Cantara, navigate to Certificates.
-
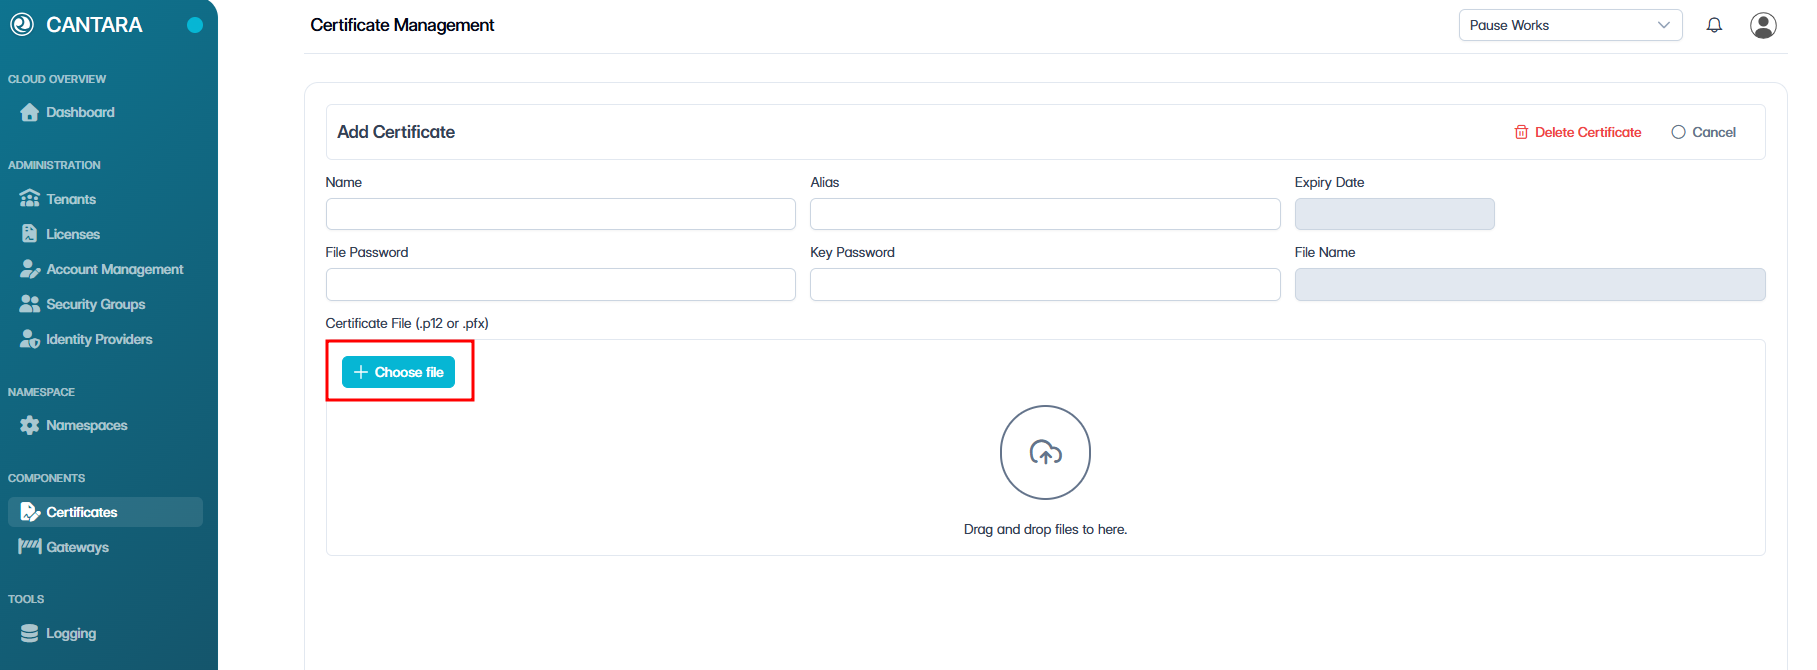
Click + Add Certificate.
-
Click + Choose file and upload the certificate.
Note: The certificate must be in PKCS#12 format.
-
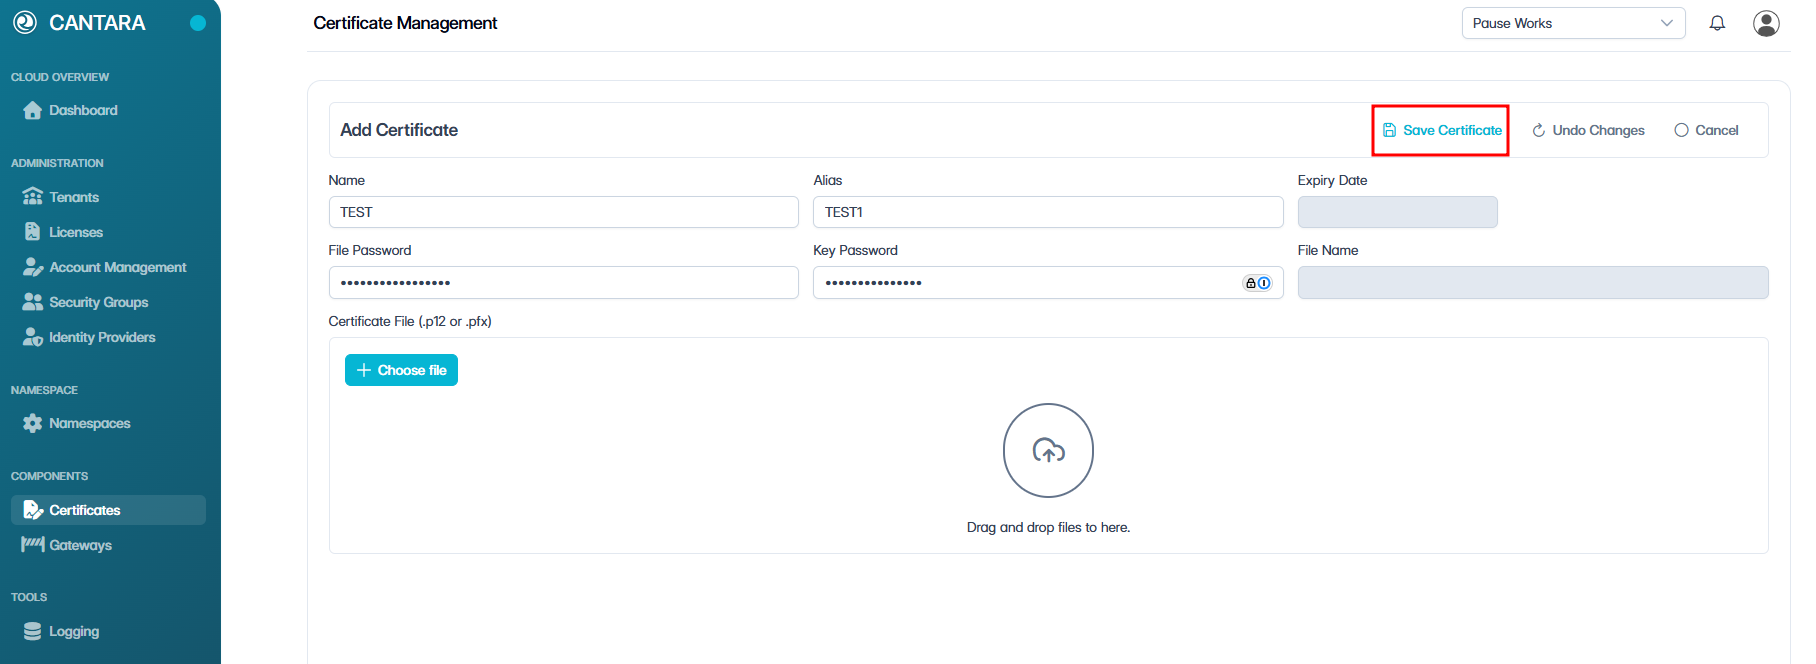
Complete the following fields:
|
Field |
Description |
|---|---|
|
Name |
Enter a name for the certificate. |
|
Alias |
If the key store contains multiple certificates, provide an alias. If there is only one certificate, the alias field can be left blank. |
|
File Password |
Enter the password associated with the SSL certificate file. This is mandatory to ensure file security. |
|
Key Password |
If using a private key, enter the password for it. This may not always be required. |
For more information on how certificates are managed in Cantara, see Certificates in the Administration Guide.
-
Click Save Certificate.
Outcome
The certificate is uploaded and available for use. The expiry date is displayed to confirm validity.
Certificates are managed at the tenant level, not the namespace level. You can reuse the same certificate across multiple namespaces.
If a certificate expires, you can upload a new one under the same name or give it a new name, depending on your preference.
Step 2: Configure Gateway in Cantara
-
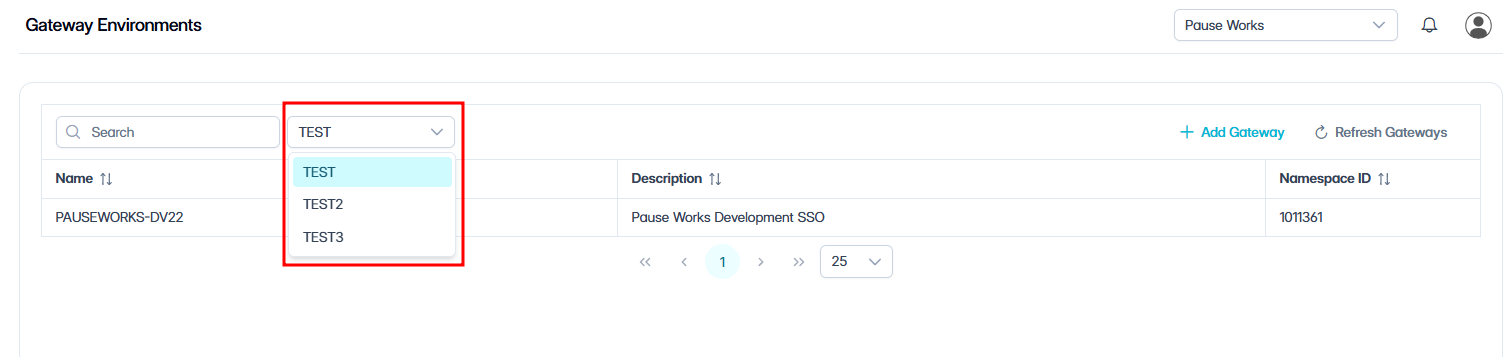
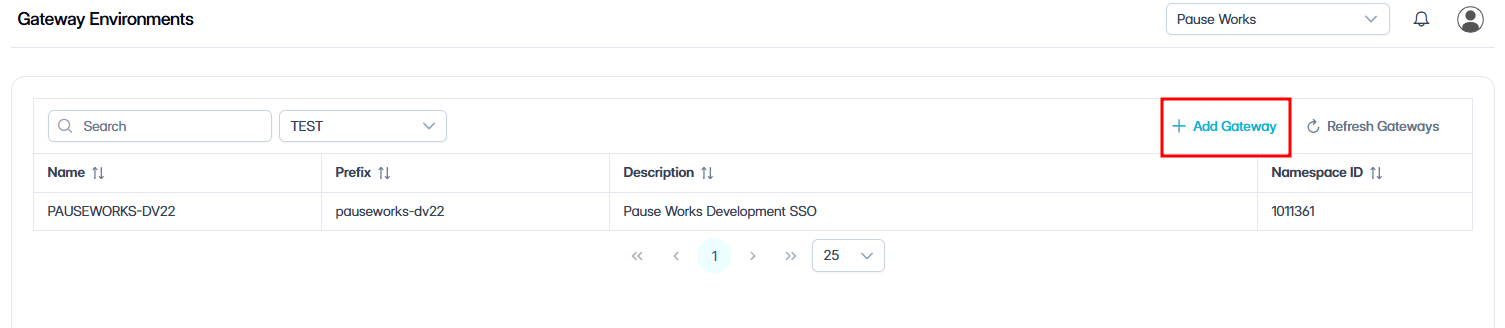
In Cantara, navigate to Gateways.
-
Select the appropriate namespace.
-
Click + Add Gateway.

-
Complete the following fields:
|
Field Name |
Description |
|---|---|
|
Name |
Unique name for the gateway (must correspond with the Node Name in JDE) |
|
Security Provider |
Select OAuth2 |
|
Prefix |
Enter the gateway prefix you chose in Part One: Machine Name. This is the value entered as the Machine Name for the Gateway node. The prefix that forms part of the gateway URL must be globally unique and must match exactly. |
|
Time Zone |
Set to the time zone where the JDE servers are hosted |
|
Default Date Format |
Select the date format your system uses |
|
JDE Authentication |
Defaults to JWT |
|
JDE Environment Name |
Specify the JDE environment being connected to (e.g., TEST, PROD). |
|
Long Usernames |
Recommended to enable unless the environment does not support long usernames |
The following fields are optional and can be configured as needed:
|
Field Name |
Description |
|---|---|
|
Token Timeout |
The duration in seconds before the token expires. Default is 3,600 (1 hour). |
|
Description |
Add a description for the gateway. |
|
Component Version |
Specify the component version. |
|
Email From Address |
Set the default sender email address for notifications. |
|
Session Cookie Name |
Specify a custom session cookie name. |
|
RememberMe Cookie Name |
Specify a custom remember me cookie name. |
Note: Cookie settings can typically be left as default unless specific overrides are required.
JWT Authentication
|
Field Name |
Description |
|---|---|
|
Node Name |
JDE node name created during setup |
|
Node Password |
Password for the node |
|
Certificate Name |
Select certificate used for secure communication |
JDE Security
|
Field Name |
Description |
|---|---|
|
Service Username |
JDE service account username |
|
Service Password |
Password for the JDE service account |
|
JDE Role |
The role for the user |
|
JDE Date Format |
Date format for the JDE service user |
OAuth 2.0 Configuration
|
Field Name |
Description |
|---|---|
|
Authentication Method |
Select OAuth2 as the authentication method. |
|
Client ID |
OAuth 2.0 client identifier |
|
Client Secret |
OAuth 2.0 client secret |
|
Authentication URL |
OAuth 2.0 authorisation endpoint |
|
Access Token URL |
OAuth 2.0 token endpoint |
|
Redirect URL |
OAuth 2.0 redirect URL. Must match the redirect URI registered in Microsoft Entra ID for the application. |
|
JSON Web Key Set URL |
JWKS token validation support |
|
Username Attribute |
Note: Must match the JD Edwards username
|
Enable Refresh Tokens
If refresh tokens are required for your authentication flow, enable the Refresh Token setting in your IdP application configuration.
Outcome
The gateway is configured with authentication, identity mapping, and connectivity to JD Edwards.
Step 3: Configuring AIS or JAS Service in Cantara
-
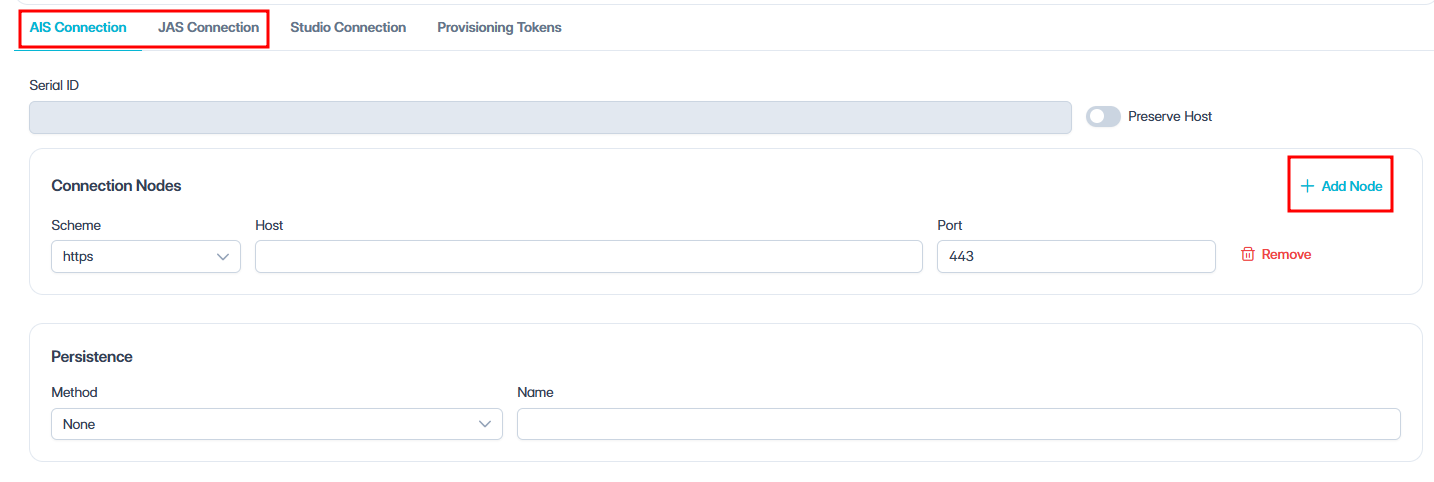
Select the required service:
-
AIS
-
JAS
-
Set Up Connection Node
-
Select the Scheme from the dropdown:
-
HTTP
-
HTTPS
-
-
Enter Host details.
-
DNS name of your secure endpoint
-
Outcome
The gateway is configured to route requests to the JD Edwards.
Step 4: Network Requirements
Before the gateway can communicate with JD Edwards, ensure the following network configurations are complete.
IP Whitelisting
Allow traffic from the following Cantara IP addresses:
|
REGION |
CANTARA IP ADDRESS |
|---|---|
|
Asia Pacific |
34.151.106.182 |
|
Asia Pacific |
35.189.15.37 |
|
United States |
104.154.231.218 |
|
United States |
34.135.234.39 |
|
Europe |
34.140.87.23 |
|
Europe |
34.76.36.159 |
Configure firewall and network controls to allow traffic only from the aforementioned IPs. Collaborate with your network or system administrators to ensure these settings are applied correctly.
Optional: Load Balancing
If your environment uses multiple AIS or JAS nodes, load balancing can be configured.
-
Additional nodes can be added in Cantara
-
Health checks should be enabled for multi-node setups
For single-node environments, load balancing is not required.
Outcome:
The AIS or JAS service is now available through the Cantara gateway using the configured authentication and network settings.
Outcome
Your first gateway is configured and operational. A secure connection has been established between Cantara and your JD Edwards environment, with authentication handled through your IdP and JWT token signing secured via SSL certificates. Authenticated requests can now be routed from Cantara to JDE through the gateway.
If SCIM provisioning was configured, user accounts and group memberships are synchronised automatically from your IdP into Cantara.
What’s next?
Once the gateway is configured, Gateway Access Control can be configured to manage access to services and functions. See Configure Gateway Access Control.