Purpose
To configure gateway access control for services once a gateway has been set up in Cantara.
To understand how permissions interact, see Understanding Gateway Access Control.
Before you begin
-
Ensure you have a gateway set up in Cantara. For details, see Configure a Gateway.
-
To use JDE Roles for access control, JDE security must be configured in the gateway.
-
To use IdP Groups for access control, SCIM provisioning must be configured, see Configure SCIM Provisioning.
Gateway Service Types and Permissions
The table below lists the gateway service types available for access control. Some services support specific access permissions, allowing you to control access to individual items, such as a named orchestration, business function, form, report, notification, table, or view, within that service.
|
Service Type |
Access Permissions |
Supported Item Types |
Documentation |
|---|---|---|---|
|
Business Functions |
Base level + specific access |
Business function name |
|
|
Data Service |
Base level + specific access |
Table or view name. Data row-level security is enforced in JDE. |
|
|
Form Service |
Base level + specific access |
Form name |
|
|
Information |
Base level only |
N/A |
|
|
Logging |
Base level only |
N/A |
|
|
Media |
Base level only |
N/A |
|
|
Messaging |
Base level only |
N/A |
|
|
Notification |
Base level + specific access |
Subscriptions, Discover, Notification name |
|
|
Orchestration |
Base level + specific access |
Orchestration name |
|
|
Orchestrator Studio |
Planned for future release |
N/A |
N/A |
|
Report Service |
Base level + specific access |
Report name; Discover (all reports); Status (all reports). Report version enforcement is handled in JDE. |
|
|
Web Access |
Base level only |
N/A |
This table summarises Gateway Access Control. For full AIS service details, see Oracle REST API documentation.
Procedure
To configure Gateway Access Control:
-
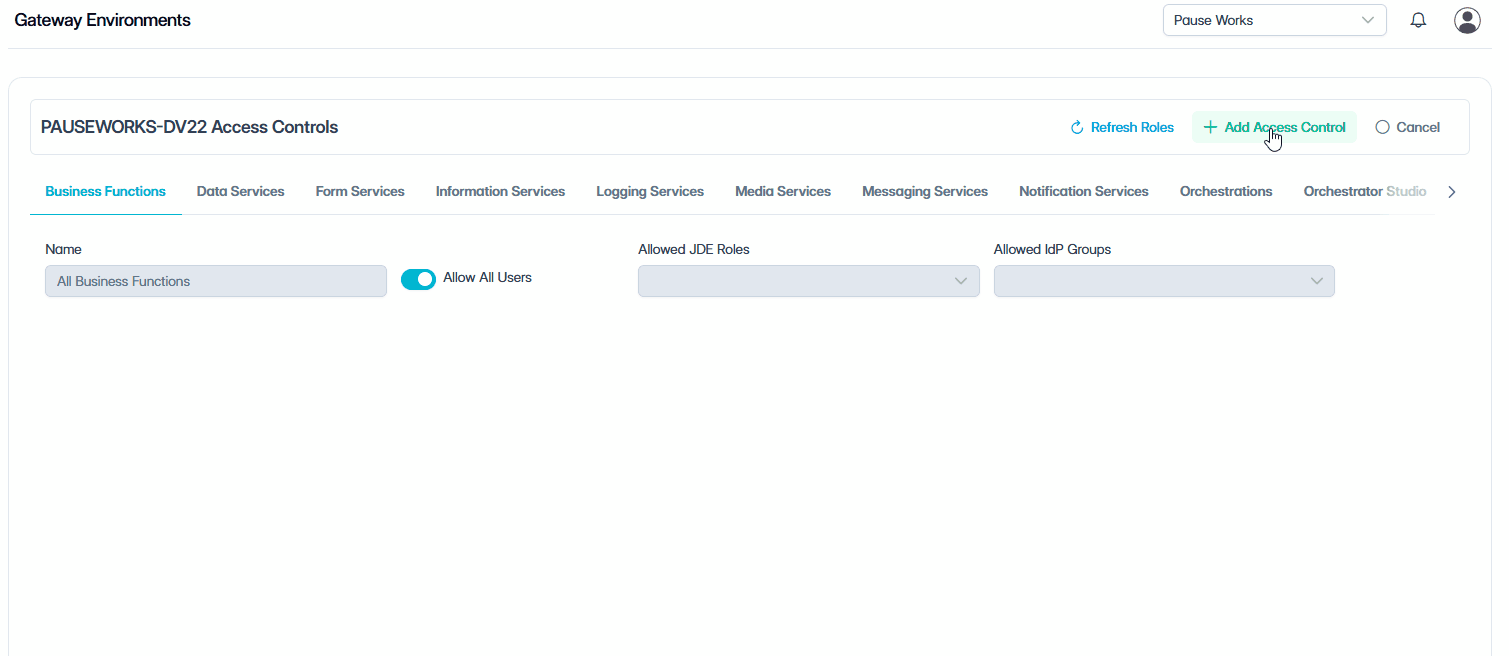
In Cantara, navigate to Gateways.
The available gateways are displayed.
-
Select the Gateway you want to configure.
-
Click + Add Access Control.
The available services are displayed along the top of the screen.
-
Select the service you want to configure.
Depending on your requirements, complete one or both of the following:
Set Base Level Permissions
To set Base Level permissions:

-
Allow All Users:
-
Enabled: All authenticated users can access all functions.
-
Disabled: Access is restricted.
-
-
Allowed JDE Roles: Limit access to a JDE Role by selecting from the dropdown.
-
Allowed IdP Groups: Limit access to an IdP group by selecting from the dropdown.
NOTE: To use JDE Roles or IdP Groups for access control, they must be configured in the gateway.
-
JDE Roles: JDE security must be set up in the gateway to load JDE role mappings. For details, see Configure a Gateway.
-
IdP Groups: SCIM provisioning must be configured to load mapped IdP groups. For details, see Configure SCIM Provisioning.
-
Save: Click Save to apply the base level permissions.
Set Specific Access Permissions
To set Specific Access Permissions:
NOTE: Specific Access Permissions are only available for Business Functions, Data Services, Form Services, Report Services, and Notifications. All other services use base level permissions only.
-
Click + Add Access Control at the top right.
-
Enter the exact item type name as listed in the Gateway Service Types and Permissions table above.
-
Allow All Users
-
Enabled: All authenticated users can access all functions.
-
Disabled: Access is restricted.
-
-
Allowed JDE Roles: Limit access to a JDE Role by selecting from the dropdown.
-
Allowed IdP Groups: Limit access to an IdP group by selecting from the dropdown.
-
-
Click Save to apply the specific access permission.
You’re all set
Congratulations! You’ve successfully configured your tenant. The tenant is now ready to use.
For ongoing administration, see the Administration Guide, which covers day-to-day tasks such as managing users and other system administration activities.