This guide provides step-by-step instructions for completing the installation and configuration of a single instance of a Cantara 5.0 installation using Apache Tomcat 9.0.10 and Oracle MySQL 5.7 running on Windows Server 2016 Standard. The platform will connect to an Oracle JD Edwards EnterpriseOne 9.2 system running 9.2.2.2 tools and will incorporate both a production and non-production farm. All links and file names are correct at the time of writing. Available software versions and files names may be changed so please review the current MTRs and vendor information during installation.
A Cantara installation includes the following steps:
-
Download the required components
-
Install and deploy the Cantara JDE objects
-
Confige the JD Edwards Enterprise Server
-
Set up the necessary folders and permissions
-
Install Oracle Java SE JDK
-
Install and Configure Oracle MySQL
-
Install and Configure MongoDB (optional)
-
Install and configure Apache Tomcat
-
Deploy the Cantara Assur Servers
-
Deploy the Cantara Access Servers
-
Deploy the Cantara Administration Console
-
Configure the Cantara Administration Console
-
Define the access server
-
Defining each Farm
-
Adding an Environment
-
Testing Connectivity
Required components
The following components are required to complete this installation. It is assumed that you have a patch Windows 2016 Server instance available with sufficient privileges to install and configure the required components.
|
Component |
Vendor |
Link |
Sample File Name |
|---|---|---|---|
|
Oracle Java SE JDK 1.8.0 Update 181 64bit |
Oracle |
http://www.oracle.com/technetwork/java/javase/downloads/index.html |
jdk-8u181-windows-x64.exe |
|
Apache Tomcat 9.0.10 |
The Apache Software Foundation |
https://tomcat.apache.org/download-90.cgi |
apache-tomcat-9.0.10-windows-x64.zip |
|
Oracle JD Edwards AIS Client Library |
Oracle |
https://updatecenter.oracle.com/ |
AIS_Client_Java_API_2.0.3_23_99.par |
|
JavaMail API |
Oracle |
https://javaee.github.io/javamail/#Download_JavaMail_Release |
javax.mail.jar |
|
Oracle MySQL 5.7.22 Server |
Oracle |
https://dev.mysql.com/downloads/windows/installer/5.7.html |
mysql-installer-community-5.7.22.1.msi |
|
Oracle MySQL 5.7 JDBC Driver 8.0.11 |
Oracle |
https://dev.mysql.com/downloads/connector/j/ |
mysql-connector-java-8.0.11.zip |
|
MongoDB Community Server 4.0.0 |
MongoDB |
https://www.mongodb.com/download-center#community |
mongodb-win32-x86_64-2008plus-ssl-4.0.0-signed.msi |
|
Cantara Access Server 5.0.5 |
Rinami |
https://portal.cantara.cloud/software |
cantara-server-5.0.5.20180521-tomcat8.zip |
|
Cantara Assur Server 5.0.5 |
Rinami |
https://portal.cantara.cloud/software |
cantara-assur-5.0.5.20180521-tomcat8.zip |
|
Cantara Administration Console 5.0.5 |
Rinami |
https://portal.cantara.cloud/software |
cantara-console-5.0.5.20180521-tomcat8.zip |
|
Cantara JD Edwards Core Components 5.0.5 |
Rinami |
https://portal.cantara.cloud/software |
PRJ_CNTR_CORE_E920_5.0.5.par |
|
Oracle JD Edwards Connector Libraries |
Oracle |
Oracle JD Edwards EnterpriseOne Interoperability Libraries C:\E920\system\Classes\ |
|
Deploying the Cantara JDE Objects to Your JD Edwards Server
To deploy the Cantara JDE objects
In this example installation, only the minimum required components will be deployed. To utilise Rinami Cantara mobile applications you will be required to install additional JD Edwards components from the Cantara Portal. Please refer to your implementation partner as to which components should be deployed. The same method can be utilised for each module.
It is assumed that the person completing the Cantara JD Edwards Components installation has experience working within the JD Edwards Object Management Workbench and is familiar with the process of defining, building and deploying JD Edwards packages.
The steps required to deploy the Cantara JD Edwards Components to your Oracle JD Edwards EnterpriseOne system are:
-
Create an OMW project and promote it so that new objects can be created within the project. The project can be named as per your corporate naming standard. If there is no preferred standard then the project can be named as per the PAR file, so for example, the core components projects would be named CNTR_CORE. The most common configuration would be to promote the project to status 21 and create the objects within the DV environment.
-
Within OMW, select the new project and click the Restore action.

-
Select Yes to use a ZIP file and then choose the Cantara JD Edwards Components file from your download location. An example of the file name would be PRJ_CNTR_CORE_E920_5.0.5.par
-
Ensure that all of the objects within the project are checked in.
-
Complete a Full package build and deployment to any enterprise servers that will be connected to Cantara for each environment required.
-
Once the package is deployed, go back into OMW and generate the tables included in the project
-
You can promote and deploy the objects to each required path code using the normal JD Edwards OMW and deployment server process.
Cantara is an Oracle Validated Integration and uses the system code Q35. As the base components introduce a new code library within Oracle JD Edwards EnterpriseOne a full build is required to initialise this library. Subsequent updates and enhancements may be deployed via an update package in certain circumstances. Due to the way that Oracle JD Edwards caches method signatures, it is generally recommended a full package build is deployed with each update to the Cantara components.
Refer to the JD Edwards Objects and Configuration topic for more details.
Configuring the JD Edwards Enterprise Server
To ensure the correct operation of the Cantara Integration Platform you must ensure that all relevant kernels and components on the target Oracle JD Edwards EnterpriseOne Enterprise servers are configured correctly. This should be completed using Server Manager but can also be done via direct edit of the JDE.INI if that is standard policy. Updates to the Enterprise servers should only be completed by an experienced JD Edwards System Administrator that understands Configurable Network Computing (CNC) activities.
Specific configuration elements to be reviewed/updated are:
List Retrieval Engine

The Output Location is where temporary query results are written prior to being returned the Cantara via the XMLList engine. You should check that this path is correct, the defined folder exists and that the user that the JD Edwards server kernels are running as have read and write permissions to it. It is recommended that this folder be monitored and any expired query results that have not been automatically removed are deleted.
The Repository Size is the percentage of free disk space that the list engine will allocate to temporary results. If this limit is exceeded then the list engine will fail to return results to the Cantara. It is important to ensure that the location selected output location has sufficient free disk space to handle both the maximum size of expected queries but also takes into account the likely number of concurrent queries being executed by users. This setting only takes effect if disk monitoring is enabled.
Use Disk Monitor enables disk monitoring. It is recommended that this enabled to ensure that query activities to do not directly impact the operation of the JD Edwards enterprise server.
XML Lookup
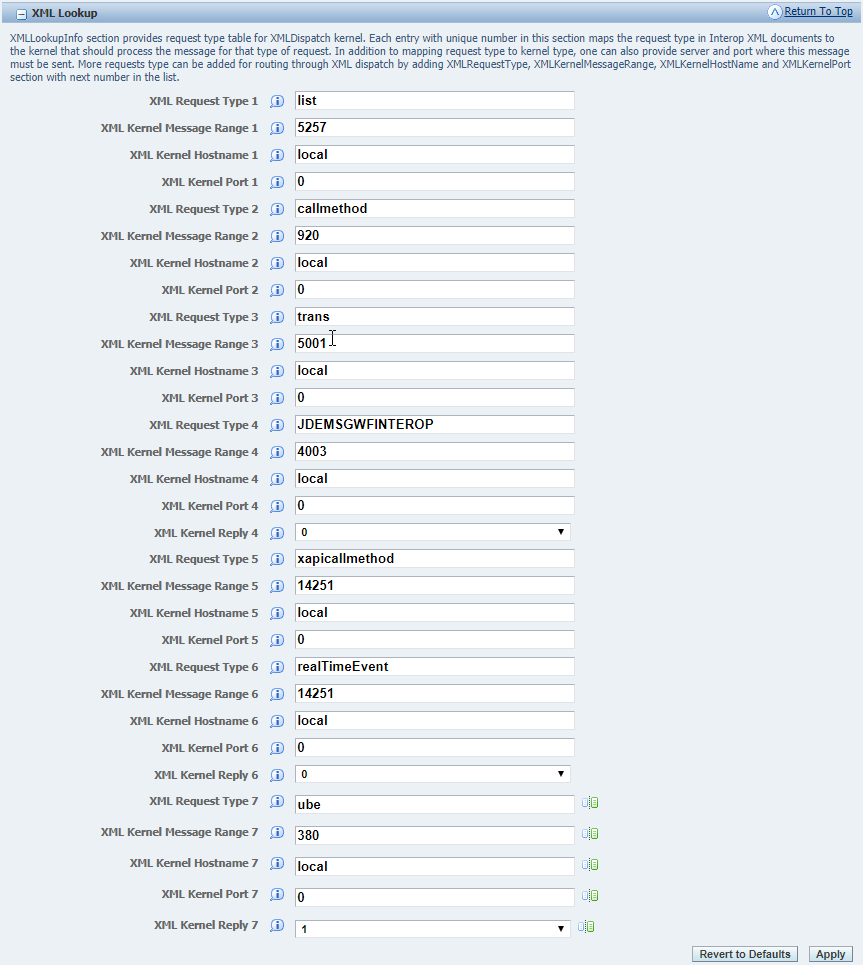
Generally the XML List settings do not need to be updated from the default except for the last setting which is XML Kernel Reply 7. This must be set to 1 (enabled) to ensure that UBE submission through Cantara operates correctly.
Kernel Definitions
There are a number of kernels required to enable integration to JD Edwards. Changes kernel definitions can significantly impact the performance and operation of the JD Edwards Enterprise server and therefore should be only made after consideration for all of the factors involved.
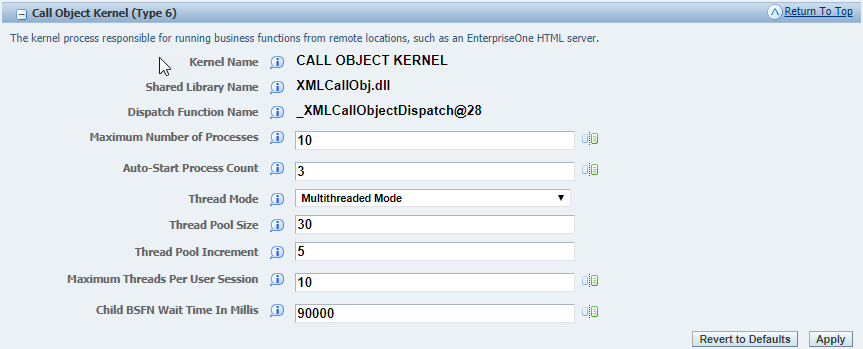
The Call Object Kernel is central to the operation of the enterprise servers. Generally this will not require changes however if you are expecting a high number of concurrent users to be accessing JD Edwards through the Cantara platform then it may be necessary to increase the maximum number of kernels allowed to support the increased load.
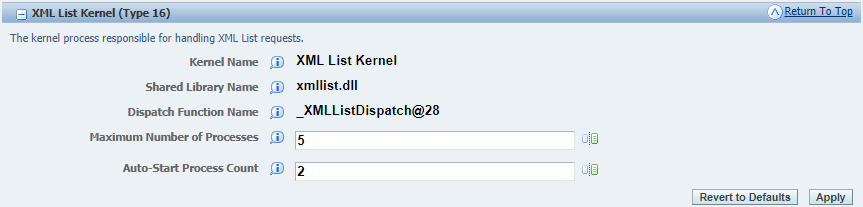
The XML List Kernel will process query requests from Cantara. These kernels are not multi-threaded and are shared by concurrent users and therefore sufficient resources should be provided to prevent queuing of query requests.
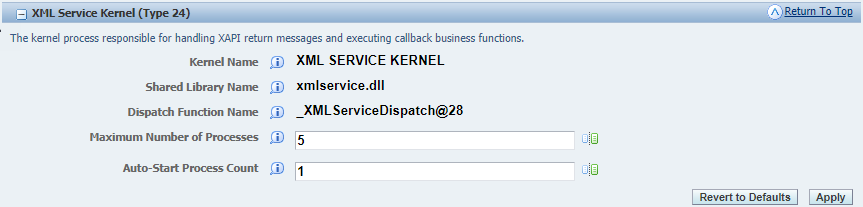
The XML Service Kernel is responsible for receiving and routing service requests from Cantara. If you experience timeouts of execution of functions then it may be that there are insufficient XML Service kernels available to process the volume of requests.
Further details of the elements to be modified are available at JD Edwards Objects and Configuration under JDE.INI settings.
These changes must be done to each JD Edwards Enterprise or Batch server that will be integrated to via Cantara. To apply any changes made to the enterprise server configuration, the relevant services will need to be restarted.
Creating the required installation folders
This is an example configuration for a full local install of the Cantara Integration Platform with all components installed under a single parent directory of C:\Cantara. Please refer to your internal guidelines with regards to installation paths and folders and adjust as necessary.
The following folders should be created:
|
Folder |
Purpose |
|---|---|
|
C:\Cantara\Java |
Oracle JDK installation path |
|
C:\Cantara\MySQL |
Oracle MySQL installation path |
|
C:\Cantara\MongoDB |
MongoDB installation path |
|
C:\Cantara\Test |
Cantara Test farm components |
|
C:\Cantara\Test\Worker |
Cantara Test Access Server (Worker) components |
|
C:\Cantara\Test\Worker\etc |
Cantara Test Access Server configuration |
|
C:\Cantara\Test\Worker\logs |
Cantara Test Access Server logs |
|
C:\Cantara\Test\Assur |
Cantara Test Assur Server components |
|
C:\Cantara\Test\Assur\etc |
Cantara Test Access Server configuration |
|
C:\CantaraTest\Assur\logs |
Cantara Test Assur Server logs |
|
C:\Cantara\Prod |
Cantara Production farm components |
|
C:\Cantara\Prod\Worker |
Cantara Prod Access Server (Worker) components |
|
C:\Cantara\Prod\Worker\etc |
Cantara Prod Access Server configuration |
|
C:\Cantara\Prod\Worker\logs |
Cantara Prod Access Server logs |
|
C:\Cantara\Prod\Assur |
Cantara Prod Assur Server components |
|
C:\Cantara\Prod\Assur\etc |
Cantara Prod Assur Server configuration |
|
C:\Cantara\Prod\Assur\logs |
Cantara Prod Assur Server logs |
|
C:\Cantara\Console |
Cantara Administration Console components |
|
C:\Cantara\Console\etc |
Cantara Administration Console configuration |
|
C:\Cantara\Console\logs |
Cantara Administration Console logs |
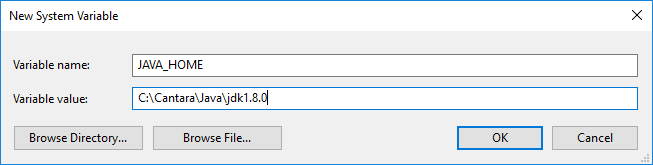
Install Oracle Java SE JDK 1.8.0
Execute the Oracle Java installer.
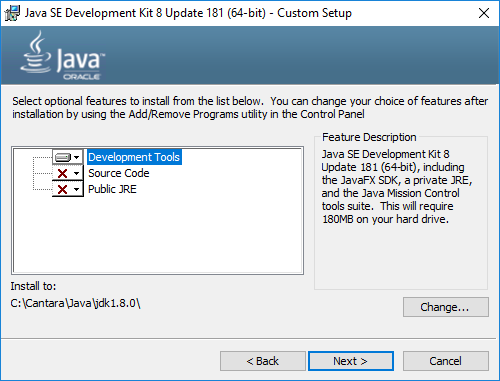
The only required component is the Development Tools. These are to be installed in C:\Cantara\Java\jdk1.8.0.
Install and Configure Oracle MySQL Server
Execute the Oracle MySQL installer.
Select the Custom install option so that you can determine the required components and installation path.
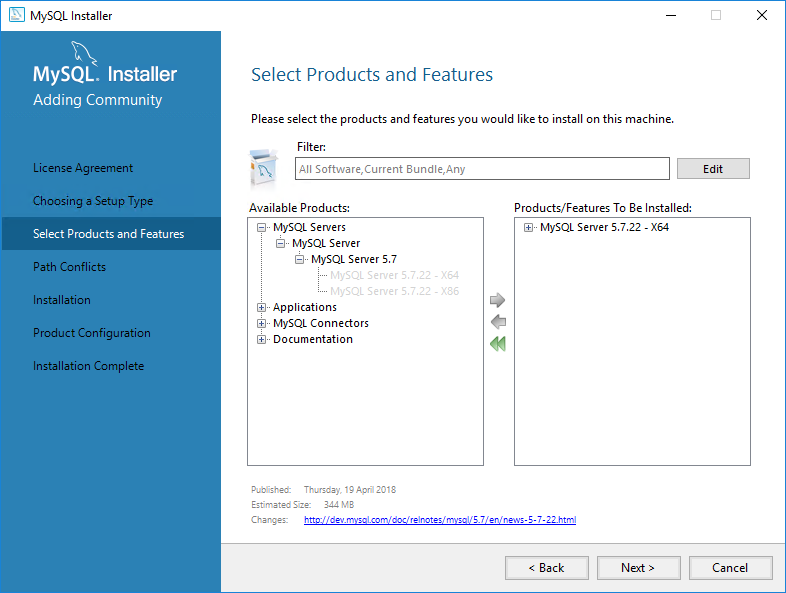
Select the MySQL Server 5.7.22 - X64 edition. You can optionally install the MySQL Workbench if you wish to administer the server directly from within the host machine.
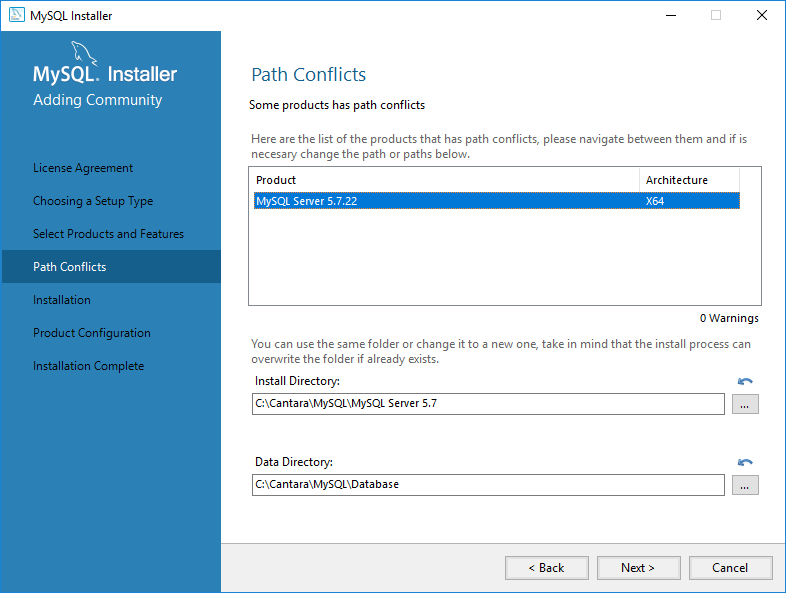
Define the installation and data directories as per your prior setup.
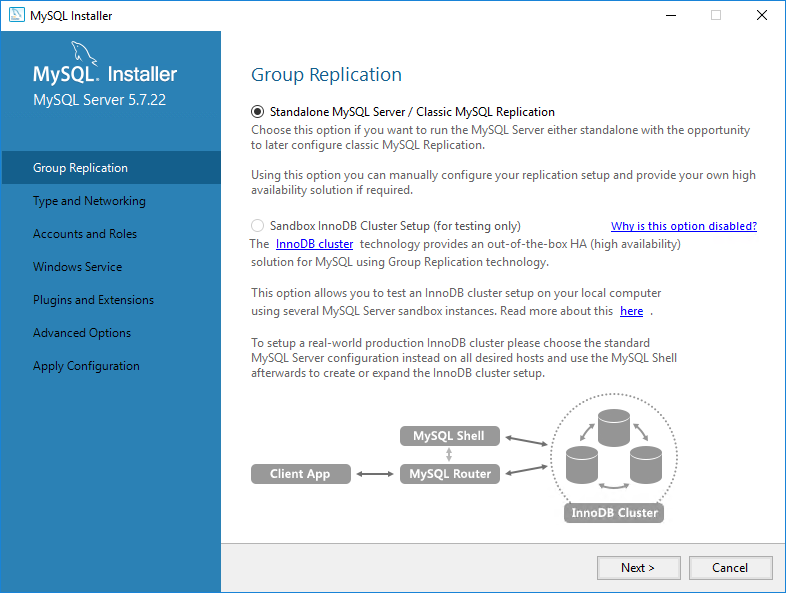
Once the installation is completed you can configure the MySQL server for Cantara. Select Standalone MySQL Server.
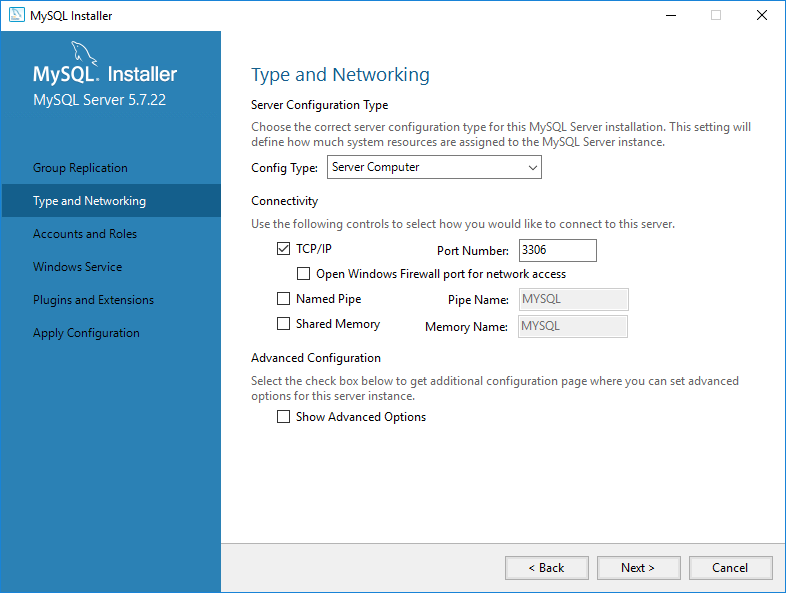
Set the Config Type to Server Computer. You can leave the other settings as per their defaults. If you wish to access the database server remotely and have Windows Firewall enable then make sure to check the option Open Windows Firewall port for network access.
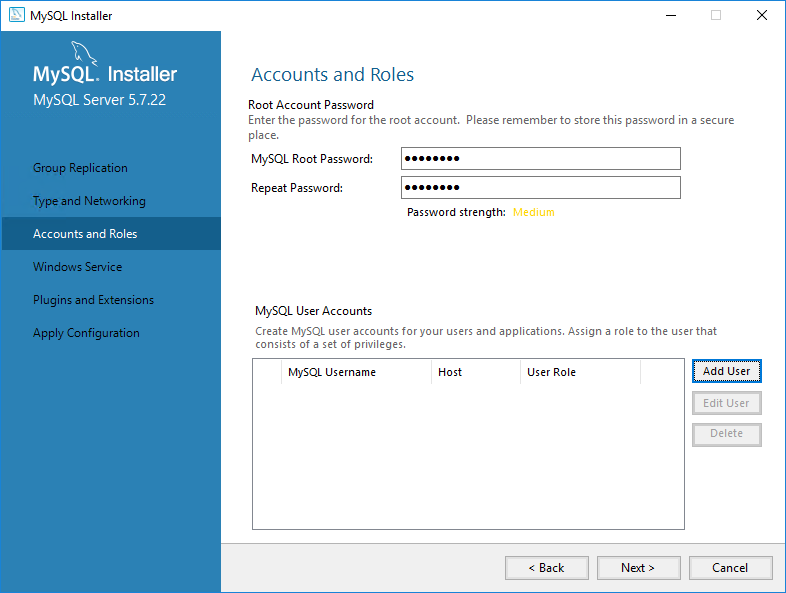
Set a root password for database administration. If you wish to connect to the database from a remote host you will also need to create a User Account with administration rights that is able to connect remotely.
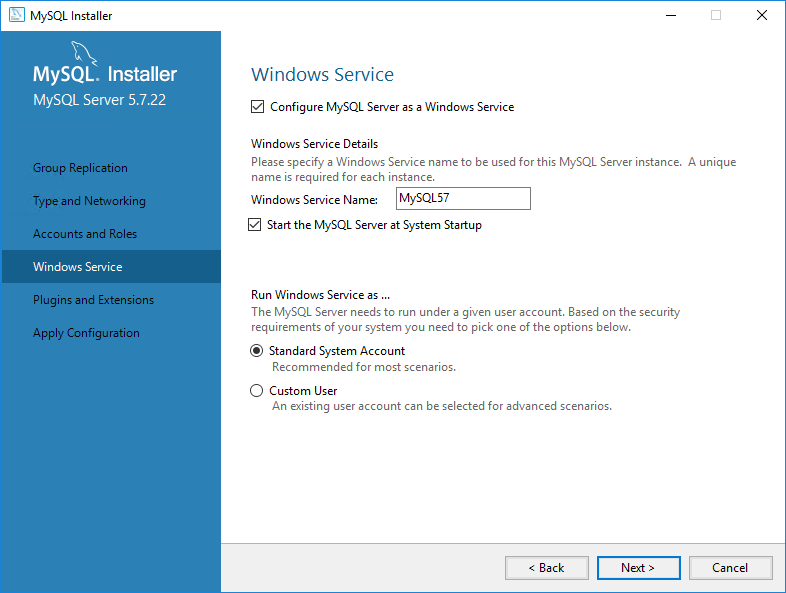
If you want MySQL to run as a service (recommended) then you can configure the requirements for the service. Default options are suitable for Cantara.
Database Creation
As we will be installing two farms you will need to define at least two databases as the data for each farm is defined at database level. You can optionally install a database per component and per farm which is the configuration described below. The benefit of separating the databases is that you can then relocate each component to different database servers (eg production and non-production) as required. The following databases will be created:
|
Database Name |
Purpose |
Character Set |
Collation |
|---|---|---|---|
|
cntr_access_test |
Cantara Access Server Test Farm |
utf8 |
utf8_bin |
|
cntr_access_prod |
Cantara Access Server Production Farm |
utf8 |
utf8_bin |
|
cntr_assur_test |
Cantara Assur Server Test Farm |
utf8 |
utf8_bin |
|
cntr_assur_prod |
Cantara Assur Server Production Farm |
utf8 |
utf8_bin |
|
cntr_admin_prod |
Cantara Administration Console |
utf8 |
utf8_bin |
The SQL script to create a Cantara database user and the above databases would be:
CREATE USER 'cantara'@'localhost' IDENTIFIED BY 'PASSWORD';

CREATE SCHEMA `cntr_access_test` DEFAULT CHARACTER SET utf8 COLLATE utf8_bin;
CREATE SCHEMA `cntr_access_prod` DEFAULT CHARACTER SET utf8 COLLATE utf8_bin;
CREATE SCHEMA `cntr_assur_test` DEFAULT CHARACTER SET utf8 COLLATE utf8_bin;
CREATE SCHEMA `cntr_assur_prod` DEFAULT CHARACTER SET utf8 COLLATE utf8_bin;
CREATE SCHEMA `cntr_admin_prod` DEFAULT CHARACTER SET utf8 COLLATE utf8_bin;

GRANT ALL ON `cntr_access_test`.* TO 'cantara'@'localhost';
GRANT ALL ON `cntr_access_prod`.* TO 'cantara'@'localhost';
GRANT ALL ON `cntr_assur_test`.* TO 'cantara'@'localhost';
GRANT ALL ON `cntr_assur_prod`.* TO 'cantara'@'localhost';
GRANT ALL ON `cntr_admin_prod`.* TO 'cantara'@'localhost';
Once the database schemas have been created you can then run the appropriate installation script again each as required.
|
Cantara Component |
Database Script |
|---|---|
|
Cantara Access Server |
Unknown Attachment |
|
Cantara Assur Server |
Unknown Attachment |
|
Cantara Administration Console |
Unknown Attachment |
Install and Configure MongoDB Server (Optional)
This is an optional component which can be deployed to provide detailed audit and transaction history from the Cantara Administration Console
Execute the MondoDB installer and select Custom Setup.
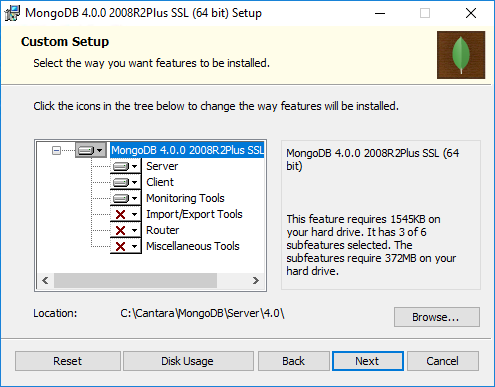
Select the required components and set the installation path. Please refer to the MongoDB documentation regarding the installation requirements. You may choose to install the additional components if required for you deployment.
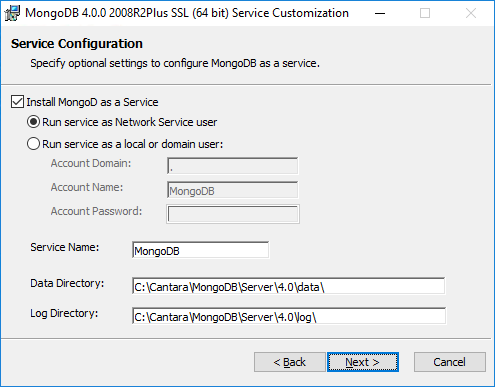
Configure the service information so that the MongoDB service starts as a service within Windows.
Install Apache Tomcat 9.0 servers
This documentation provides an example installation of Apache Tomcat 9.0 on a Windows 2016 Server system. Please refer to the Apache Tomcat documentation relevant to your operating environment for further details and options with regards to the installation and configuration of the Apache Tomcat server.
As we are running both a production and test farm on the same Windows machine, we will require two instances of Apache Tomcat to be installed.
Extract the Apache Tomcat archive to C:\Cantara\Test\apache-tomcat-9.0 and to C:\Cantara\Prod\apache-tomcat-9.0
Set the JAVA_HOME environment variable within Windows. This should be configured as a System variable and set to C:\Cantara\Java\jdk1.8.0
Before performing and configuration, run the startup script to initialise the default server folders. This can be found at $CATALINA_HOME\bin\startup.bat (where $CATALINA_HOME is the base install path of the Apache Tomcat server) and will launch a new console window showing the status of the startup. Check that no errors exist on initialisation.
If your Cantara system will be accessible from outside of the network is it recommended that the default Apache Tomcat applications are removed. To do this go to the $CATALINE_HOME\webapps folder and remove all of the sub-folders. This will mean that all configuration/deployment will need to be done through file edits.
Extract the MySQL Java Connector archive and copy the jdbc driver JAR into the $CATALINA_HOME\lib folder. The file will be named mysql-connector-java-8.0.11.jar. Also copy the javax.mail.jar file into the same Apache Tomcat library folder.
Once each of the web applications have been deployed you can complete the configuration of the Apache Tomcat instances.
Deploy the Cantara Assur Servers
To deploy the Test Farm Cantara Assur Server
-
Extract the Assur application archive file into the folder C:\Cantara\Test\Assur\assur.war.
-
Copy the context.xml from within the C:\Cantara\Test\Assur\assur.war\META-INF folder into the C:\Cantara\Test\apache-tomcat-9.0\conf\Catalina\localhost folder. The file should be renamed to match the context that will be used for the deploy. By default this would be assur.xml.
-
The context file includes the context name to be used for the deployment and example connection settings for database and email JNDI definitions. Update the file to match web archive installation path and the database created for the test Assur instance.
XML<?xml version="1.0" encoding="UTF-8"?> <Context docBase="C:\Cantara\Test\Assur\assur.war"> <Manager pathname="" /> <Resources cachingAllowed="true" cacheMaxSize="100000" /> <Resource auth="Container" driverClassName="com.mysql.jdbc.Driver" maxTotal="100" maxIdle="30" maxWaitMillis="10000" name="jdbc/TestAssur" password="PASSWORD" type="javax.sql.DataSource" url="jdbc:mysql://localhost:3306/cntr_assur_test" username="cantara"/> </Context>
To deploy the Prod Farm Cantara Assur Server
-
Extract the Assur application archive file into the folder C:\Cantara\Prod\Assur\assur.war.
-
Copy the context.xml from within the C:\Cantara\Prod\Assur\assur.war\META-INF folder into the C:\Cantara\Prod\apache-tomcat-9.0\conf\Catalina\localhost folder. The file should be renamed to match the context that will be used for the deploy. By default this would be assur.xml.
-
The context file includes the context name to be used for the deployment and example connection settings for database and email JNDI definitions. Update the file to match web archive installation path and the database created for the production Assur instance.
XML<?xml version="1.0" encoding="UTF-8"?> <Context docBase="C:\Cantara\Prod\Assur\assur.war"> <Manager pathname="" /> <Resources cachingAllowed="true" cacheMaxSize="100000" /> <Resource auth="Container" driverClassName="com.mysql.jdbc.Driver" maxTotal="100" maxIdle="30" maxWaitMillis="10000" name="jdbc/ProdAssur" password="PASSWORD" type="javax.sql.DataSource" url="jdbc:mysql://localhost:3306/cntr_assur_prod" username="cantara"/> </Context>
Deploying the Cantara Access Servers
To deploy the Test Farm Cantara Access Server
-
Extract the Access application archive file into the folder C:\Cantara\Test\Worker\worker.war.
-
Copy the context.xml from within the C:\Cantara\Test\Worker\worker.war\META-INF folder into the C:\Cantara\Test\apache-tomcat-9.0\conf\Catalina\localhost folder. The file should be renamed to match the context that will be used for the deploy. By default this would be cantara.xml.
-
The context file includes the context name to be used for the deployment and example connection settings for database and email JNDI definitions. Update the file to match web archive installation path and the database created for the test Access instance.
XML<?xml version="1.0" encoding="UTF-8"?> <Context docBase="C:\Cantara\Test\Worker\worker.war"> <Manager pathname="" /> <Resources cachingAllowed="true" cacheMaxSize="100000" /> <Resource auth="Container" driverClassName="com.mysql.jdbc.Driver" maxTotal="100" maxIdle="30" maxWaitMillis="10000" name="jdbc/TestWorker" password="PASSWORD" type="javax.sql.DataSource" url="jdbc:mysql://localhost:3306/cntr_access_test" username="cantara"/> <Resource auth="Container" mail.debug="false" mail.smtp.auth="false" mail.smtp.host="smtp.rinami.com" mail.transport.protocol="smtp" name="mail/Rinami" global="mail/Rinami" type="javax.mail.Session"/> </Context>You can optionally include a definition for an SMTP mail server. This will enable the Cantara Integration Platform to send email messages either via REST service calls or as part of the Advanced Job Scheduler functionality.
-
Copy the required Oracle JD Edwards Connector library files into the folder C:\Cantara\Test\Worker\worker.war\WEB-INF\lib
-
Extract the contents of the AIS_Client_Java_API archive and copy the AIS_Client_2.0.jar file into the folder C:\Cantara\Test\Worker\worker.war\WEB-INF\lib.
If your tools release is older than 9.2.2.0 then you should use the AIS_Client.jar file. If you do not wish to deploy AIS support then you do not need the client jar.
To deploy the Prod Farm Cantara Access Server
-
Extract the Access application archive file into the folder C:\Cantara\Prod\Worker\worker.war.
-
Copy the context.xml from within the C:\Cantara\Prod\Worker\worker.war\META-INF folder into the C:\Cantara\Prod\apache-tomcat-9.0\conf\Catalina\localhost folder. The file should be renamed to match the context that will be used for the deploy. By default this would be cantara.xml.
-
The context file includes the context name to be used for the deployment and example connection settings for database and email JNDI definitions. Update the file to match web archive installation path and the database created for the production Access instance.
XML<?xml version="1.0" encoding="UTF-8"?> <Context docBase="C:\Cantara\Prod\Worker\worker.war"> <Manager pathname="" /> <Resources cachingAllowed="true" cacheMaxSize="100000" /> <Resource auth="Container" driverClassName="com.mysql.jdbc.Driver" maxTotal="100" maxIdle="30" maxWaitMillis="10000" name="jdbc/ProdWorker" password="PASSWORD" type="javax.sql.DataSource" url="jdbc:mysql://localhost:3306/cntr_access_prod" username="cantara"/> <Resource auth="Container" mail.debug="false" mail.smtp.auth="false" mail.smtp.host="smtp.rinami.com" mail.transport.protocol="smtp" name="mail/Rinami" global="mail/Rinami" type="javax.mail.Session"/> </Context>You can optionally include a definition for an SMTP mail server. This will enable the Cantara Integration Platform to send email messages either via REST service calls or as part of the Advanced Job Scheduler functionality.
-
Copy the required Oracle JD Edwards Connector library files into the folder C:\Cantara\Prod\Worker\worker.war\WEB-INF\lib
-
Extract the contents of the AIS_Client_Java_API archive and copy the AIS_Client_2.0.jar file into the folder C:\Cantara\Prod\Worker\worker.war\WEB-INF\lib.
If your tools release is older than 9.2.2.0 then you should use the AIS_Client.jar file. If you do not wish to deploy AIS support then you do not need the client jar.
Deploying the Cantara Administration Console
To deploy the Cantara Administration Console Server
-
Extract the Console application archive file into the folder C:\Cantara\Console\console.war.
-
Copy the context.xml from within the C:\Cantara\Console\console.war\META-INF folder into the C:\Cantara\Prod\apache-tomcat-9.0\conf\Catalina\localhost folder. The file should be renamed to match the context that will be used for the deploy. By default this would be console.xml.
-
The context file includes the context name to be used for the deployment and example connection settings for database and email JNDI definitions. Update the file to match web archive installation path and the database created for the production Assur instance.
XML<?xml version="1.0" encoding="UTF-8"?> <Context docBase="C:\Cantara\Console\console.war"> <Manager pathname="" /> <Resources cachingAllowed="true" cacheMaxSize="100000" /> <Resource auth="Container" driverClassName="com.mysql.jdbc.Driver" maxTotal="100" maxIdle="30" maxWaitMillis="10000" name="jdbc/Console" password="PASSWORD" type="javax.sql.DataSource" url="jdbc:mysql://localhost:3306/cntr_admin_prod" username="cantara"/> </Context>
Configuring the Apache Tomcat 9.0 Test Farm Server
Install Apache Tomcat as a windows service by running the command
C:\Cantara\Test\apache-tomcat-9.0\bin\service.bat install Test
This will create a Windows service named Apache Tomcat 9.0 Cantara. If you are using Windows SMB shares for JD Edwards Media Object storage, the service account for this Windows service should be changed to a domain account that has read/write access to the media object queue folders. The service should also be set to delayed autostart so that it launches after the pre-requisite database services have started.
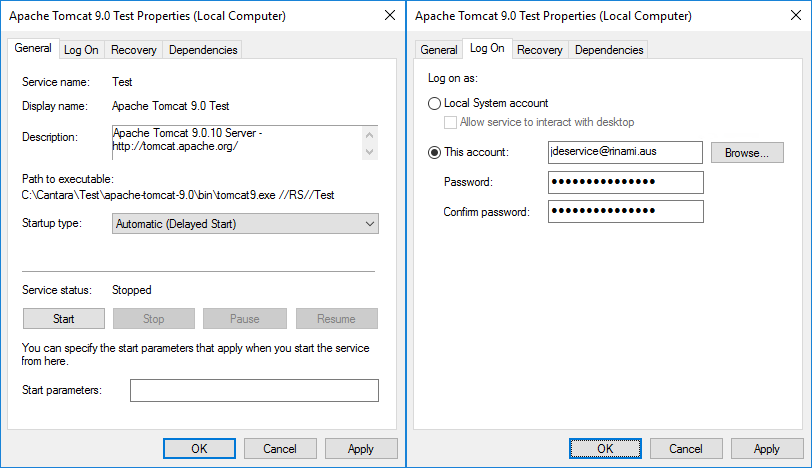
Configure the Apache Tomcat server using the tomcat9w.exe configuration tool
C:\Cantara\Test\apache-tomcat-9.0\bin\tomcat9w.exe //ES//Test
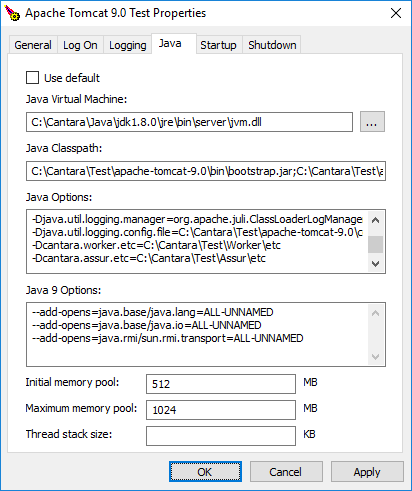
Update the Java properties to add the following Java Options:
-Dcantara.worker.etc=C:\Cantara\Test\Worker\etc
-Dcantara.assur.etc=C:\Cantara\Test\Assur\etc
Change the Initial memory pool to 512MB and the Maximum memory pool to 1024MB.
As there will be two instances of Apache Tomcat running on a single host, you must reconfigure one instance to use different ports. The following changes should be made to the C:\Cantara\Test\apache-tomcat-9.0\conf\server.xml file:
<Server port="8005" shutdown="SHUTDOWN">
changed to
<Server port="8105" shutdown="SHUTDOWN">


<Connector port="8080" protocol="HTTP/1.1"
               connectionTimeout="20000"
               redirectPort="8443" />
changed to
<Connector port="8180" protocol="HTTP/1.1"
               connectionTimeout="20000"
               redirectPort="8543" />


<Connector port="8009" protocol="AJP/1.3" redirectPort="8443" />
changed to
<Connector port="8109" protocol="AJP/1.3" redirectPort="8443" />
Configuring the Apache Tomcat 9.0 Production Farm Server
Install Apache Tomcat as a windows service by running the command
C:\Cantara\Prod\apache-tomcat-9.0\bin\service.bat install Prod
This will create a Windows service named Apache Tomcat 9.0 Cantara. If you are using Windows SMB shares for JD Edwards Media Object storage, the service account for this Windows service should be changed to a domain account that has read/write access to the media object queue folders. The service should also be set to delayed autostart so that it launches after the pre-requisite database services have started.
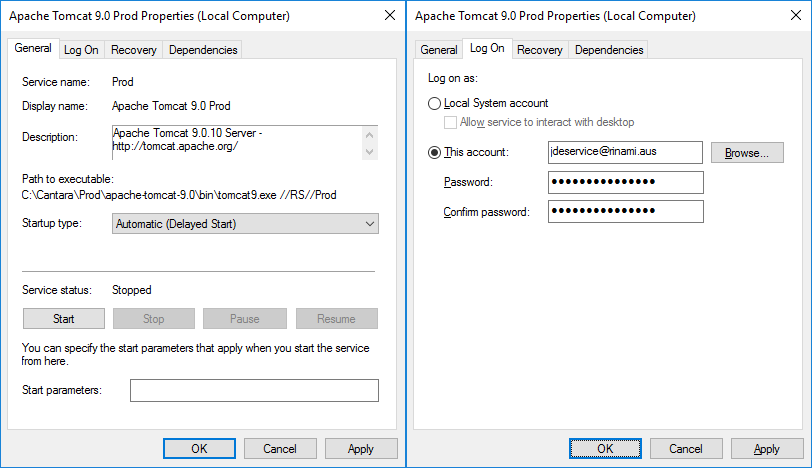
Configure the Apache Tomcat server using the tomcat9w.exe configuration tool
C:\Cantara\Prod\apache-tomcat-9.0\bin\tomcat9w.exe //ES//Prod
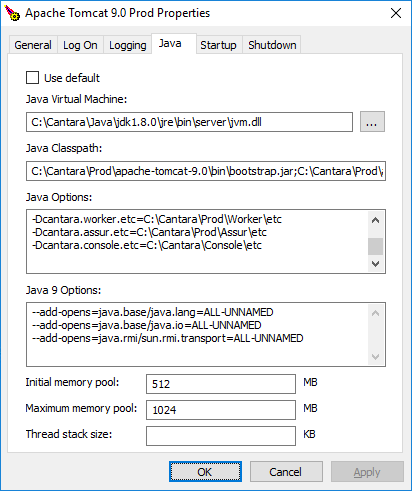
Update the Java properties to add the following Java Options:
-Dcantara.worker.etc=C:\Cantara\Prod\Worker\etc
-Dcantara.assur.etc=C:\Cantara\Prod\Assur\etc
-Dcantara.console.etc=C:\Cantara\Console\etc
Change the Initial memory pool to 512MB and the Maximum memory pool to 1024MB.
Verify Service Installation
Start the Test and Prod Apache Tomcat services through the Windows Service Management Console. The services should start cleanly and logs should be clear of errors. Check the following log files for errors:
-
C:\Cantara\Prod\apache-tomcat-9.0\logs\catalina.yyyy-mm-dd.log
-
C:\Cantara\Test\apache-tomcat-9.0\logs\catalina.yyyy-mm-dd.log
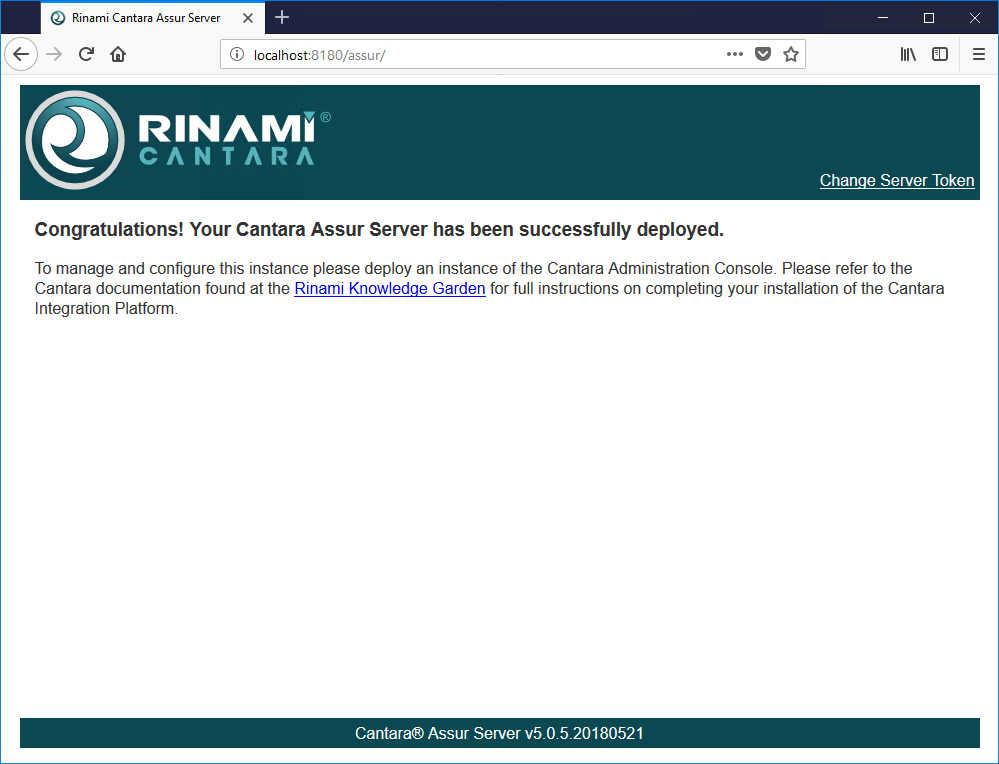
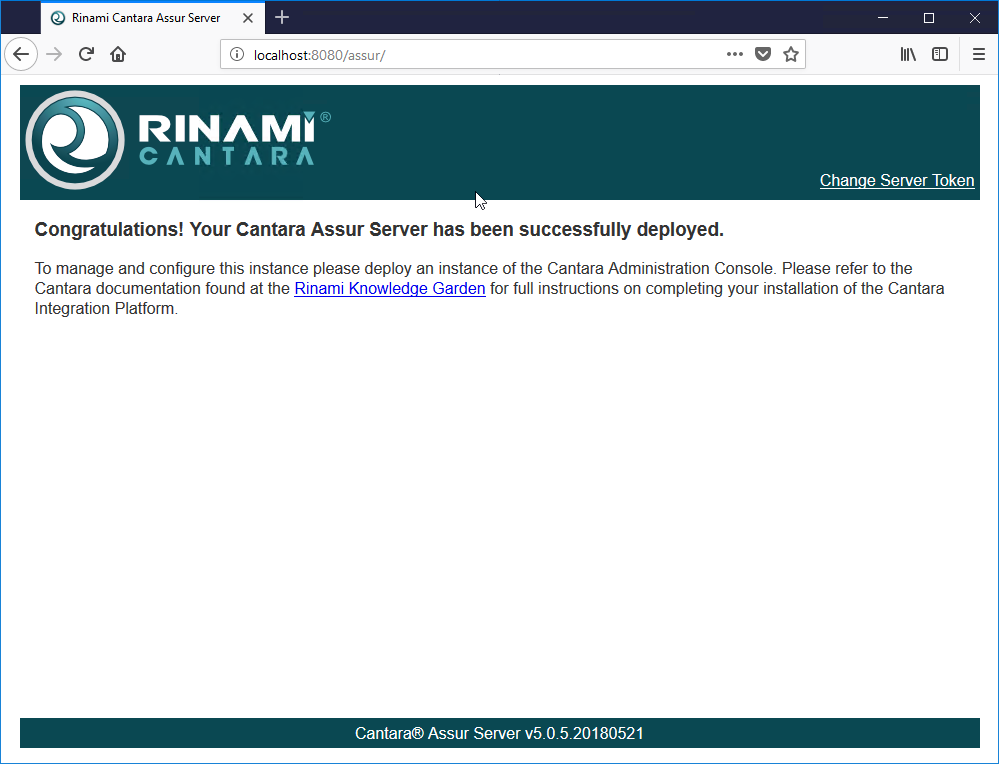
Verify Landing Pages and Update Server Tokens
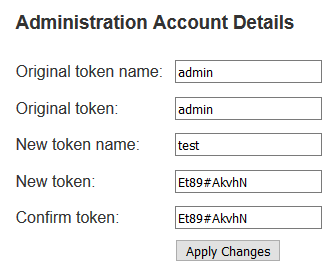
To control administration access between components, credentials must be set on each of the access server and assur server components. This is accessed through the Change Server Token link in the top right of each component landing page. The default credentials are admin/admin.
Test Farm Cantara Access Server
http://localhost:8180/cantara/

Test Farm Cantara Assur Server
Production Farm Cantara Access Server
http://localhost:8080/cantara/

Production Farm Cantara Assur Server
Cantara Administration Console Server
Configuring the Cantara Administration Console
When you launch the Cantara Administration Console you will be greeted with a login prompt. The default username and password are admin/admin.
Initial configuration must be completed in the following order.
Base Administration Console Configuration
Go to the Administration page and set your Tenant ID and Database JNDI name. Your tenant ID is available from the Cantara Portal at https://portal.cantara.cloud.

|
Field |
Value |
Note |
|---|---|---|
|
Session Timeout |
30 |
How long administration console session remain active with no activity, defaults to 30 minutes |
|
Tenant ID |
Your ID |
Your tenant ID which is available from the Cantara Portal . |
|
Database JNDI Name |
jdbc/Console |
The JNDI named defined within the Web Context file |
|
Database Type |
MYSQL |
The database platform that the administration console database is deployed on |
|
Max Total |
100 |
The maximum number of open connections to Cantara components. This value should only be changed if you are experiencing performance issues administering your farms. |
|
Max per Route |
20 |
The maximum number of open connections to a single Cantara component. This value should only be changed if you are experiencing performance issues administering your farms. |
|
Connection Request Timeout (ms) |
60000 |
How long the administration console server will wait for an available connection to a Cantara component. |
|
Connection Timeout (ms) |
15000 |
How long the administration console will wait for a response from a Cantara component. |
|
Socket Timeout (ms) |
0 |
How long the administration console will wait for a request to complete. 0 is unlimited. |
Define the Test Farm
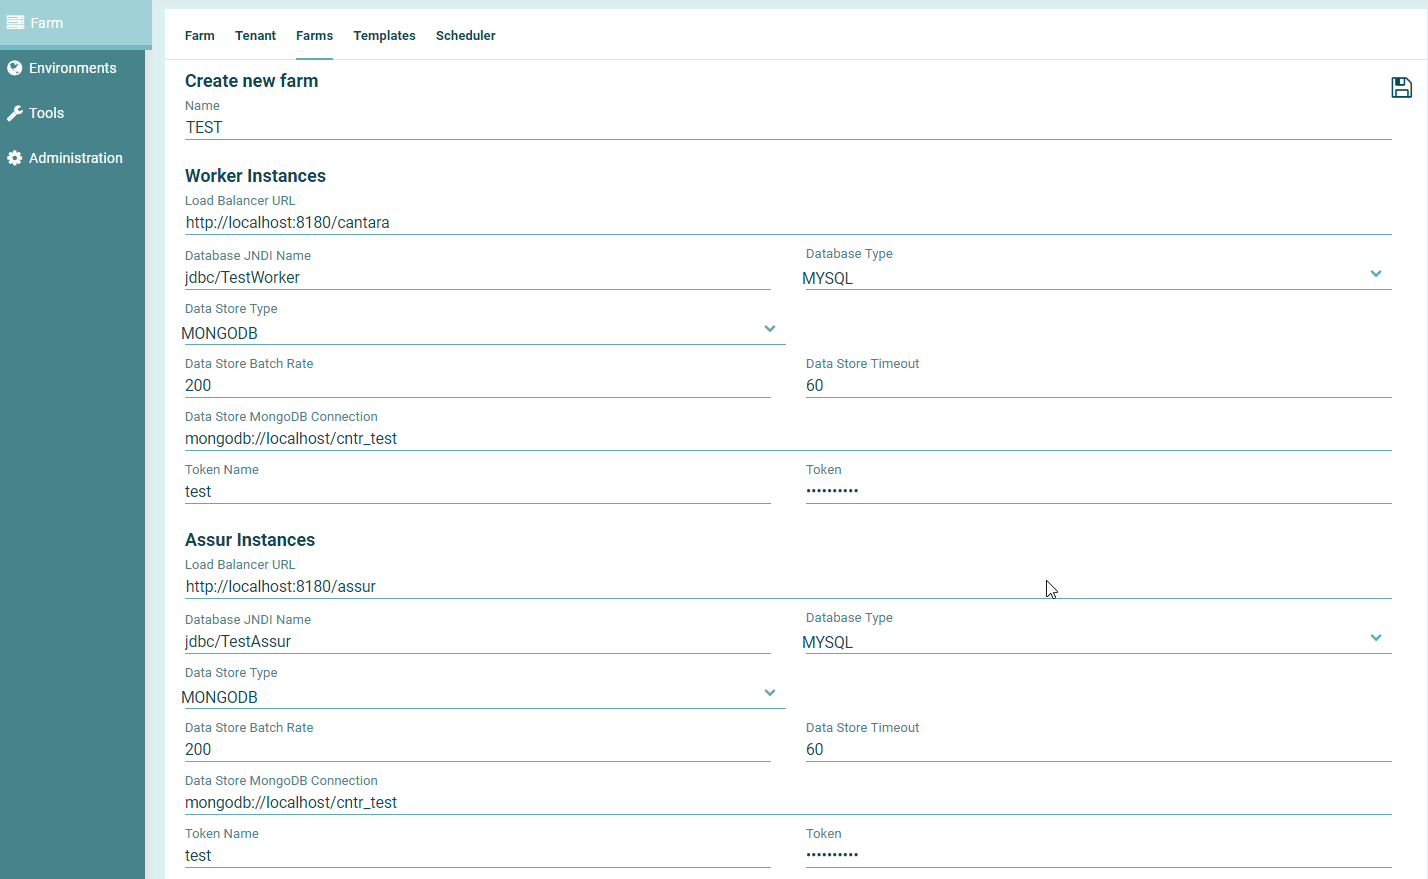
Go to the Farm page and enter the first farm details.
|
Field |
Value |
Note |
|---|---|---|
|
Name |
TEST |
Test farm name |
|
Load Balancer URL |
http://localhost:8180/cantara |
If you are deploying multiple worker instances within a farm, these should be deployed behind a load balancer to support both performance and high availability requirements. In this installation only a single worker instance is being deployed, therefore the load balancer URL will equal the worker URL. |
|
Database JNDI Name |
jdbc/TestWorker |
The database JNDI named defined in the Web Context file for each worker instance. |
|
Database Type |
MYSQL |
The database platform that the administration console database is deployed on |
|
Data Store Type |
MONGODB |
The data storage platform that the audit information will be recorded to |
|
Data Store Batch Rate |
200 |
The number of transactions recorded during each write. If you wish to see instance records per transaction then this can be set to 1 however performance issues may occur due the transaction rate. |
|
Data Store Timeout |
60 |
The maximum amount of time in seconds between transaction writes. This timeout will only be triggered if the transaction rate is less than the Data Store Batch Rate. |
|
Data Store MongoDB Connection |
mongodb://localhost/cntr_test |
The MongoDB connection URI. |
|
Token Name |
test |
The token name defined for the worker components |
|
Token |
Et89#AkvhN |
The token value defined for the worker components |
Define the Assur Instance
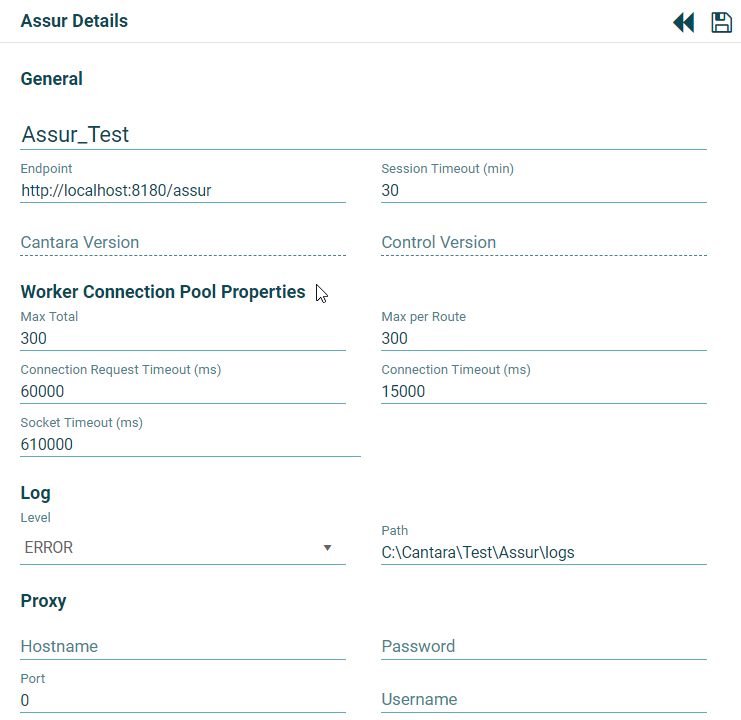
Configure the Assur Instance details.
|
Field |
Value |
Note |
|---|---|---|
|
Name |
Assur_Test |
The Assur instance for the Test farm. This name should be unique. |
|
Endpoint |
http://localhost:8180/assur |
The URL of the Assur instance |
|
Max Total |
300 |
The maximum number of connections from the Assur server to the farm Worker instances |
|
Max per Route |
300 |
The maximum number of connections to a single Worker instance |
|
Connection Request Timeout (ms) |
60000 |
The maximum amount of time the Assur server will wait for an available connection to the worker instances |
|
Connection Timeout (ms) |
15000 |
The maximum amount of time the Assur server will wait for a response from a Worker instance |
|
Socket Timeout (ms) |
610000 |
The maximum amount of time the Assur instance will wait for a transaction to complete. 0 is infinite. This value must not be less than the maximum acceptable transaction time on the JD Edwards server. (eg, the longest running query request) |
|
Log Level |
ERROR |
The logging level, you may wish to set this to DEBUG during installation so that issues are easier to review however this will generate a significant amount of logging information and will impact system performance. |
|
Path |
C:\Cantara\Test\Assur\logs |
The folder to store the Assur log file |
Define the Test Farm Worker Instance
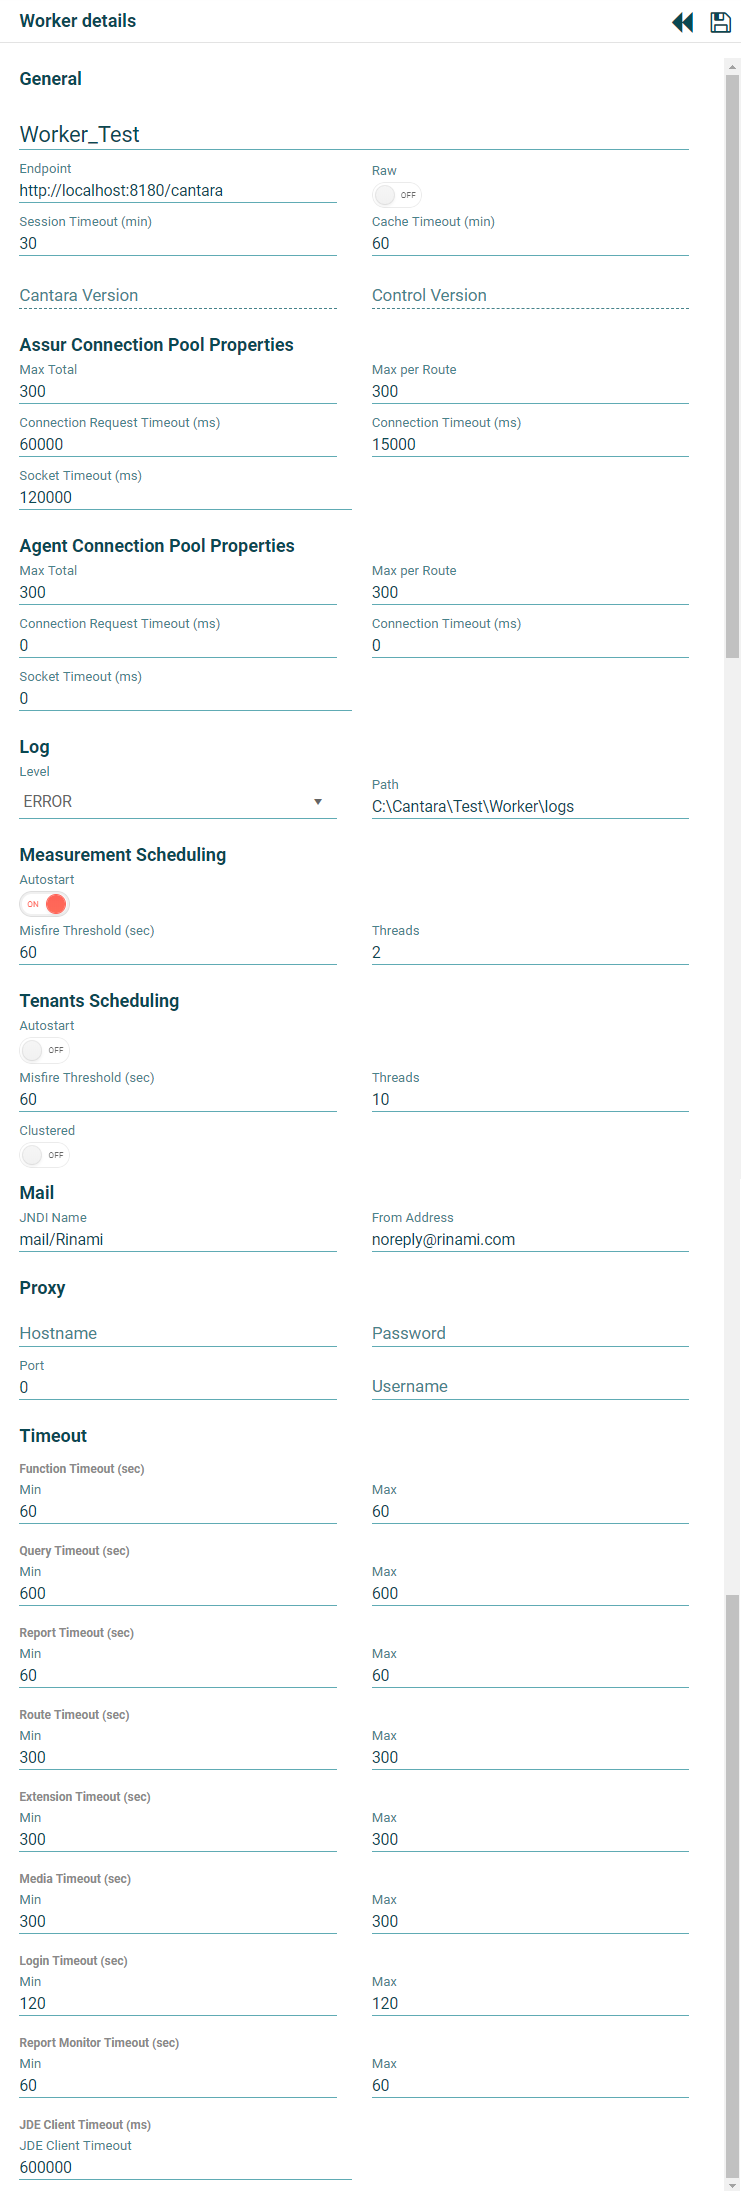
|
Field |
Value |
Note |
|---|---|---|
|
Name |
Worker_Test |
The Worker instance for the Test farm. This name should be unique. |
|
Endpoint |
http://localhost:8180/cantara |
The URL of the Worker instance |
|
Session Timeout (min) |
30 |
The amount of time an idle connection to the Worker instance will remain active in minutes. This will impact the end user experience as they will be required to login each time their session expires. Login may be seamless if the Cantara Environment is configured to support token authentication. |
|
Cache Timeout (min) |
60 |
The interval that the Worker will refresh the data cache. Cantara caches data such as UDC descriptions, address records etc and changes made in JD Edwards may not be reflected within client applications accessing Cantara until the cache refreshes. You can manually force a cache refresh from the Farm management form if required. |
|
Assur Max Total |
300 |
The maximum number of connections to the Assur servers. This value should only be changed if you are experiencing performance issues with activities such as user login or from within the Job Scheduler. |
|
Assur Max per Route |
300 |
The maximum number of connections to a single Assur server. |
|
Assur Connection Request Timeout (ms) |
60000 |
The maximum amount of time the Worker will wait for an available Assur connection in milliseconds. |
|
Assur Connection Timeout (ms) |
15000 |
The maximum amount of time the Worker will wait to establish a connection to the Assur server in milliseconds. |
|
Assur Socket Timeout (ms) |
120000 |
The maximum amount of time the Worker will wait for an active request to an Assur instance to complete. |
|
Agent Connection Pool Properties |
N/A |
This installation does not utilise Cantara Agents so these settings are ignore. |
|
Log Level |
ERROR |
The logging level, you may wish to set this to DEBUG during installation so that issues are easier to review however this will generate a significant amount of logging information and will impact system performance. |
|
Log Path |
C:\Cantara\Test\Worker\logs |
The folder to store the Worker log file |
|
Measurement Scheduling Autostart |
ON |
Enable the measurement scheduler on startup. The measurement scheduler is used to actively monitor performance of the worker and provide statistics on user sessions and behaviour. This should only be enabled if you have configured a data store for the worker. |
|
Measurement Misfire Threshold (sec) |
60 |
The window during which a measurement event can execute after its scheduled execution time. |
|
Measurement Threads |
2 |
The number of simultaneous measurement tasks that can execute. |
|
Tenants Scheduling Autostart |
OFF |
Enable the advanced job scheduler on startup. |
|
Scheduler Misfire Threshold (sec) |
60 |
The window during which a scheduler job can execute after its schedule execution time. |
|
Scheduler Threads |
10 |
The number of simultaneous scheduler jobs that can run. |
|
Scheduler Clustered |
OFF |
Must be set to ON if there is more than one worker instance in the farm running the job scheduler. |
|
Mail JNDI Name |
mail/Rinami |
The JNDI name for the SMTP server defined within the Web Context file for the Worker instance. |
|
From Address |
noreply@example.com |
The reply email address that messages are sent from. The Cantara Worker cannot receive email messages so this should be either a dummy account of a service email address of some form. |
|
Proxy |
N/A |
Only to be configured if the Worker must use a proxy server to access other web services. |
|
Function Timeout (sec) |
Min = 60; Max = 60 |
The timeout for failure on JD Edwards Business Function requests |
|
Query Timeout (sec) |
Min = 600; Max = 600 |
The timeout for failure on JD Edwards Queries |
|
Report Timeout (sec) |
Min = 60; Max = 60 |
The timeout for failure on JD Edwards Reports |
|
Route Timeout (sec) |
Min = 300; Max = 300 |
The timeout for failure on Route execution |
|
Extension Timeout (sec) |
Min = 300; Max = 300 |
The timeout for failure on Extension execution |
|
Media Timeout (sec) |
Min = 300; Max = 300 |
The timeout for failure on Media Upload/Download |
|
Login Timeout (sec) |
Min = 120; Max = 120 |
The timeout for failure on login execution |
|
Report Monitor Timeout (sec) |
Min = 60; Max = 60 |
The timeout for scheduled jobs monitoring |
|
JDE Client Timeout (ms) |
600000 |
The maximum timeout for all JD Edwards requests |
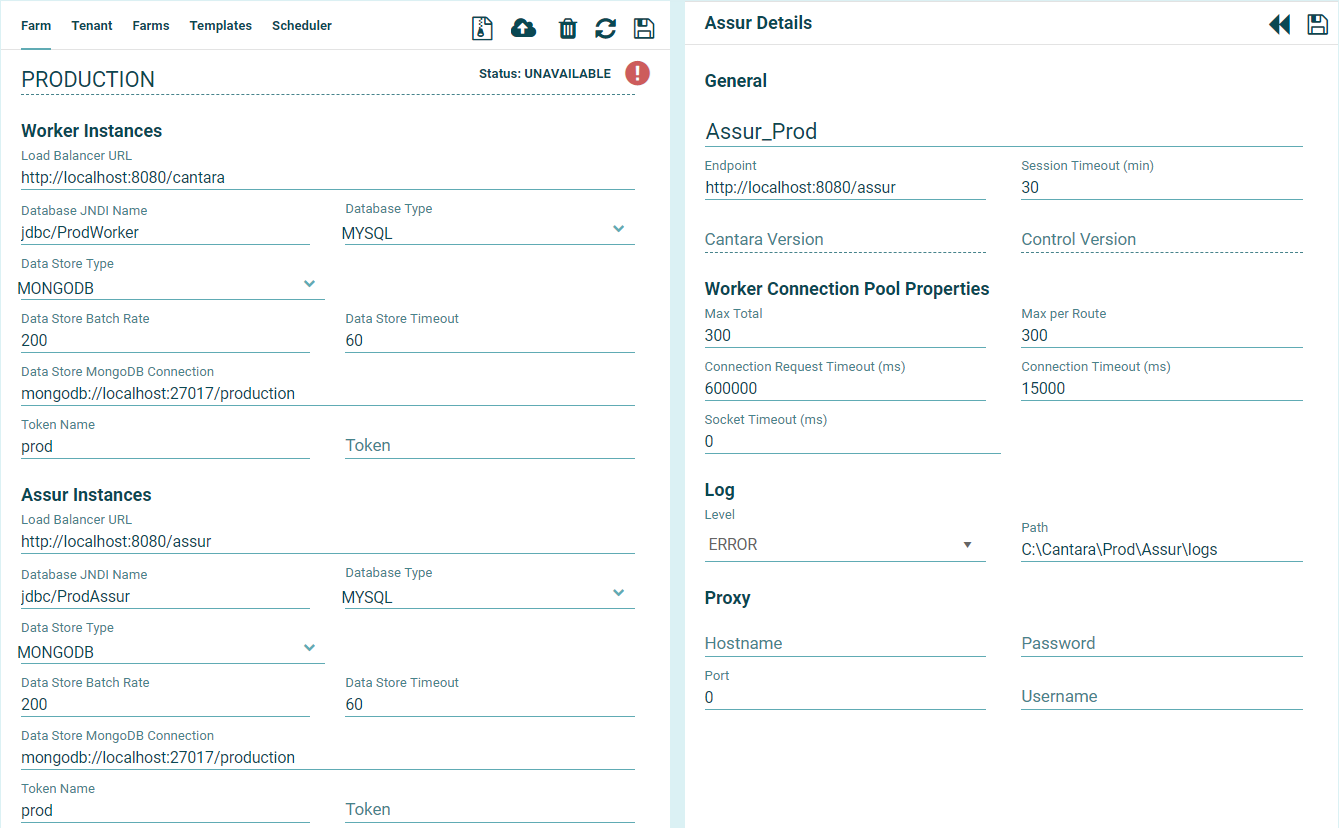
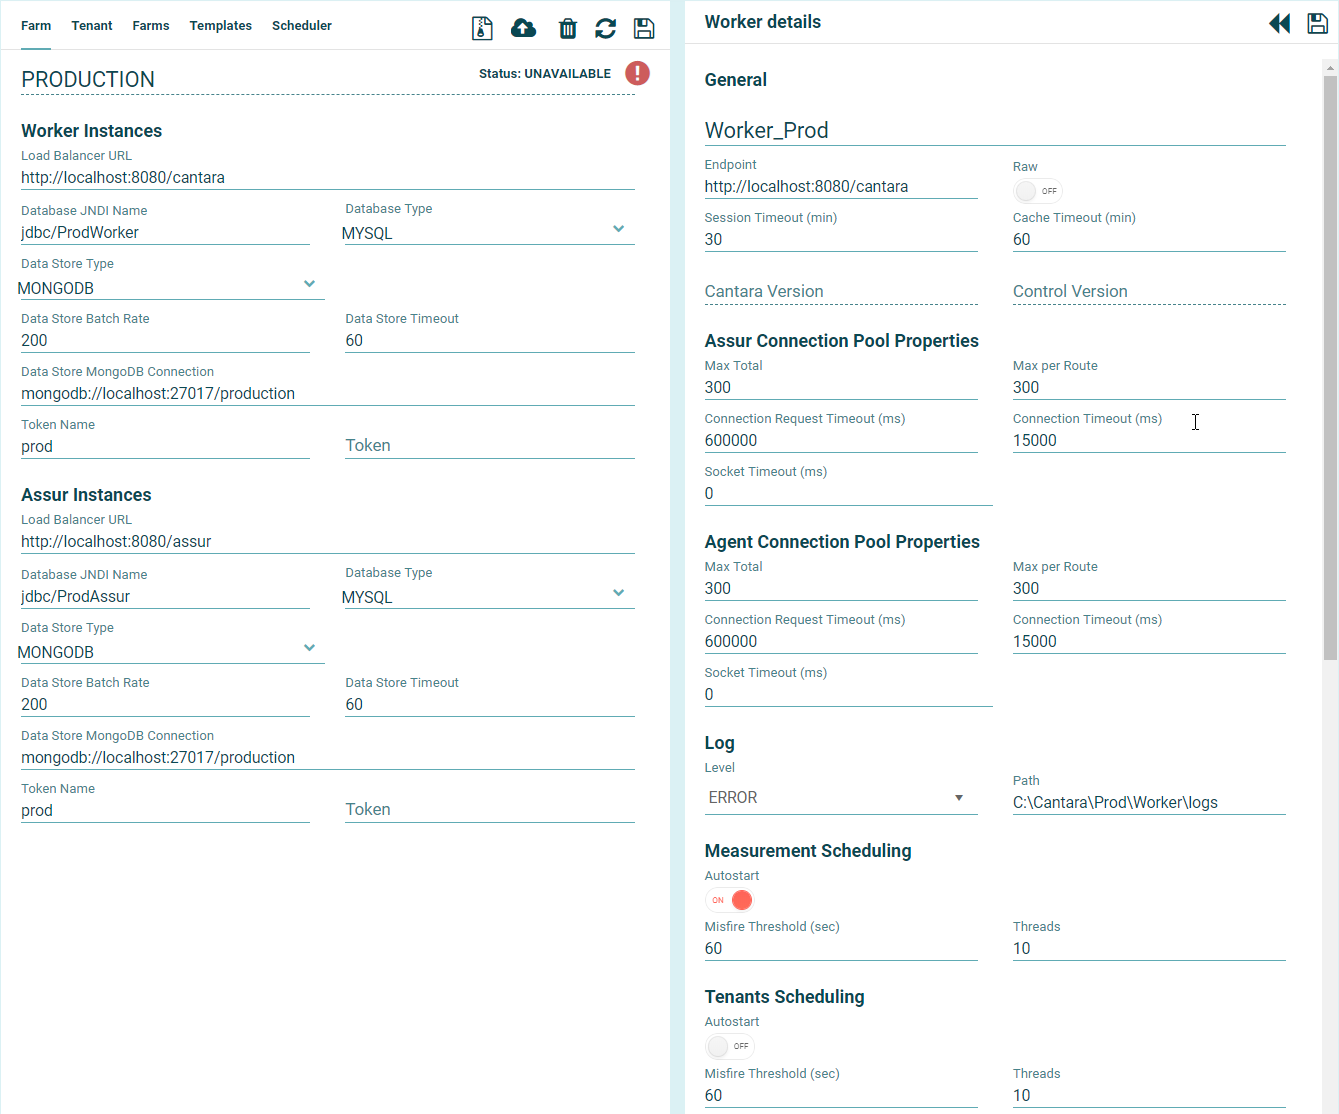
Define the Production Farm
Go to the Farm page and then to the Farms tab to add a new Farm. Follow the same process as the test farm but ensuring the URL endpoints and JNDI entries are correct for Production.
Enter your Enterprise Licence information
You can access your licence information from the Cantara Portal at https://portal.cantara.cloud
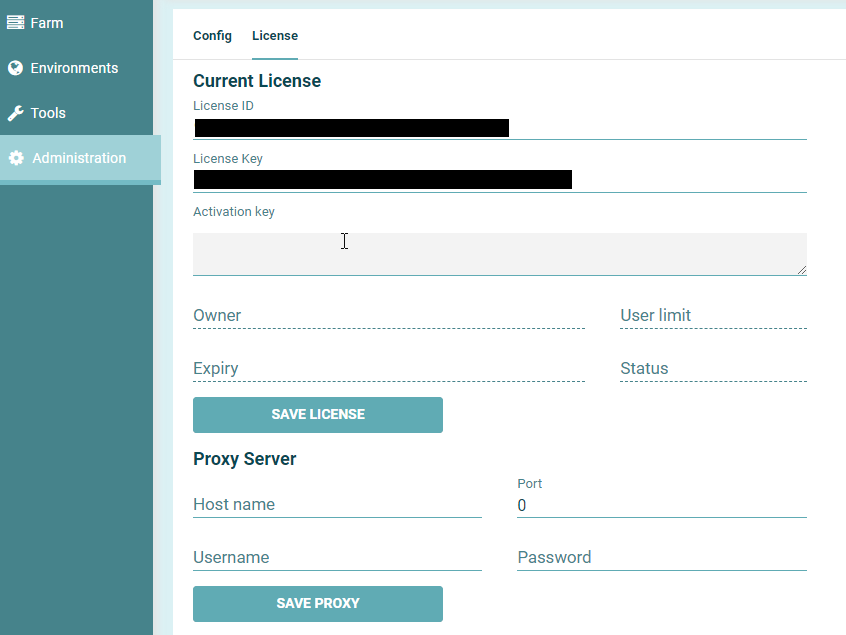
If the licence has applied correctly then you should be able to access the full menu and your Tenant information will be available in the top right header.