Defining an Environment
The following procedure describes all of the configuration settings required to create a new environment.
A new environment may alternatively be created by copying an existing environment. Refer to Copying an Environment for further information.
Adding an Environment
- Open the Components menu group in the navigation panel.
Select the Environments node. A list of the configured environments is displayed:
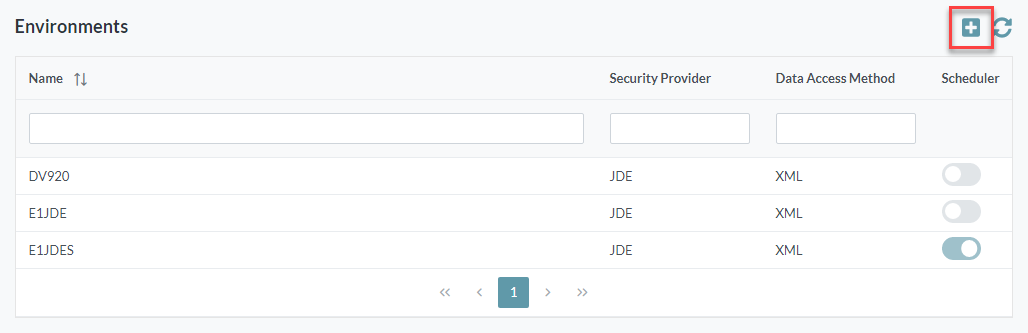
- Click the Add button. The Add Environment screen is displayed.
The configuration items on this screen are described in the sections below.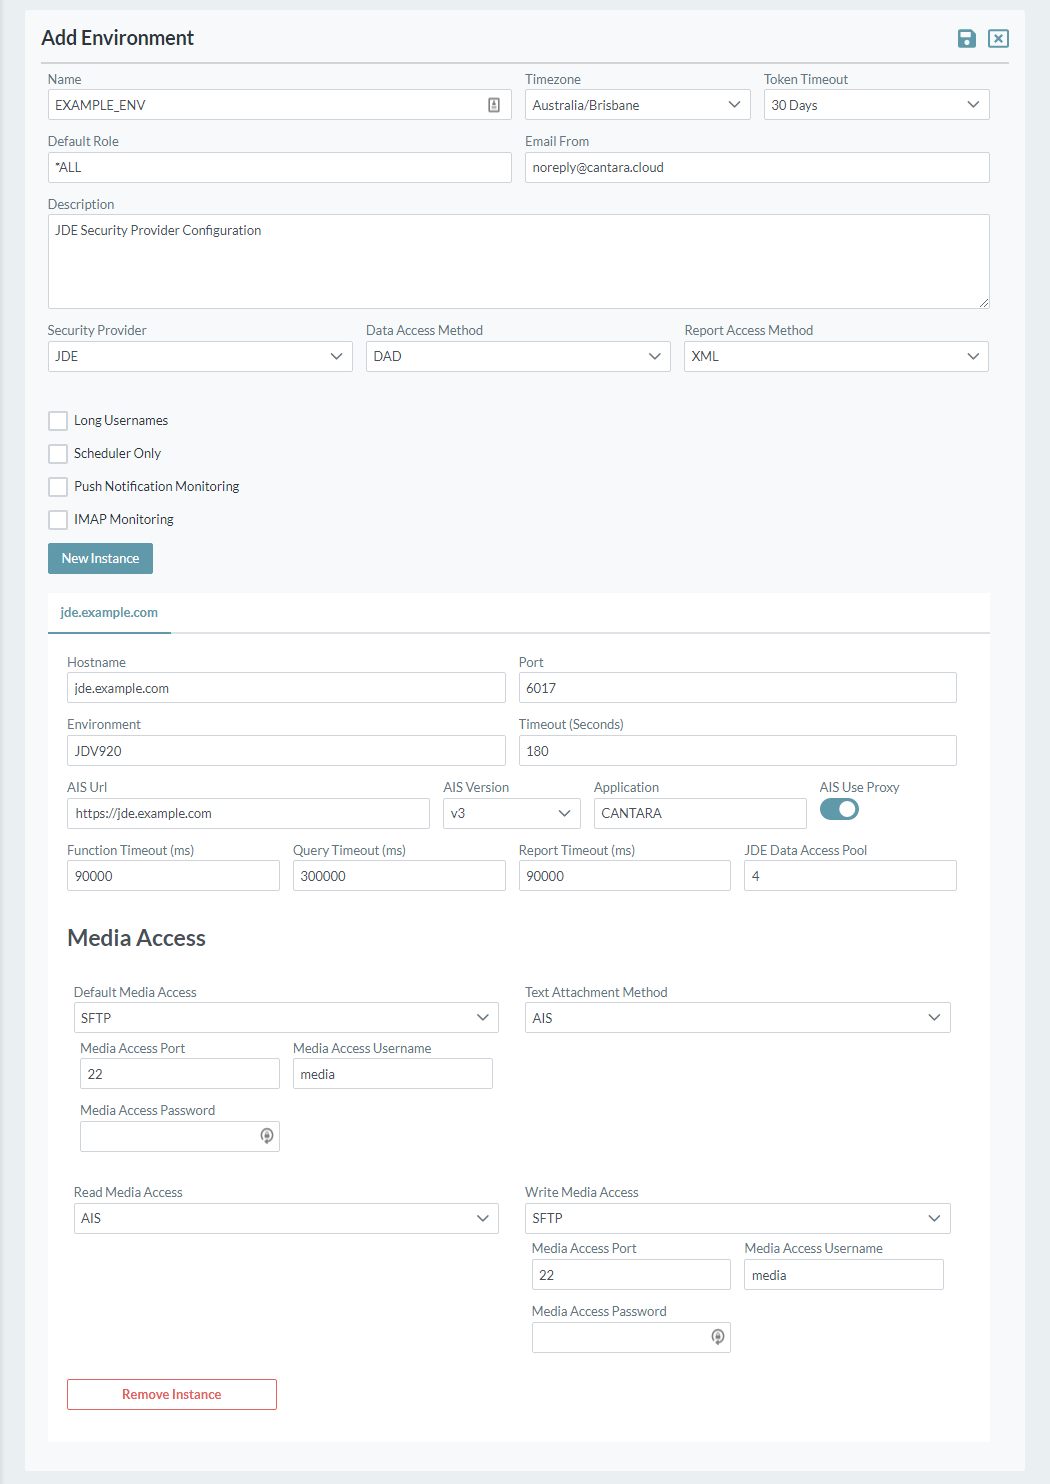
Click the New Instance button to connect additional JDE instances to the Cantara environment, if required.
A Cantara Access Server supports multiple Cantara environments, each of which may reference multiple JDE instances.
The JDE instances referenced by a single Cantara environment must relate to a single JDE environment.
- Click the Save button to save your configuration changes.
Common Environment Elements
- Name: A unique name to identify the environment configuration within the access server. The value for this field can be a maximum of 12 characters (no spaces). Valid characters include numbers, letters, underscore (_) and a dash (-).
- Timezone: Select the required timezone from the list that matches the timezone of the targeted JDE system.
- Token Timeout: The amount of time from when the security token is created until it expires. For further information, refer to User Tokens.
- Default Role: The role that the user will login with through the JDE security server. Defaults to *ALL if not specified.
- Email From: Enter the required email address that the Cantara platform will send email notifications from.
- Description: Enter a description for the environment configuration
Security Provider: Select a security provider from the following table:
Security Provider Comment JDE This will use the JDE security server specified by the targeted environment. CANTARA Utilize the Cantara Proxy Users defined for the Farm for authentication to this environment.
LDAP User authentication services are provided by an LDAP compliant provider. This option requires the creation of one or more Cantara Proxy Groups that will use a specific JDE username/password to connect to JDE. Additional configuration is required:
- URI: This is the URI of the LDAP server. For example: ldap://example.com:389 or ldaps://example.com:636 for encrypted connections.
- Domain: This is the domain that will be used for the user authentication. For example: company.local
- Service Username/Password: Service credentials.
- Filter: This is the filter that will be executed on the LDAP server. Users must match this filter to be authenticated. An example filter definition is: (memberOf=CN=MobileUsers,CN=Users,DC=company,DC=local)(objectClass=user)
- Search Path: This is the search path that will be executed on the LDAP server. For example: cn=Users,dc=company,dc=local
- Username Attribute: This is the LDAP attribute name where the username is stored. For example: userPrincipalName
- Address # Attribute: This is the LDAP attribute name where the user's JDE address book number will be stored. For example: employeeNumber
- Group Attribute: This is the LDAP attribute name where the Cantara Proxy Group name will be stored. For example: employeeID
OAUTH2 Use the OAuth2 solution for user authentication, which also includes support for Azure AD and Firebase.
OAuth2 login configuration details:
Authentication Method: Select the required client authentication method.
The following table defines Cantara support for the different client authentication methods. Implementation details such as required parameters may be vendor-specific. Refer to vendor documentation from your authentication provider for information about your chosen authentication method.

- Client ID: OAuth2 application client ID. Please refer to your OAuth provider for further details.
- Client Audience: Refer to OAuth provider documentation for value (not required for BASIC or POST method).
- Client Secret: OAuth2 application client secret. Please refer to your OAuth provider for further details.
- Client Private Key: Enter the contents of your private key (PRIVATE_KEY method only)
- Address Number Attribute: User information attribute that contains the user's JDE address book number.
- Group Attribute: User information attribute that contains the Cantara Proxy Group name. If this option is not defined, then User Attribute shall be used.
- User Attribute: User information attribute that contains the JDE username. NB: If Group Attribute has been defined, it shall be used instead of User Attribute. If neither User Attribute nor Group Attribute is defined, then the OAuth2 username shall be used.
- JDE Username / Password: JD Edwards EnterpriseOne service account used to update related user account information for authentication. Refer to JDE application PQ35PWD - Q35 Password Reset to configure the required permissions and roles managed by this account.
- Authentication URL: The OAuth2 authentication end point URL that users will be redirected to for login.
- Access Token URL: The OAuth2 provider's access token URL.
- Redirect URL: The Cantara Access Server exposed URL. This must match the redirect URL configured on your OAuth2 provider.
- User Info URL: If not using OpenID, the User Info URL to retrieve the user information token. If left blank, Cantara will attempt to use OpenID connect to get user information from the token payload.
- JSON Web Key Set URL: Public key set to validate the access token provided by your OAuth2 authentication provider.
- Secure JWK URL: Select this option if your authentication vendor requires authentication to retrieve the JSON Web Key Set.
- Client Resource: (Optional) Client resource, refer to OAuth provider documentation.
SAML User authentication services are provided by a SAML compliant provider.
- Entity ID: The globally unique service name URI.
- IDP Metadata URL: This is the Identity Provider metadata URL address if the Identity Provider supports metadata retrieval from the URL.
- Login URL: Authentication end point URL where the user will be redirected for authentication by the identity provider.
- Logout URL: The URL to be used for logout from the service.
- IDP Identifier: The identity provider used for authentication.
- X509 Certificate: Entity public key.
- Address Number Attribute: This is the SAML attribute name where the user's JDE address book number will be stored. For example: employeeNumber.
- Group Attribute: User information attribute that contains the Cantara Proxy Group name. If this option is not defined, then User Attribute shall be used.
- Display Name Attribute: Defines the format used to display users.
- User Attribute: User information attribute that contains the JDE username. NB: If Group Attribute has been defined, it shall be used instead of User Attribute. If neither User Attribute nor Group Attribute is defined, then the identity provider username shall be used.
- JDE Username / Password: JD Edwards EnterpriseOne service account used to update related user account information for authentication. Refer to JDE application PQ35PWD - Q35 Password Reset to configure the required permissions and roles managed.
EVEREST Use the Everest JDE SSO solution for user authentication. If you select this option, 3 additional fields appear:
- URI: This is the URI of the Everest SSO server.
- Domain: This is the Active Directory domain that will be used for the user authentication.
- Encryption Key File Name: This is the encryption file that will be used to encrypt the content between Cantara and Everest.
Further information is available from the Everest website.
STELTIX Use the Steltix TLX10 solution for user authentication.
Steltix transparent login configuration details:
NB: Steltix database settings should be obtained from the Steltix admin console.
- Database Type: Select H2 Database Engine, Microsoft SQL Server or Oracle Database.
- Database URL: Database connection to the Steltix system.
- Database Username/Password: Credentials used to access the database.
- LDAP URI: This is the URI for the LDAP authentication server.
- LDAP Domain: This is the domain that will be used for user authentication.
- LDAP Bind Username/Password: Credentials used to bind to the LDAP service.
- Filter: This is the filter that will be executed on the LDAP server. Users must match this filter to be authenticated.
- Search Path: This is the search path that will be executed on the LDAP server. Users must be within this search path.
- Username Attribute: This is the LDAP attribute name where the username is stored.
- JDE Username/Password: JD Edwards EnterpriseOne service account used to update related user account information for authentication. Refer to JDE application PQ35PWD - Q35 Password Reset to configure the required permissions and roles managed by this account.
TRUST Use the Trust authentication solution.
- Trust Key: Used as password included in login to secure gateway (Clicking the refresh button will generate a new key).
- JDE Username/Password: JD Edwards EnterpriseOne service account used to update related user account information for authentication.
Data Access Method: Select a data access method from the following table:
Data Access Method Comment XML Utilize the JDE XML List kernel for data read access (see Cantara JDE Objects).
DAD Utilize the JDE Data Access Server for data read access (see Oracle JDE Connection Files).
Report Access Method: Select a report access method from the following table:
Report Access Method Comment XML Utilize the JDE XML dispatch kernel for report submission.
AIS Utilize the JDE AIS Server for report submission.
NB: This method is only supported if the AIS Version option is V3 or greater. Refer to JDE Instance Elements for details about the AIS Version option.- Long Usernames: Select this option if the long user names option is enabled in JDE
- Scheduler Only: The Cantara environment can only be utilized by the Tenant Scheduler for the execution and monitoring of scheduler groups. Enabling this option requires configuration of additional Scheduler Environment Elements.
- Push Notification Monitoring: Enable monitoring of the push notification messages table within the JDE environment. Enabling this option requires configuration of additional Push Notification Elements.
- IMAP Monitoring: Enable monitoring of a defined imap mailbox and process any unread messages through the relevant Route.
Enabling this option requires configuration of additional IMAP Mail Service Elements.
JDE Instance Elements
- Hostname: Host name for the JDE batch or logic server.
- Port: The port that the JDE batch or logic server listens on, which is defined in the jde.ini file on the server
- Environment: The JDE environment to connect to.
- Timeout: The total number of seconds the JDE server will maintain an active session for continuous service calls. A timeout value of 180 is recommended to limit the number of idle threads on the JDE server.
- AIS URL: The URL of the AIS server associated with this environment. It is not necessary to configure the context. For example: http://example.com:9218 is a valid URL.
AIS Version: Select the version of AIS Server Capabilities according to the following table:
AIS Version JDE Tools Requirement V1 9.1.5.0 or greater V2 9.2.1.2 or greater V3 9.2.3.0 or greater
Refer to the AIS Server Reference Guide for information about the AIS server releases available.- Application: Enter the required application name.
- AIS Use Proxy: If the report access method is set to AIS and the proxy server is to be used, enable this option.
NB: To use this option, the proxy server must be configured. For details about Proxy Server settings, refer to Creating the Access Server Properties File in the installation guide. - Function Timeout: Maximum time for JDE function completion (in milliseconds).
- Query Timeout: Maximum time for JDE query completion (in milliseconds).
- Report Timeout: Maximum time for JDE report completion (in milliseconds).
- JDE Data Access Pool: If the data access method is set to DAD, JDE Data Access Pool defines the number of active connections to the JDE database per user session. Default value is 4. Less than 2 is not recommended.
Media Access Elements
To integrate with media objects on JDE, you will also need to define the access method that should be used to access the files.
Default Media Access: Select FTP, SFTP, SMB* or AIS if you want to enable access to the media objects.
*SMB Media Access
SMB media access method is only supported on Microsoft Windows hosts, and the Cantara Access/Agent server must be running as an authenticated domain user that has read and write permissions to the relevant JDE media object queues.
- Read Media Access: To override the default media access method for read access.
NB: If this option is set to NONE, the default access method will be used for reading. - Write Media Access: To override the default media access method for write access.
NB: If this option is set to NONE, the default access method will be used for writing. - Media Access Port (S/FTP only): Port number of the FTP/SFTP server that hosts the JDE media objects.
- Media Access Username (S/FTP only): Username for the server that hosts the JDE media objects.
Media Access Password (S/FTP only): Password of the server that hosts the JDE media objects.
Text Attachment Method: Select a method for receiving JDE text attachments. Refer to the following table:
Text Attachment Method
Comment BSFN Utilize business functions to obtain JDE text attachments. Text formatting will be discarded.
AIS Utilize AIS to obtain JDE text attachments. HTML text formatting will be preserved.
NB: This method is only supported if the AIS Version option is V2 or greater. Refer to JDE Instance Elements for details about the AIS Version option.
Scheduler Environment Elements
Enabling the Scheduler Only option will disable the standard service environment options and display the scheduler specific options shown below.
- Scheduler Username: JDE user account that will be used to monitor batch job status
- Scheduler Password: JDE user account password
- Monitoring Interval: Interval between status monitoring requests (seconds).
- Execution Host: Execution hostname configured for the targeting JDE enterprise server. This hostname must match exactly, including capitalization, with the server definition within JDE.
- Source Access Method: Select FTP, SFTP or SMB if you want to enable access to the output from scheduled reports.
- Source Port: Port number of the FTP/SFTP server to use to access JDE UBE output.
- Source Username: Username for the server to use to access JDE UBE output.
- Source Password: Password to use to access JDE UBE output.
- Source Path: The path or URL to the folder that contains the UBE output on the selected JDE server.
- Output Access Method: Select FTP, SFTP or SMB if you want to enable the ability to save scheduled report output to a specific folder.
- Output Port: Port number of the FTP/SFTP server to use to store JDE UBE output.
- Output Username: Username for the server to use to store JDE UBE output.
- Output Password: Password to use to store JDE UBE output.
Environment Security
To ensure security is maintained, scheduler environments cannot be used to execute general Cantara services. Likewise, general environment definitions are not available within the scheduler configuration.
Push Notification Elements
- Username/Password: User credentials to be used.
- Monitoring Interval: The time between successive checks for JDE push notification messages (minutes).
IMAP Mail Service Elements
To configure execution of Cantara routes via email messaging, you must provide details for an IMAP mail service for this environment.
- IMAP Hostname: Host name of the IMAP service.
IMAP Port: Port number to connect to on the IMAP server.
IMAP Username/IMAP Password: User credentials to be used to connect to the IMAP service.
- JDE Username/JDE Password: User credentials of the JDE account that the Cantara Route should execute as.
IMAP Folder: The IMAP folder to retrieve unread emails from. If none is specified then 'inbox' will be accessed.
Monitoring Interval: The interval, in minutes, that the Cantara server will check the mail account for unread emails.
- SSL Enabled: Select SSL Enabled to use a secure connection to the IMAP server.
Agent Enabled: Enable this option for the IMAP monitoring to be triggered via the Agent (always locally installed). Disable this option for IMAP monitoring to be triggered by the Cantara Access Server (For Cloud install, this will be in the cloud i.e. not in the local data center).