How To Complete a Single Instance Cantara Installation on Wildfly 11.0
This guide provides step-by-step instructions for completing the installation and configuration of a single instance of a Cantara installation using a Wildfly server and Oracle MySQL.
A Cantara installation includes the following steps:
Deploying the Cantara JDE Objects to your Oracle JD Edwards Server.
- Configuring the JD Edwards Enterprise Server.
- Installing and Configuring Oracle MySQL 5.7.
- Set up the necessary folders and permissions.
Configuring Wildfly 11.0.
- Deploying the Cantara Assur Server.
Deploying the Cantara Access Server.
Deploying the Cantara Administration Console.
Configuring the Cantara Administration Console.
Defining a Farm.
Adding an Environment.
Testing Connectivity.
Deploying the Cantara JDE Objects to Your JD Edwards Server
To deploy the Cantara JDE objects
The Cantara JDE Objects are available on the Rinami Customer Portal at https://portal.cantara.cloud
Once you have registered for you license you can access the downloads section and select your Oracle JD Edwards release and your preferred Java Application Server. A minimum installation will require you to download the Cantara Access Server, Cantara Administration Console and Cantara JD Edwards Components. You can optionally download the Cantara JD Edwards Services PAR which provides a number of business functions that wrap up common business processes in a number of JD Edwards modules.
The steps required to deploy the Cantara JD Edwards Components to your Oracle JD Edwards EnterpriseOne system are:
- Create an OMW project and promote it so that new objects can be created within the project. The most common configuration would be to promote the project to status 21 and create the objects within the DV environment.
- Download the Cantara JD Edwards Components PAR from the Rinami Customer Portal.
- Within OMW, select the new project and click the Restore action.

- Select Yes to use a ZIP file and then choose the Cantara JD Edwards Components file from your download location. An example of the file name would be PRJ_CNTR_CORE_E920_5.0.5.par
- Ensure that all of the objects within the project are checked in
- Complete a Full package build and deployment to any enterprise servers that will be connected to Cantara
- Once the package is deployed, go back into OMW and generate the tables included in the project
- You can promote and deploy the objects to each required path code using the normal JD Edwards OMW and deployment server process.
A Full build is required
Cantara is an Oracle Validated Integration and uses the system code Q35. As the base components introduce a new code library within Oracle JD Edwards EnterpriseOne a full build is required to initialise this library. Subsequent updates and enhancements can be deployed via an update package.
Refer to the JD Edwards Objects and Configuration topic for more details.
Configuring the JD Edwards Enterprise Server
To ensure the correct operation of the Cantara Integration Platform you must ensure that all relevant kernels and components on the target Oracle JD Edwards EnterpriseOne Enterprise servers are configured correctly. This should be completed using Server Manager but can also be done via direct edit of the JDE.INI if that is standard policy.
Details of the elements to be modified are available at JD Edwards Objects and Configuration under JDE.INI settings.
These changes must be done to each JD Edwards Enterprise or Batch server that will be integrated to via Cantara.
Installing and Configuring Oracle MySQL 5.7
The MySQL database can be installed on the same host that Wildfly has been installed on. Alternatively you can use any of the other supported database platforms with details available at Setting up the Cantara Databases
Please refer to the Oracle MySQL 5.7 documentation regarding server installation which is available at http://dev.mysql.com/doc/refman/5.7/en/installing.html
Once you can installed and configured the MySQL server you can create a new database schema for Cantara. You will need one schema per Cantara environment. So if you intend to have a single production instance and a single test instance then you will need two schemas. If you intend to have two production instances of Cantara you would only need a single schema. It is recommended that the schema collation be utf8_bin.
The user that the Cantara Access Server connects to the database as must have read/write permission to all tables.
You can then run the appropriate database table creation script against the schema. You can find the installation scripts at Setting up the Cantara Databases.
Setting Up the Necessary Folders and Permissions
The Cantara Administration Console, Cantara Assur Server and Cantara Access Server require several configuration and definition files to operate correctly. The user that the Wildfly 11.0 server is running as must have read and write permissions to this folder.
Refer to the guides on setting up folders for more information.
Configuring Wildfly 11.0
This documentation does not intend to document Wildfly and It is assumed that anyone following the documentation contained on this page has experience working with Wildfly. Please refer to the Wildfly 11.0 documentation relevant to your operating environment. In addition, ensure the minimum heap size is correctly configured as per the technical requirements for the Cantara Assur Server, Cantara Access Server and Cantara Administration Console.
Java Settings
Java options are generally set in either the standalone.conf or domain.conf files located in the bin directory of your Wildfly 11.0 installation. If you are deploying Cantara Assur Server, Cantara Access Server and Cantara Administration Console on the same instance, the following are the recommended minimum settings:
JAVA_OPTS="-Xms1024m -Xmx1024m";
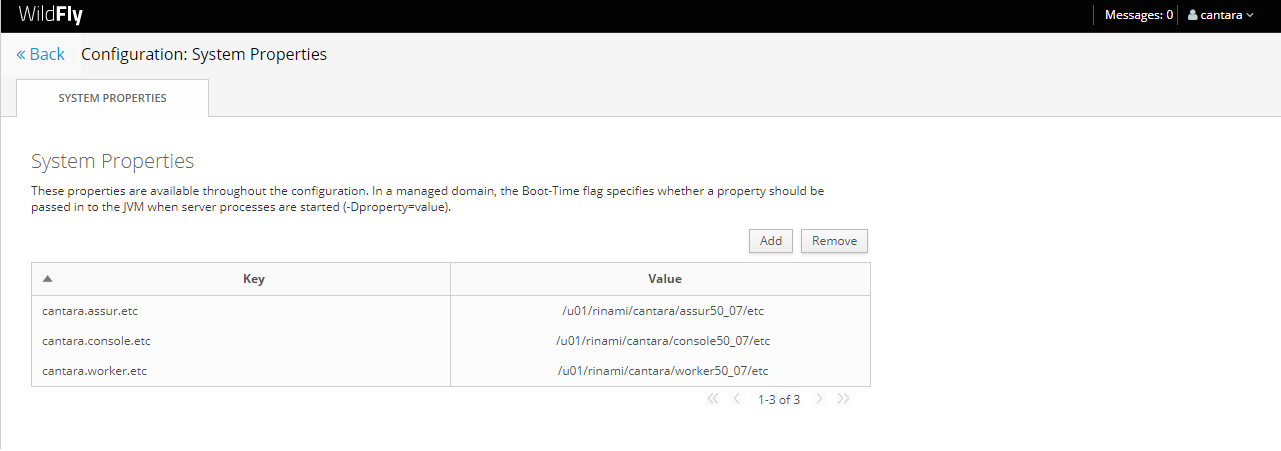
As part of your server configuration you need to configure the cantara java properties necessary to start all the Cantara Server instances that will be running on this server.
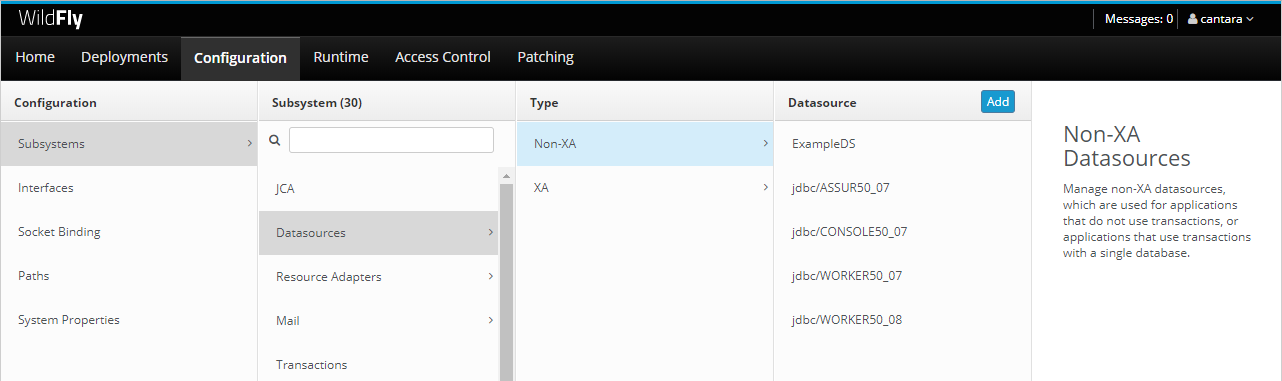
You need to define the appropriate data source for your database. you can find useful information on Configuring JDBC Data Sources.
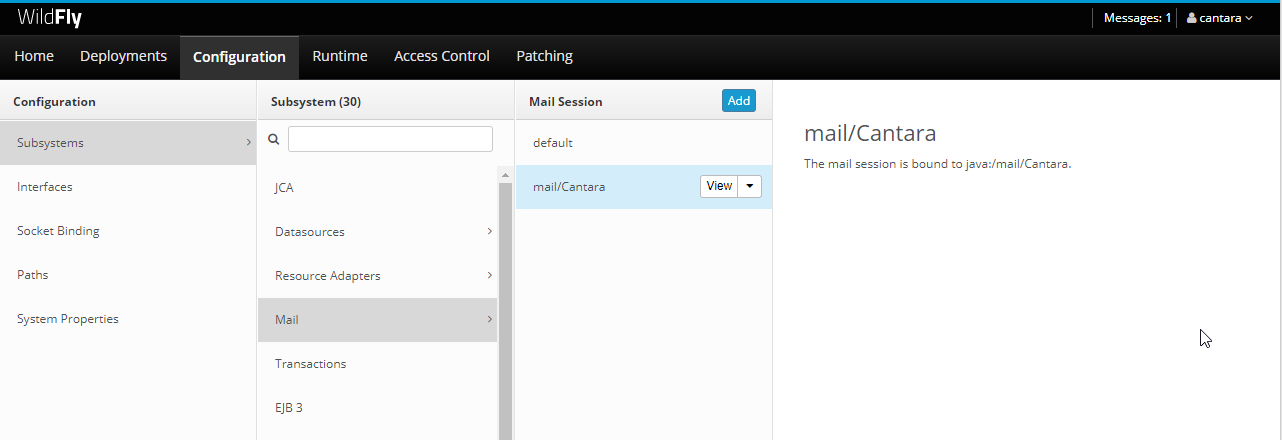
For the Cantara Access Server it is needed a Mail JNDI definition to be able to send emails from the Cantara Scheduler.
Deploying the Cantara Assur Server
To deploy the Cantara Assur Server
- Extract the provided application .ZIP archive file into the folder defined for staging the applications for deployment. You should see a single index.jsp file and the following four folder names under the main folder:
images
META-INF
uploads
WEB-INF
JD Edwards Library Files NOT required
Unlike the Cantara Access Server, the Cantara Assur Server does not require the JD Edwards library files to be copied into the WEB-INF/lib folder.
Refer to the documentation on installing the Cantara Assur Server. When deployment is complete, you should be able to navigate to the Cantara Assur Server landing page.
Deploying the Cantara Access Server
To deploy the Cantara Access Server
- Extract the provided application .ZIP archive file into the folder defined for staging the applications for deployment. You should see a single index.jsp file and the following four folder names under the main folder:
images
META-INF
uploads
WEB-INF
As per the documentation, copy the required JD Edwards JAR libraries from either a fat client or your deployment server into the WEB-INF/lib folder. You can find the JAR libraries in <JDE Client Install Directory>\system\Classes. For the 9.1.x or 9.2.x Tools releases, the following files are required:
JD Edwards Library Files
- Base_JAR.jar
- JdeNet_JAR.jar
- jmxremote_optional.jar
- jmxri.jar
- ManagementAgent_JAR.jar
- System_JAR.jar
- xmlparserv2.jar
- AIS_Client.jar
- You should also copy the agent.properties file into WEB-INF/classes from the JDE Server Manager Agent home.
- Once the required libraries have been included in the application it can now be deployed. Refer to the documentation on installing the Cantara Access Server.
- When deployment is complete, you should be able to navigate to the Cantara Access Server landing page.
Deploying the Cantara Administration Console
To deploy the Cantara Administration Console
- Extract the provided application .ZIP archive file into the folder defined for staging the applications for deployment. Once the file is extracted, you should see the following four folder names under the main folder:
META-INF
static
WEB-INF
- Refer to the documentation on installing the Cantara Administration Console. When deployment is complete, you should be able to navigate to the Cantara Administration login page. The default context for the application is /cantara-console
JD Edwards Library Files NOT required
Unlike the Cantara Access Server, the Cantara Administration Console does not require the JD Edwards library files to be copied into the WEB-INF/lib folder.
Configuring the Cantara Administration Console
When you launch the Cantara Administration Console you will be greeted with a login prompt. The default username and password are admin/admin.
In order to get your Cantara Platform Up and Running you need to complete 3 steps:
- To complete the Administration Console Configuration (On-Premises only) setup.
- To define a Farm
- To setup your Cantara License.
The order of above steps is as listed above, you cannot execute 3 until get 2 done and you cannot execute 2 until get 1 done.
You should then create an administrator user and change the administration password. User configuration is found under the Configuration menu.
Defining a Farm
Once you have defined the configuration file and administrator user for the Administration Console, you will be able to define a Farm.
To define a Farm
- Details can be found at Adding a Farm. The farm will remain in UNAVAILABLE status until the license is configured but the license cannot be configured if there is no farm defined.
- Once the farm has been added you need to enter your license details to activate the server instances for the first time. Your license details will available on the Rinami Customer Portal at https://portal.cantara.cloud/license. Details on how to configure the license are available at Defining the Cantara License.
Adding an Environment
Once you have connectivity your farm Active, you must define at least one environment before you can execute function, queries or reports on the JD Edwards server.
To add an environment
Testing Connectivity
To confirm that you have connectivity to the JD Edwards server you can execute a simple function from within the Administration Console.
To test connectivity
- Click the Functions menu option located under the server name in the navigation menu.
- Select the FormatLocation function to open the function definition panel.
- Enter an existing JDE Branch/Plant in the branch parameter's default value field. Enter XXXXX in the fileLocation parameter's default value.
- Click the Execute Function button to run the test. If the test is successful, you should see the expected result in the three text areas located at the bottom of the page. See the Testing a Function topic for more information.
On This Page