Managing Groups
The scheduler allows you to create and manage a group of jobs that you submit to the JD Edwards system. You can control how and when the jobs are triggered, the order that the jobs are executed, and the dependencies that are associated with them. The following diagram shows the flow of a scheduled group.

Creating a Group
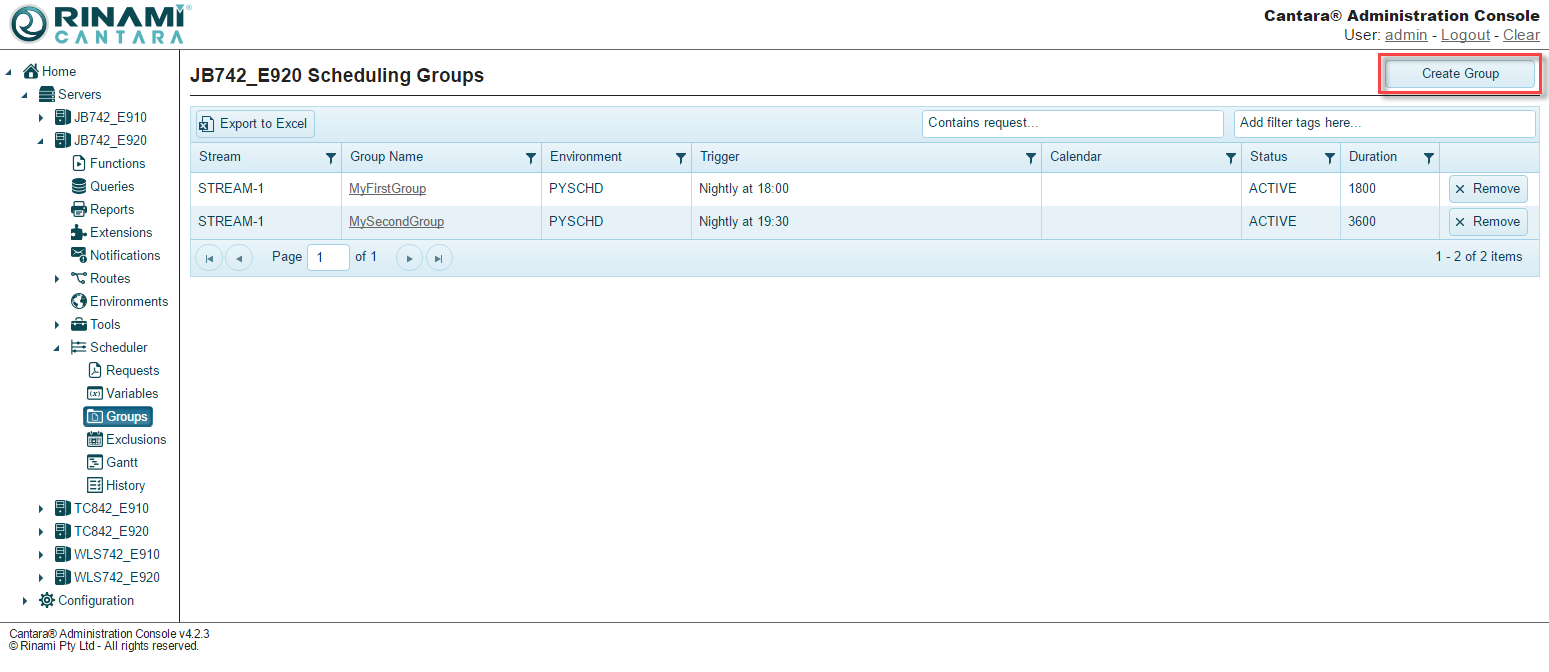
To create a scheduling group
- Select Scheduler in the navigation panel.
- Select the Groups node.
- Click the Create Group button.
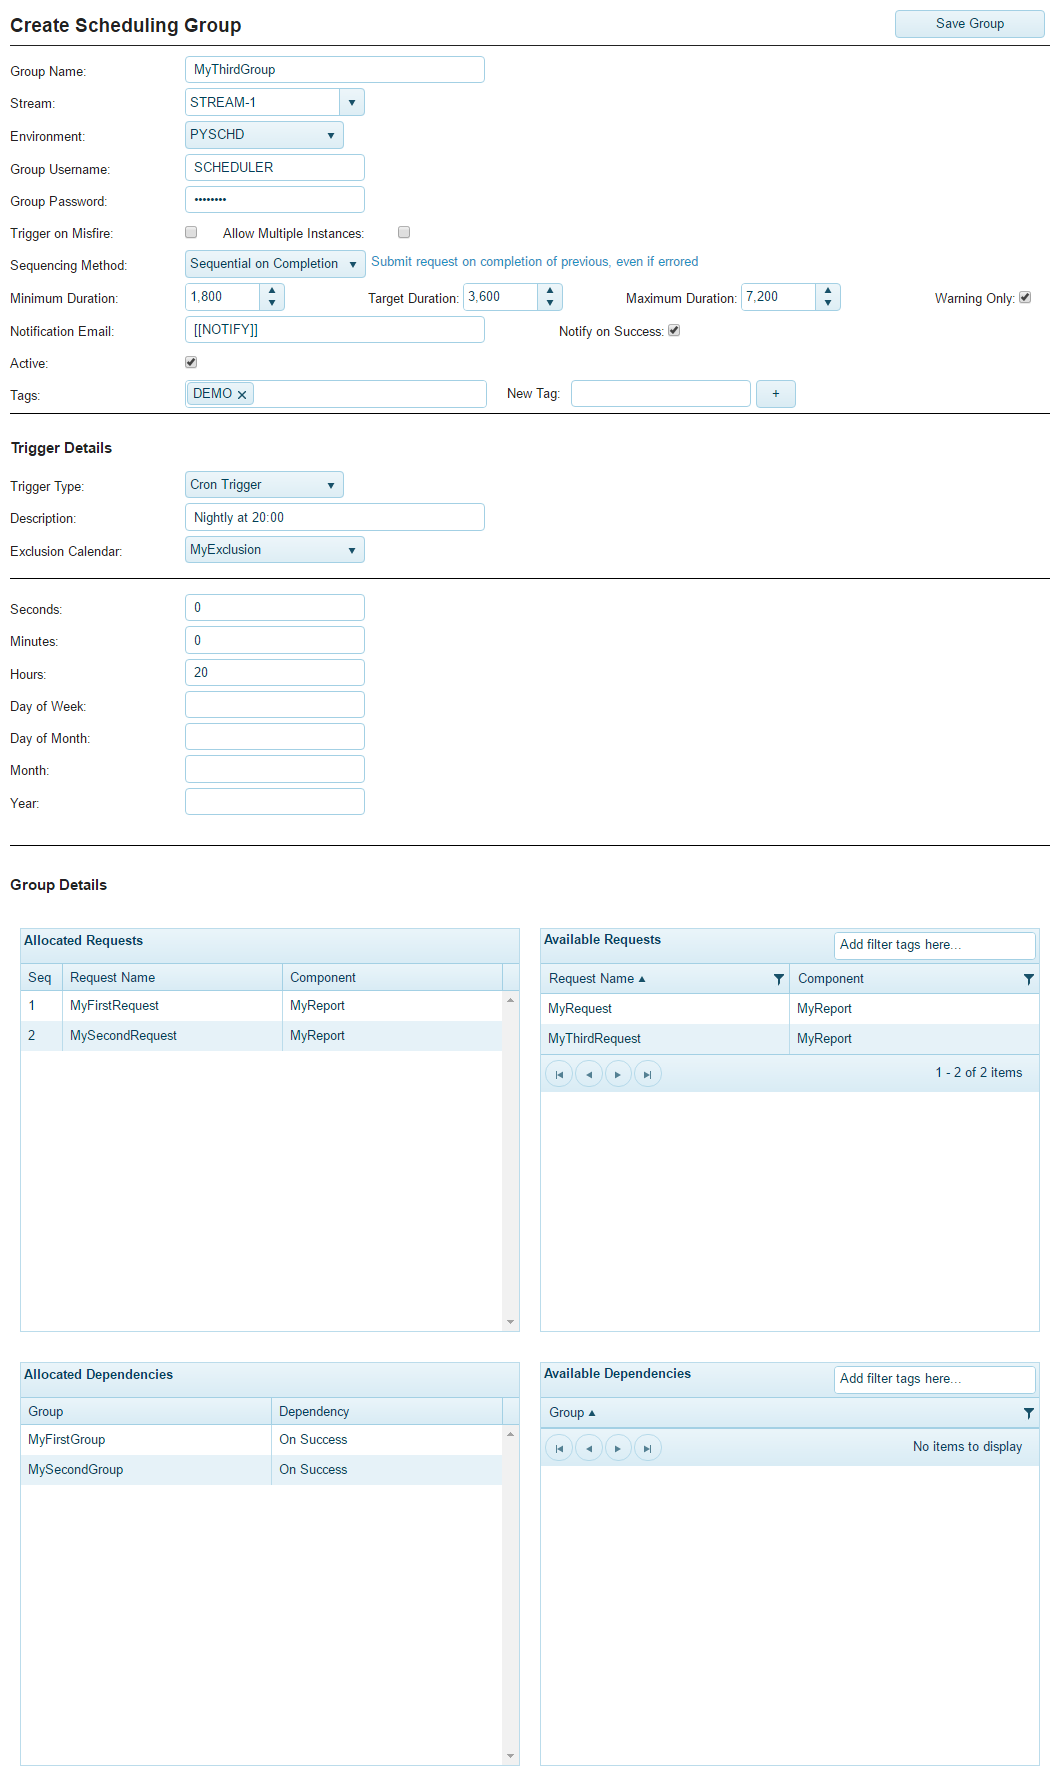
- Add a distinct Group Name. The value for this field can be a maximum of 40 characters (no spaces). Valid characters include numbers, letters, dash and underscore.
- Select a Stream from the drop-down list, if creating a new stream simply enter the name of the stream it will be saved and added to the drop-down list for the next time a group is added.
- Specify how to handle jobs that are suspended:
- Trigger on Misfire - By enabling this option you will ensure that a job will be immediately submitted if it misses its window to run due to the scheduler being shutdown or is in a suspended state. Once the scheduler is resumed the job will be submitted to JDE. If it miss's multiple windows to run it will only be submitted once. If this option is not enabled then a job will not submitted after its opportunity to run has been missed.
- Allow Multiple Instances - Select this option to allow multiple instances of the same job to execute at the same time. For example, if you have a job scheduled to run every 10 minutes and it take 15 minutes to run, it will be submitted every 10 minutes. In this scenario, leaving this option unchecked will cause the subsequent jobs to generate an error each time they are submitted to JDE.
- Select a sequencing method to specify how the job should be submitted to JDE:
- Sequential on Success - Each job is submitted in sequential order and only after the previous job is successful. This is the default sequencing method.
- Sequential on Completeness - Each job is submitted in sequential order and only after the previous job is completed, even if errored.
- In Parallel - Each job is submitted at once in parallel.
- Specify a duration (in seconds) for the job:
- Minimum Duration - Enter a value from zero to 86,400 that specifies the minimum amount of time to allow a job to run. An error notification is sent to the system if the job runs shorter than this value.
- Target Duration - This option helps you to create a plan for scheduling. Enter a value that indicates an estimate of how long you think it will take for a job to run.
- Maximum Duration - Enter a value from zero to 86,400 that indicates the maximum amount of time to allow a job to run. An error notification is sent to the system if the job runs longer than this value.
- Warning Only - If you choose warning only then an email will be sent to the defined notification email but the group will continue to execute and will not be treated as if it has errored. If warning only is not selected then if the group completes before the minimum duration or excedes the maximum duration it will be considered to have errored for dependency purposes.
- In the space provided, enter the email address of the person to send a Notification Email when an error occurs in the group. You can also add a variable in this field. For example, if your email changes, you only have one place to make the change. Using a variable in this field is also helpful if you have multiple departments within your company that may receive a notification. See Managing Variables. You can choose the Notify on Success option if you wish to receive an email each time the group completes successfully.
- Select the Active option if you want the group submitted to the Scheduler to run. If this option is unchecked, the job will not be on the schedule to run.
- Add existing Tag or create a new Tag. Tags assist in searching for groups in the groups screen.
- Define the Trigger Details. See Trigger Details.
- The Group Details section contains a list of available requests and groups that you can add to the Allocated Requests and Allocated Dependencies lists, respectively. Specify your group details:
- Available Requests - List of requests currently configured in the system that you can associate with the scheduled job. You must add at least one request to the Allocated Requests list. To move an item, use your mouse to drag and drop it in the Allocated Requests table. The requests are executed top to bottom in the order in which they appear in the list. You can drag the items with your mouse to place them in any order you desire.
- Available Dependencies - If the group depends on another group running before it starts, move that group to the Allocated Dependencies list. The order of the dependencies does not have an influence on the job. The system checks the trigger setting first, then any dependencies. When a trigger start setting occurs before the start date and time for a dependency, the system will wait for the dependency before it runs. If an error occurs for a dependency and it is unable to run, the job will have an error.
- Click the Save Group button to save the group schedule settings.
Trigger Details
You can define one of the following trigger types for a scheduling job:
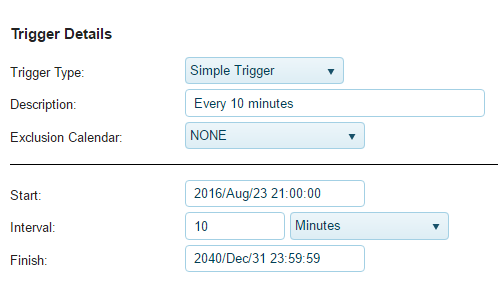
Simple Trigger
In Cantara, a Simple trigger starts and stops a job when a specific date and time occur, for a specific interval.
To define a simple trigger
- Select Simple Trigger from the drop-down list.
- Add a Description that explains what the trigger does. For example, Daily at 10 p.m. describes a trigger that runs once a day at 10 in the evening.
- Click in the Start field to open the date and time picker.
- Select the date and time you want to trigger the schedule. This value can be in the past. You can also enter the value in the space provided. Use the format 4-digit year, 2-digit month, 2-digit day, and 6-digit military time period. For example, 2014-12-31 00:00:00.
- Enter an Interval and specify its specification from the drop-down list. You can select Seconds, Minutes, Hours, Days, and Weeks.
- Enter a Finish date and time.
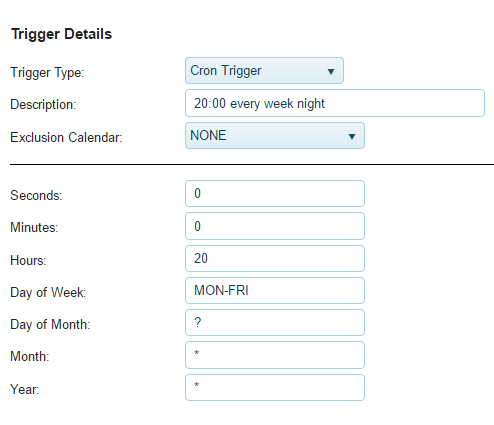
Cron Trigger
The Cantara Integration Platform uses the open source Quartz Scheduler as the underlying scheduler in its system. The Quartz Scheduler supports the use of cron expressions to specify a time to start and stop a job. For details about how to build a cron trigger, see the Quartz CronTrigger Tutorial.
To define a Cron trigger
- Select Cron Trigger from the drop-down list.
- Add a Description that explains what the trigger does. For example, Daily at 10 p.m. describes a trigger that runs once a day at 10 in the evening.
- In the spaces provided, enter the cron expression for the Seconds, Minutes, Hours, Day of Week, Day of Month, Month, and Year.
- Select the date and time you want to trigger the schedule. This value can be in the past. You can also enter the value in the space provided. Use the format 4-digit year, 2-digit month, 2-digit day, and 6-digit military time period. For example, 2014-12-31 00:00:00.
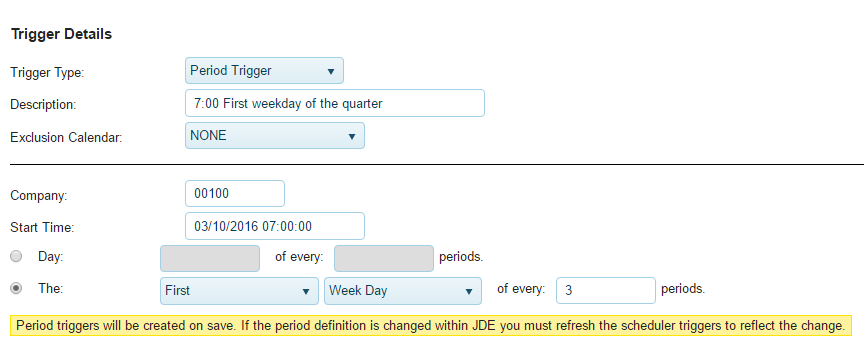
Period Trigger
A period trigger allows you to schedule jobs based on the financial pattern that is defined for your company within the JDE system.
To define a period trigger
Note
Period triggers are created when you save the group. If the current period definition is changed within the JDE system, you must refresh (open and save) the trigger to update the change in the Cantara platform.
- Select Period Trigger from the drop-down list.
- Add a Description that explains what the trigger does. For example, Daily at 10 p.m. describes a trigger that runs once a day at 10 in the evening.
- Enter the JDE code for your Company.
- Enter the Start Time for the period. You can click in the field to open the date/time picker, or enter the date and time manually. Use the format 4-digit year, 2-digit month, 2-digit day, and 6-digit military time period. For example, 2014-12-31 00:00:00.
- Specify the period:
- Enter the period in the spaces provided, or
- Select values from the drop-down lists to create logic for the period.
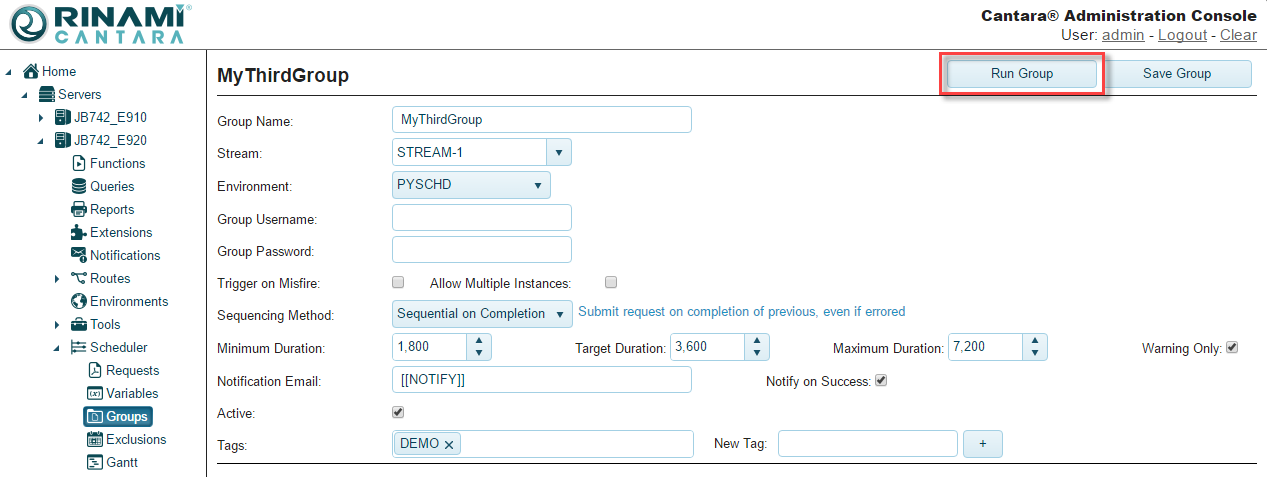
Manually Trigger Group
In some scenarios you may want to run a group manually, for example you may wish to test it.
To manually run a group
- Select Scheduler in the navigation panel.
- Select the Groups node.
- Select the Group Name you wish to edit, this will open the edit group screen.
- From the edit group screen click the Run Group button, this will submit the group to the schedular regardless of its trigger settings.
On This Page