Oracle WebLogic 12.1.3 - Cantara Server Installation
Make sure you have done the following before deploying the Cantara Access Server:
- Have an existing WebLogic Server instance or have created a server instance that meets the Cantara Server Technical Requirements.
- Set up the file system folders and confirmed that the user the WebLogic server is running as has read and write permission to these folders.
- In the case of the Enterprise Edition ensure you have set up the Cantara Database. You must create the required Data Sources within your WebLogic instance for the database platform selected.
- Extracted the Cantara Access Server application .ZIP archive file into the installation folder according to the Installing the Cantara Access Server Web Application instructions.
- Copy the required Oracle EnterpriseOne JD Edwards libraries have been included.
Mail Session Resource
If you wish to override the default JNDI name for the mail resource, which is mail/Cantara then you must update the weblogic.xml file with the assigned resource name.
weblogic.xml
<?xml version="1.0" encoding="UTF-8"?>
<weblogic-web-app
    xmlns="http://xmlns.oracle.com/weblogic/weblogic-web-app"
    xmlns:xsi="http://www.w3.org/2001/XMLSchema-instance"
    xsi:schemaLocation="http://java.sun.com/xml/ns/javaee http://java.sun.com/xml/ns/javaee/ejb-jar_3_0.xsd
                        http://xmlns.oracle.com/weblogic/weblogic-web-app http://xmlns.oracle.com/weblogic/weblogic-web-app/1.2/weblogic-web-app.xsd">
  ....
  <resource-description>
    <res-ref-name>mail/Cantara</res-ref-name>
    <jndi-name>mail/Cantara</jndi-name>
  </resource-description>
</weblogic-web-app>
To deploy an instance of the Cantara Server
Log in to the WebLogic Server Administration Console.
Make sure the Oracle WebLogic Server Instance that you are deploying to is not running during the deployment.
- Go to the Change Center and click Lock & Edit.
- In the left pane of the Console, select Deployments.
- In the right pane, click Install.
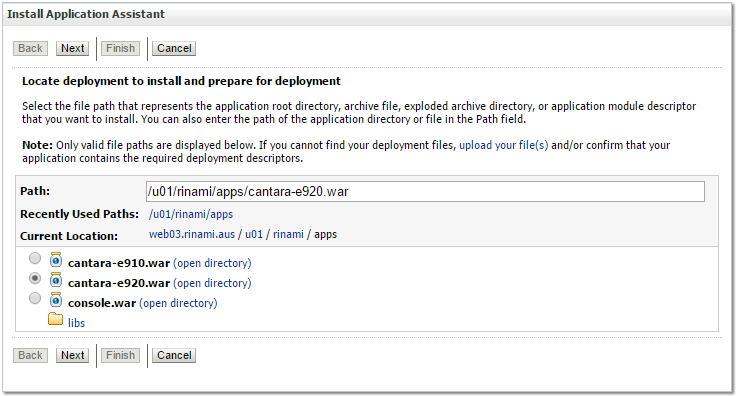
Browse to the Cantara Access Server application install path as shown in the following image:

Change Context Root
If you want to change the context root you can do so in the WEB-INF/weblogic.xml located in the installation directory. The default context root is /cantara.
- Accept the default for the Install this deployment as an application option, and click Next.
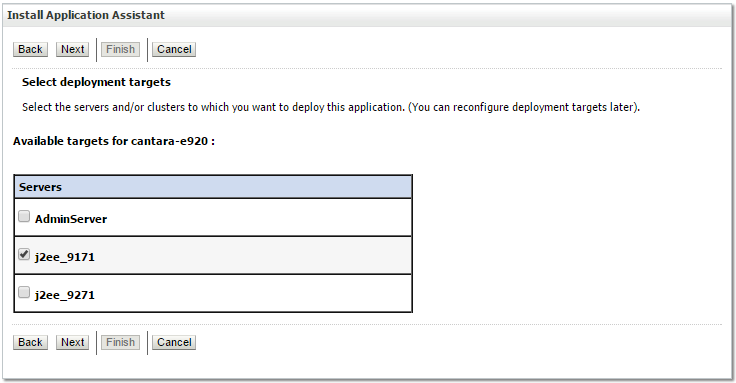
Select the WebLogic Server instance you want to deploy to, and click Next.

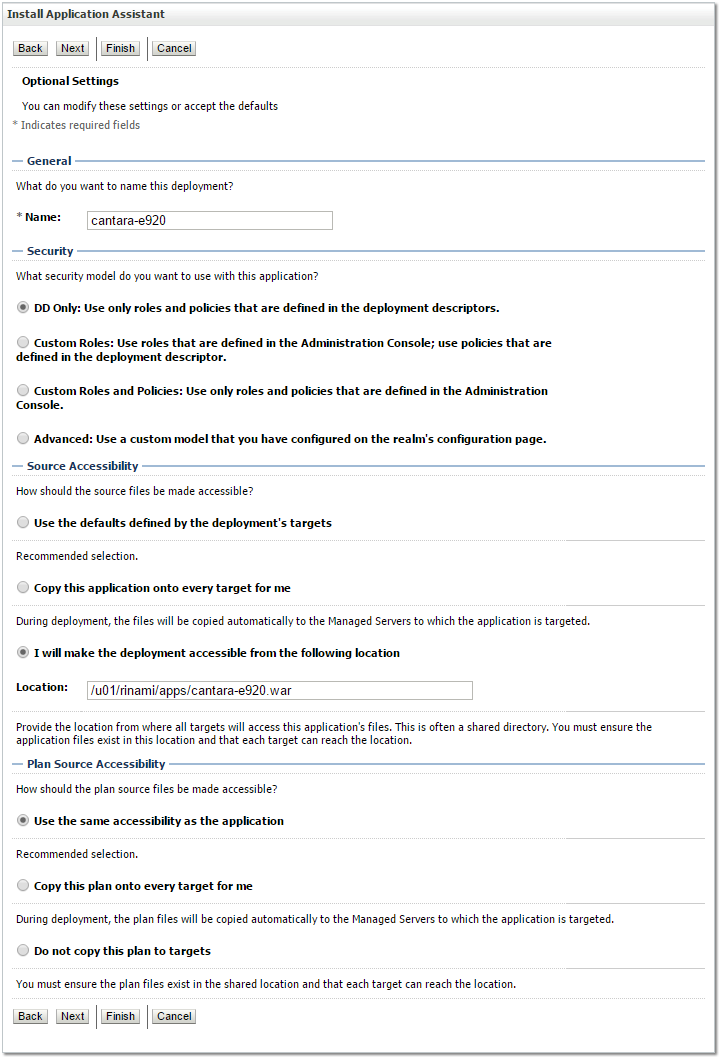
- We recommended you select the I will make the deployment accessible from the following location option. Doing so will make the process of backing up or deploying updates simpler because the location of the installation is easy to maintain.

Click Finish, and then click Activate changes located at the top left of the console.
- If the deployment is successful you will see the Cantara Access Server in the list of deployments with its state set to New.

- You can now start the WebLogic Server instance. Once the server instance starts, the deployment state will change to Prepared.
- Select the deployment and click on the Start -> Servicing all requests option.
- The state of the deployment should now change to Active. If the deployment fails to start correctly, check the appropriate WebLogic logs for deployment errors.
Validate Deployment
If you open a browser window to the base URL of the Cantara Access Server deployment you can confirm that the deployment has completed successfully.
